Thursday, May 26, 2016

Dream : Art Journal

Posted by Rajni Chawla

Good morning all!! 

A loud and a big Hello to all my Dusty Attic fans. I am back after a long time. Missed to inspire you last month due to my ill health. I am feeling better now and trying to get back to my regular routine. 

There's no denying that your kids are like a reflection of your younger self. And when I look at my daughter, I can't help but believe in this fact even more. She's almost exactly like me in every respect - a little confused about what she has to do, over enthusiastic about everything and fascinated by all forms of art. That said, these days, rarely does she enter my craft room and to help me along with project because of her exams. But whenever she does, she ends up creating a masterpiece. Something similar happened this time as well.

I was just thinking about how to start this project when she came and offered to help me. Guess what...She herself decided what she wanted to create. The project that I am sharing today with you all is 80 percent made by her. I was trying not to disturb her as I knew, she is very moody and she might leave everything and go. The way she was selecting chipboards and the way she was looking at the mood board and selecting colours….it was really an amazing feeling for me….as if she is filling up all my dreams. She created an art journal for herself. Here are the details.


Here is the gorgeous May Mood Board 


List of Dusty Attic products used: 


Here are the picture details.

Full View:


Look at the gorgeous assembling of all the elements. Loved the super grungy collection of Dusty Attic chippies and the word chippies. Beautifully layered one on top of each other.


All the chipboards were first primed with heavy white gesso and then textured using DA Texture Paste.  She has used DA Blueprint DREAM to create the title of her art journal.Different layers were created using DA Cogs #1, DA Jumbo Cogs and DA Nuts and Bolts set   The main focal image is created using DA Feather Charm #2 . Feather Charm is dusted with clear glitter using soft gel.


Though she also created textures with DA Clockwork Stencil also but it's hardly visible on the front cover but it shows perfectly on the back of the journal.


look at the beautiful textures she gave on chipboards. Dusty Attic Paints used are Dusty in Colour Navajo White, Dusty in Colour  Raisin, Dusty in Colour Dusty Pink, Dusty in Colour hot Chocolate.

Little more close up showing more texture details...
She added few pearls to add extra beauty to the project.


All the Dusty Attic products are listed and linked directly to the website for you reference.
Hope you all liked her first attempt. Do leave some love to build up her confidence.

If you are new and hunting for various craft supplies and Dusty Attic products at best prices in India,you can contact Meetu Aggarwal  or check her website Here


Thanks for stopping by!!


6 comments:

Dear Reader,
Thank you for your precious comments. They are extremely valuable and a source of continuous motivation for me. I really appreciate the effort.
Love,
Rajni

Tuesday, May 24, 2016

White and Teal Sea Life: Card using Under the Sea Collection

Posted by Rajni Chawla


Good morning all,

It's third Wednesday of the month and that means time to share new inspiration and the next month release for Heartfelt Creations. Today. Don't forget to check the amazing creations by my team members at Heartfelt Creations Blog. Also, you can check the new release Botanical Orchid Collection Here.   I'm sharing White and Teal Sea Life in my card using Heartfelt Creation Under the Sea Collection.

Products from Heartfelt Creation:

Under The Sea Die:    HCDI 799
Under the Sea Cling Stamp Set:   HCPC 3739
Heartfelt Wishes Cling Stamp Set:   HCPC 3740
Coral Reef Collage Cling Stamp Set:   HCPC 3738
Tropical Hibiscus Cling Stamp Set : HCPC 3736
Tropical Hibiscus Die HCDI :   796
Bella Rose Leaves Cling Stamp Set :  HCPC 3390
Bella Rose Die HCDI :   712
Rain Drops and Roses Die :  HCDI 743
Crystal Ultrafine Transparent Glitter
Memento Ink pad: Cottage Ivy
Designers Dry Clear Adhesive
Bright Ideas Prills: ANC 852
Deluxe Flower Shaping Kit
Double Dots DDOTS


Other Products Used:

Ranger white heat embossing powder, Scoreboard, Smooth white Card Stock,
Spellbinders Classic circle die, Mermaid Lagoon Distress Ink, Spellbinders Victorian Arch die, Versamark Ink, Heat tool, Clear UTEE, Glitters, Zig Markers And Koi Brush.

Instructions:


For flowers stamp the Tropical Hibiscus Cling stamp with Versa mark on vellum sheet and heat emboss it using white heat embossing powder. Die cut the flowers using Tropical Hibiscus Die and shape the flowers as shown by Emma Lou in the video here. The front panel measures 7” X 5” . Distress one corner with Mermaid Lagoon Distress Ink and stamp the image as shown with blue Archival Ink. Score panel at1/8th of an inch. For shells, stamp the images in shades of blue archival ink fussy cut. Dab Versa mark on images and put clear UTEE. Heat set them and shape them when little warm. For fish , stamp the image with black Archival and paint using Zig Clear Brush Markers. Die cut it using Under the Sea die. For the top of the card, layer the dies shown using foam dots and assemble the arrangement using shaped flowers. The sentiment is stamped using blue Archival using Heartfelt Wishes Cling Stamp set. I have used the masking technique to create sentiment in one line.


Here are the pictures for all details:


Hope you liked my card and got inspired. Thanks for dropping. I would love to read your lovely comments. That really boosts my confidence. 


9 comments:

Dear Reader,
Thank you for your precious comments. They are extremely valuable and a source of continuous motivation for me. I really appreciate the effort.
Love,
Rajni

Tuesday, May 17, 2016

Make a Splash Card using Under the Sea Collection by Heartfelt Creations

Posted by Rajni Chawla

Hello, friends...

It's happy Wednesday again....which means time for more inspiration with Heartfelt Creation's new release.  Today, I'm here with the new card using Under the Sea Collection. This is the fintastic collection with the cool fresh breeze, the splash of bubbles, sparkles and vibrant  shades of fish, the silence of shells and depth of the sea. Don't forget to check the beautiful splashy inspirations by all team members.

Products from Heartfelt Creations:-

Zig Clean Clear Brush markers, Staedtler Water Colour Pencils, Classics circle die by Spell Binder, Scoring Board, Mermaid Lagoon Distress Inks, Glue Dots, Smooth White Card Stock, Texture Paste and Clear Glitter.

Instructions:

The ready card measures 9 ½ inches X 5 ½ inches. It’s a top-folding card. Cut a sheet measuring 11 inches X 9 ½ inches. Score into half from 11 inches and fold. Score the complete front panel at 1/8th inch all. The card has three mats. The first mat is again white which measures 8 ½ inches X 4 ½ inches. The top two mats are from the designer paper itself which is distressed from all the sides using Tim Holtz Distress Tool. Both the mats are inked with Mermaid Lagoon Distress Ink. The top most mat is then given little texture using bubble stencil and textured paste. Add little clear glitter when wet. Dry set it using the heating tool. For the fish, stamp the image on smooth white card stock with black Archival ink and paint them with Zig Clean Clar Brush Markers. Add little highlighting with Staedtler Pencil Colours. For the shakers on the cards, nest two Classic Circle Dies together to get the rings. Stick acetate sheet to the ring. Cut a mat with pattern paper. Add Prills and close the shaker elements using foam tape. Now, assemble the card as shown. Add sentiment and twine with beads, as shown.

FULL VIEW...

1 (1) - Copy

DETAILED PICTURES...

1 (2) - Copy

Loved the beautiful cut with coordinating dies..

1 (5)

Loved the beautiful vibrant coloring with Zig clean clear markers. Wanted to add little glitter but avoided. These were looking gorgeous as it is. 

1 (6)


1 (4)

Be sure to visit Heartfelt Creations Blog for more Inspiration.
Thanks for visiting! 
Happy Crafting

14 comments:

Dear Reader,
Thank you for your precious comments. They are extremely valuable and a source of continuous motivation for me. I really appreciate the effort.
Love,
Rajni

Thursday, May 12, 2016

The Ultimate Photo...A Mixed Media Frame

Posted by Rajni Chawla

SUBMISSION FOR FINAL ROUND WITH HEARTFELT CREATIONS

PROJECT 2 : The Ultimate Photo...A Mixed Media Frame

It's all about inspiration. For me, there are lots of things that inspire me like different photos, youtube video, quotes, life experiences, nature and many more. They just inspire me to create and create. As cheesy as it sounds, I get my ideas of what I create from dreams and from the research I do. I got a chipboard sentiment in my DT package the one I got from Dusty Attic but was not finding perfect inspiration for my creations. The sentiment says, ‘The Ultimate Photo’. Now for this, I really needed some Ultimate Click. One day, when scrolling down my timeline I got a comment from Emma Lou and accidentally I clicked on to her profile picture... Aww... such a nice click.. .just PERFECTTT ,I shouted. I scrolled down a little and got another. I really don't know if I did right or wrong by using her personal pictures for this project of mine. All I can say is I couldn't resist making one of my role models as the model of my project. Emma, initially I wanted to blur out your photographs but I'll be frank, your smile just enhances my project even more. Think of it like an embellishment that I have used. Hope you don't mind. :)

Heartfelt Creation Supplies Used :

HC Tropical Hibiscus Stamp
HC Tropical Hibiscus die
Under the Sea Paper Collection
HC Bella Rose Leaves
HC Bella Rose Die
HC Botanical Rose Cling Stamp
HC Botanical Wings Die
Spring Bling Prills -12 pack
Color box Fluid Ink Harvest
Color box Fluid Ink Red Barn
Color box Fluid Ink Warm Red
Color box Fluid Ink Lime Pastel
Color box Fluid Ink Olive Pastel

Other supplies used:

White Gesso, texture paste, rock candy glitter, dusty attic chipboard, Black chipboard, Glittered heat embossing powder, stencil, any glue that dries clear, diamond dust, sprays in shades of blue, green and orange, metal charm, glossy accent, clear crackle paint.

Here are few detailed pictures...

second project (1)

My heart aches if I throw a single inch of a paper...especially pattern papers that I use. After a bad postmortem, all the bits stay safe in a box for further use. They smile every time when I add new to my stash. Here in this project, I used the bits of small pieces to create embellishments for my project. Though I also used many more things....but I m satisfied I used at least a little of it.
Check this picture....Both the frames had many joints. But I covered all by rolling twines few times around it.  The width of the strip was little smaller than the frame...but now beautifully painted with different shades of paints matching to the backgrounds.

12922164_10207846343733235_1913646974_o


12915018_10207846344093244_820923406_o


second project (5)


12896257_10207839310037397_1237987621_o

Trust me it looked much prettier when seen in person...More shabby,more trendy, Red hot hibiscus popping out from here and there....just fabulous!!

second project (6)


12896373_10207839285716789_1712230420_o

Metal Charm!!
Who can say I used scraps here.
No, No....nothing is scrap if you are in crafting....you just need to shake your head a little to find some ideas. Dusty Attic paints and Dusty Attic chipboards have become another favorite of mine this year. Lucky me that I got such a good collection in my DT package.

12903424_10207839251155925_205536234_o


12903486_10207839252835967_1488359477_o

Gorgeous textures...Just loving them all!!

12903708_10207839270516409_288651724_o


12903460_10207839300797166_488581617_o

Here comes the main title of my project -"The Ultimate Photo"

12919605_10207839267716339_2057404487_o (1)

Isn't it a perfect click....an ultimate photo!!

12922275_10207846343773236_1373259859_o - Copy

Your smile is no less than any embellishment Emma. Thank you so much for allowing me to share this project without hiding your pictures.  The project is  full of love and blessings from my side for the beautiful couple.


5 comments:

Dear Reader,
Thank you for your precious comments. They are extremely valuable and a source of continuous motivation for me. I really appreciate the effort.
Love,
Rajni

Giveaway by Shilpi Crafts (sponsor no: 10)

Posted by Rajni Chawla

Hello, friends...

Today, I m here to announce the final sponsor of my one-month long Giveaway series which I announced to celebrate the launch of my new website.  Check the detailed post HERE. Before I announce the last and final sponsor, I would love to thank all the crafters who participated along with me with so much of enthusiasm and left me spellbound with their beautiful encouraging comments and all the 10 sponsors for their support and sponsoring such lovely prizes.  
Now, on to today's giveaway which is generously sponsored by Shilpi Crafts.  Shilpi Crafts is successfully run by Shilpa Kenia and her husband Parag.  Shilpi started its journey way back in 2000. The sole aim for the brand is to provide crafters with quality products that are proudly Made in India and prices that makes it possible for every crafter to enjoy their creative journey. They strongly feel that affordability of craft material should not become the hindrance for anyone who loves crafting. Their quilling products are loved by the quillers. They have the highest range of individual, shaded, metallic and pearl shades of quilling strips. The quality of their range of quilling tools is well known. Their latest range of Artistry Inks has given the Indian crafters the medium that crafters wanted for their craft projects but couldn’t get it in India. I’ve used Artistry Inks personally and I can confidently suggest any crafter to use them. They are available in 48 shades and in regular as well as mini sizes. The smartly designed attached lids of the regular ink pads and their clearly labelled names and shades have made the work way easier for all crafters. The regular ink pads are designed upside down, so always remain juicy to work with. Moreover, you find an extra storage for keeping foam pads that help doing hassle free crafting. Isn't it amazing!!  Shilpi Crafts have their website named Craft Universe where you can see a huge collection of more craft supplies and do online shopping.

b18cfe0c-6ae1-437a-b809-6923b3ddfaac
Here is what they are sponsoring...
To celebrate along with me, Shilpi Crafts is generously sponsoring  one complete set of Artistry Mini Ink Set of 12 and blending tool with two blending foams for 2 lucky winners following the simple rules.  

e454023a-d3f9-4de8-b1a2-ce5dff356f56


Review from Shilpi Crafts...

13161557_10208165194744311_305447349_o

Simple rules to follow:
  • Comment on the sponsor's giveaway posts for an extra chance to win the sponsor prize.
  • Leave a token of love as a testimonial on the sponsor's facebook page. They will really feel loved and will appreciate your efforts too.
  • Share all the crafty posts that I make on my timeline and keep the settings open for public.( I m repeating this  step here as crafters are not following this).
  • Don’t forget to comment on the main celebration post and giveaway posts already announced to increase your chances of winning prizes
Today one more thing I want to announce that due to some unavoidable work, I am extending the giveaway for another one week...that is instead of 13th, May now you can play along till 20th May and the winners will be announced on Monday 30th, May,2016. All those who were requesting me and were on vacations have a chance to join now.


Happy Crafting !!

1 comments:

Dear Reader,
Thank you for your precious comments. They are extremely valuable and a source of continuous motivation for me. I really appreciate the effort.
Love,
Rajni

Tuesday, May 10, 2016

Revealing Under the Sea Collection and project submitted for finals

Posted by Rajni Chawla

SUBMISSION FOR THE FINAL ROUND OF HEARTFELT CREATIONS

Boxed Aquarium Album

It's second Wednesday of the month and the new release day of Heartfelt Creation's May release...Under The Sea Collection and now I am officially allowed to share the first project that I submitted for the final round for their design team selection. I really loved the new Under The Sea Collection by Heartfelt Creations. The vibrant shades of designer papers showing the depth of the sea, beauty of sparkling fishes and shells....and never ending silence of  sea weeds along with the soft n cool blooming hibiscus....It's beauty and serenity overloaded!! I was flipping through the papers and saying to myself...OH MY GOSH....How much deep the designers  can think of designing and how much grown they are in their minds....Hats off man!!
The very first thing that came into my mind after looking at the collection was Aquarium and I decided to make the same. I altered a box a shadow box with mini-album inside. I have never worked with such theme and never ever altered a box like this. This was my very first try and I loved n enjoyed every bit of it.

Don't forget to check out amazing creations by all design team members at Heartfelt Creations blog. It's another must buy collection from them. 


Here is the list of supplies of Heartfelt Creation.


Other supplies:

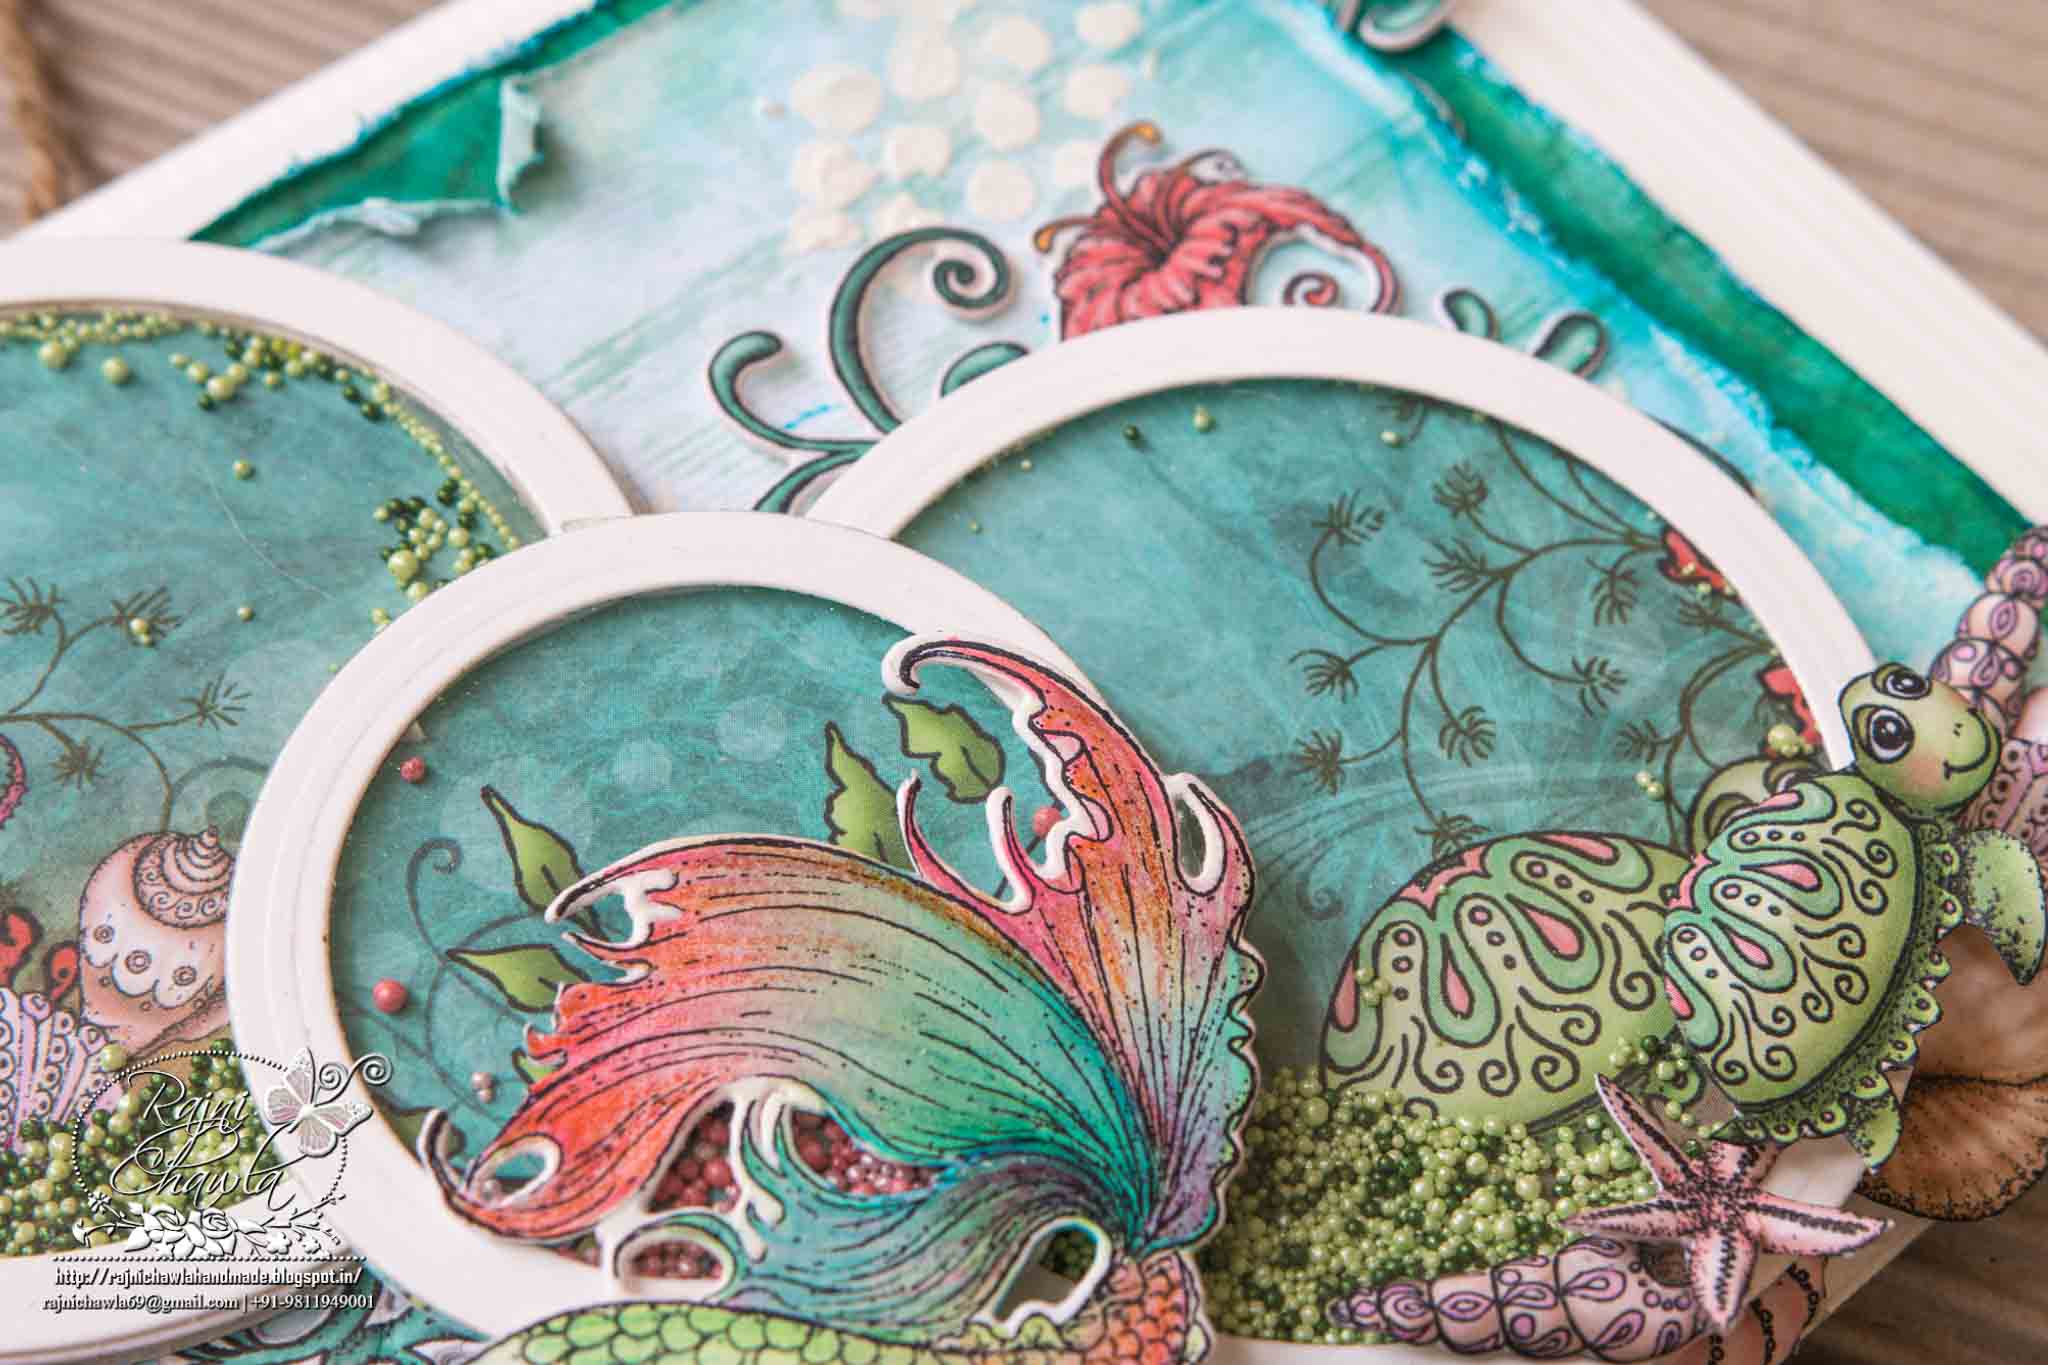
 Spellbinders Wonky rectangle die, Spellbinders Grand Ovals, Rusty Hinge, Salty Ocean, Mermaid blue and Peacock Feather Distress inks, Clear rock candy glitter, Diamond dust, Fussy cutting scissors, Ranger's Multi Medium Matt, Black Distress Marke, Red tacky tape, White Gesso, Acetate sheet, Black card stock, Black chipboard.

TOP VIEW OF THE BOX: 

12919225_10207807405239797_345935158_n (1)


 Instructions for the cover of the box:

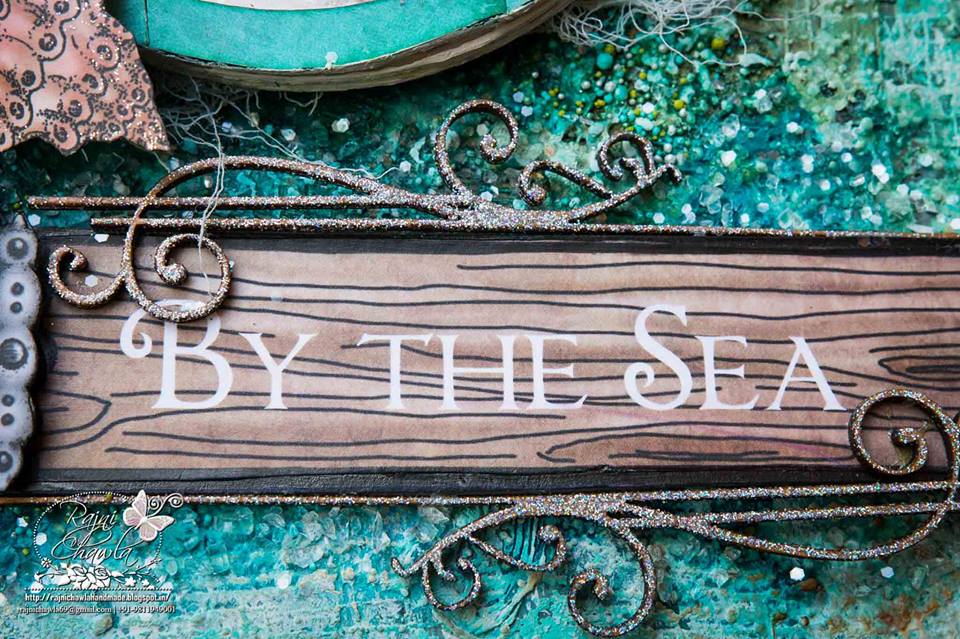
The box that I altered was 12 1/2 inches by 8 1/2 inches with bottom of 13 inches by 9 inches and height is 2 inches. For the cover of the box, I decided to make an aquarium amidst in sea waves. I took a separate piece of chipboard half an inch smaller to the actual size of the lid. Applied first coat of heavy white gesso and gave textures with tearing the pattern paper on two corners. The space left was given textures using texture paste randomly and sprinkled glass beads when wet. Dry it with the heat gun. Prime the whole area of pattern paper with a light coat of white gesso. Once dry start misting with 2-3 shades of blue  drying it in between all coats. Once happy with the background,decorated it with an oval aquarium, fussy cut and shaped embellishments from patterned paper, diamond dust and glass beads.
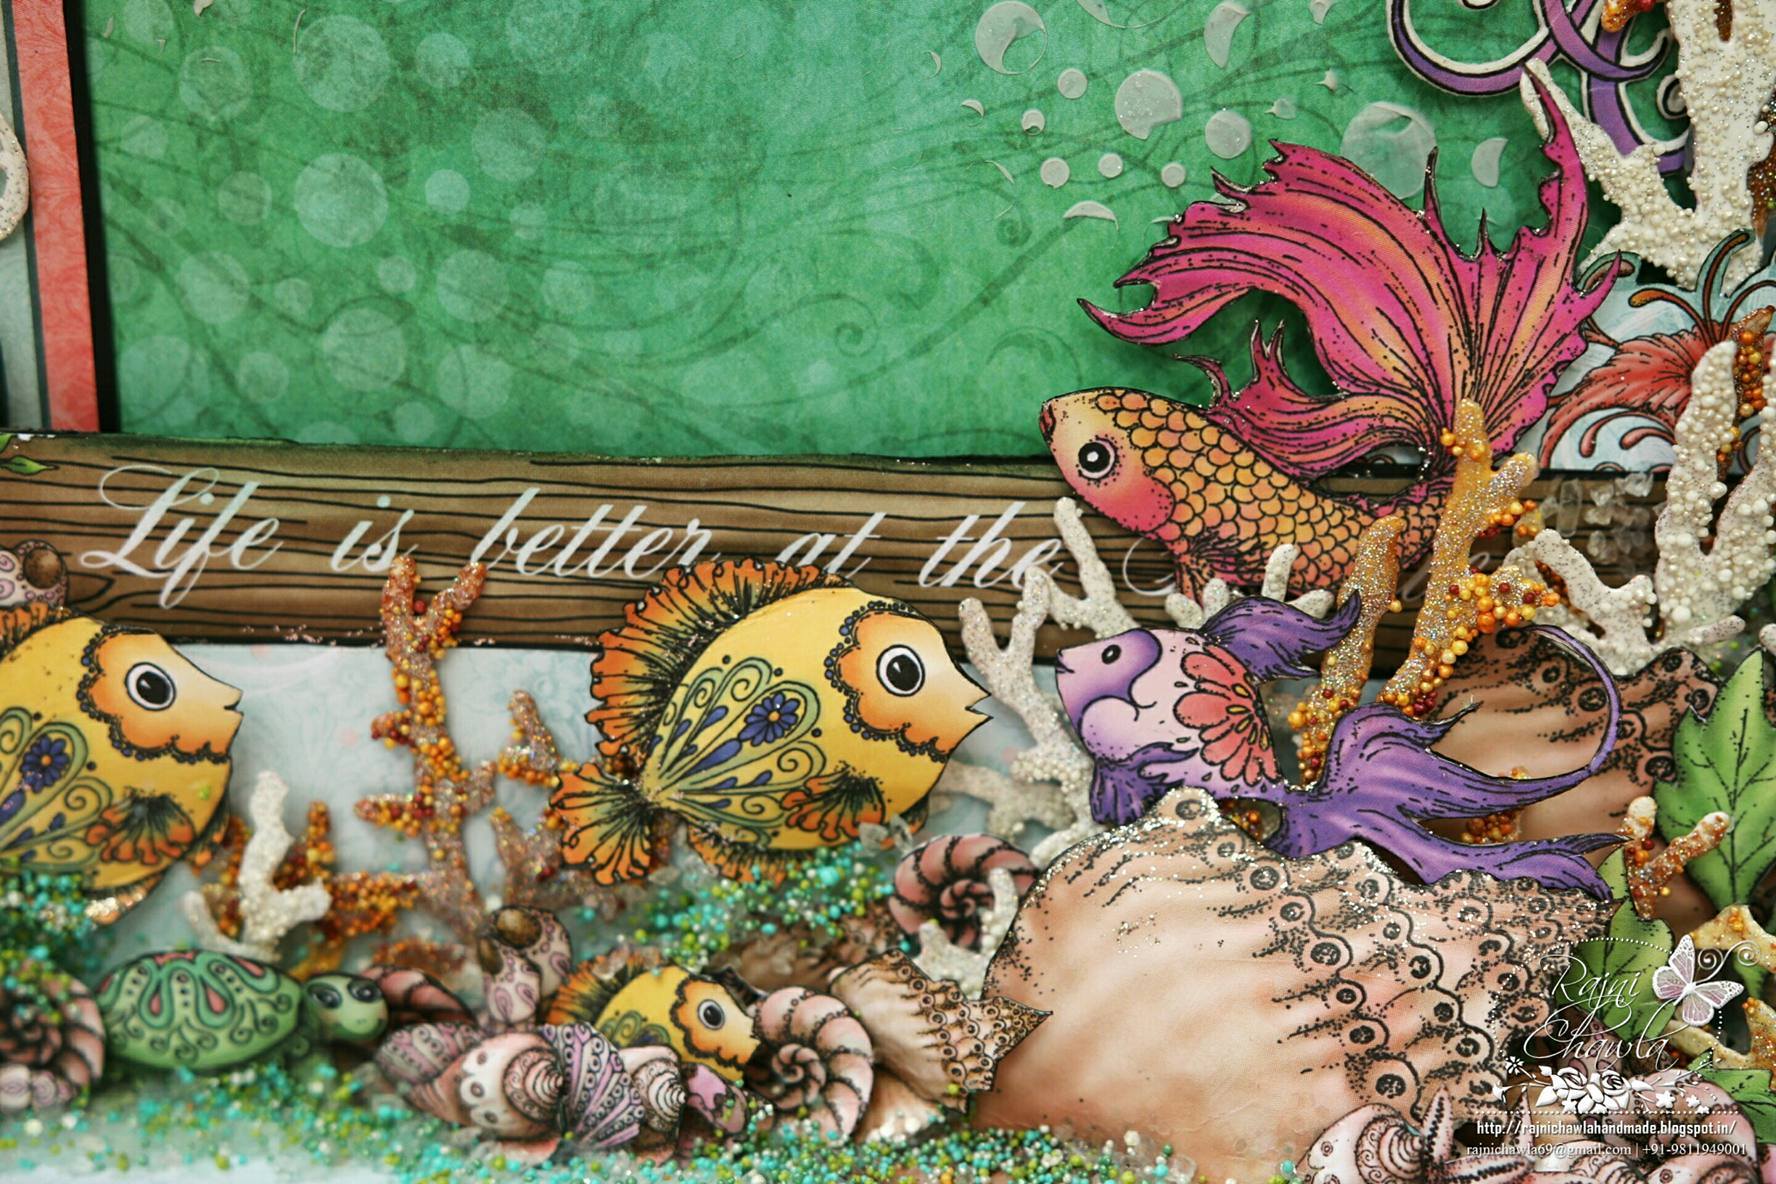
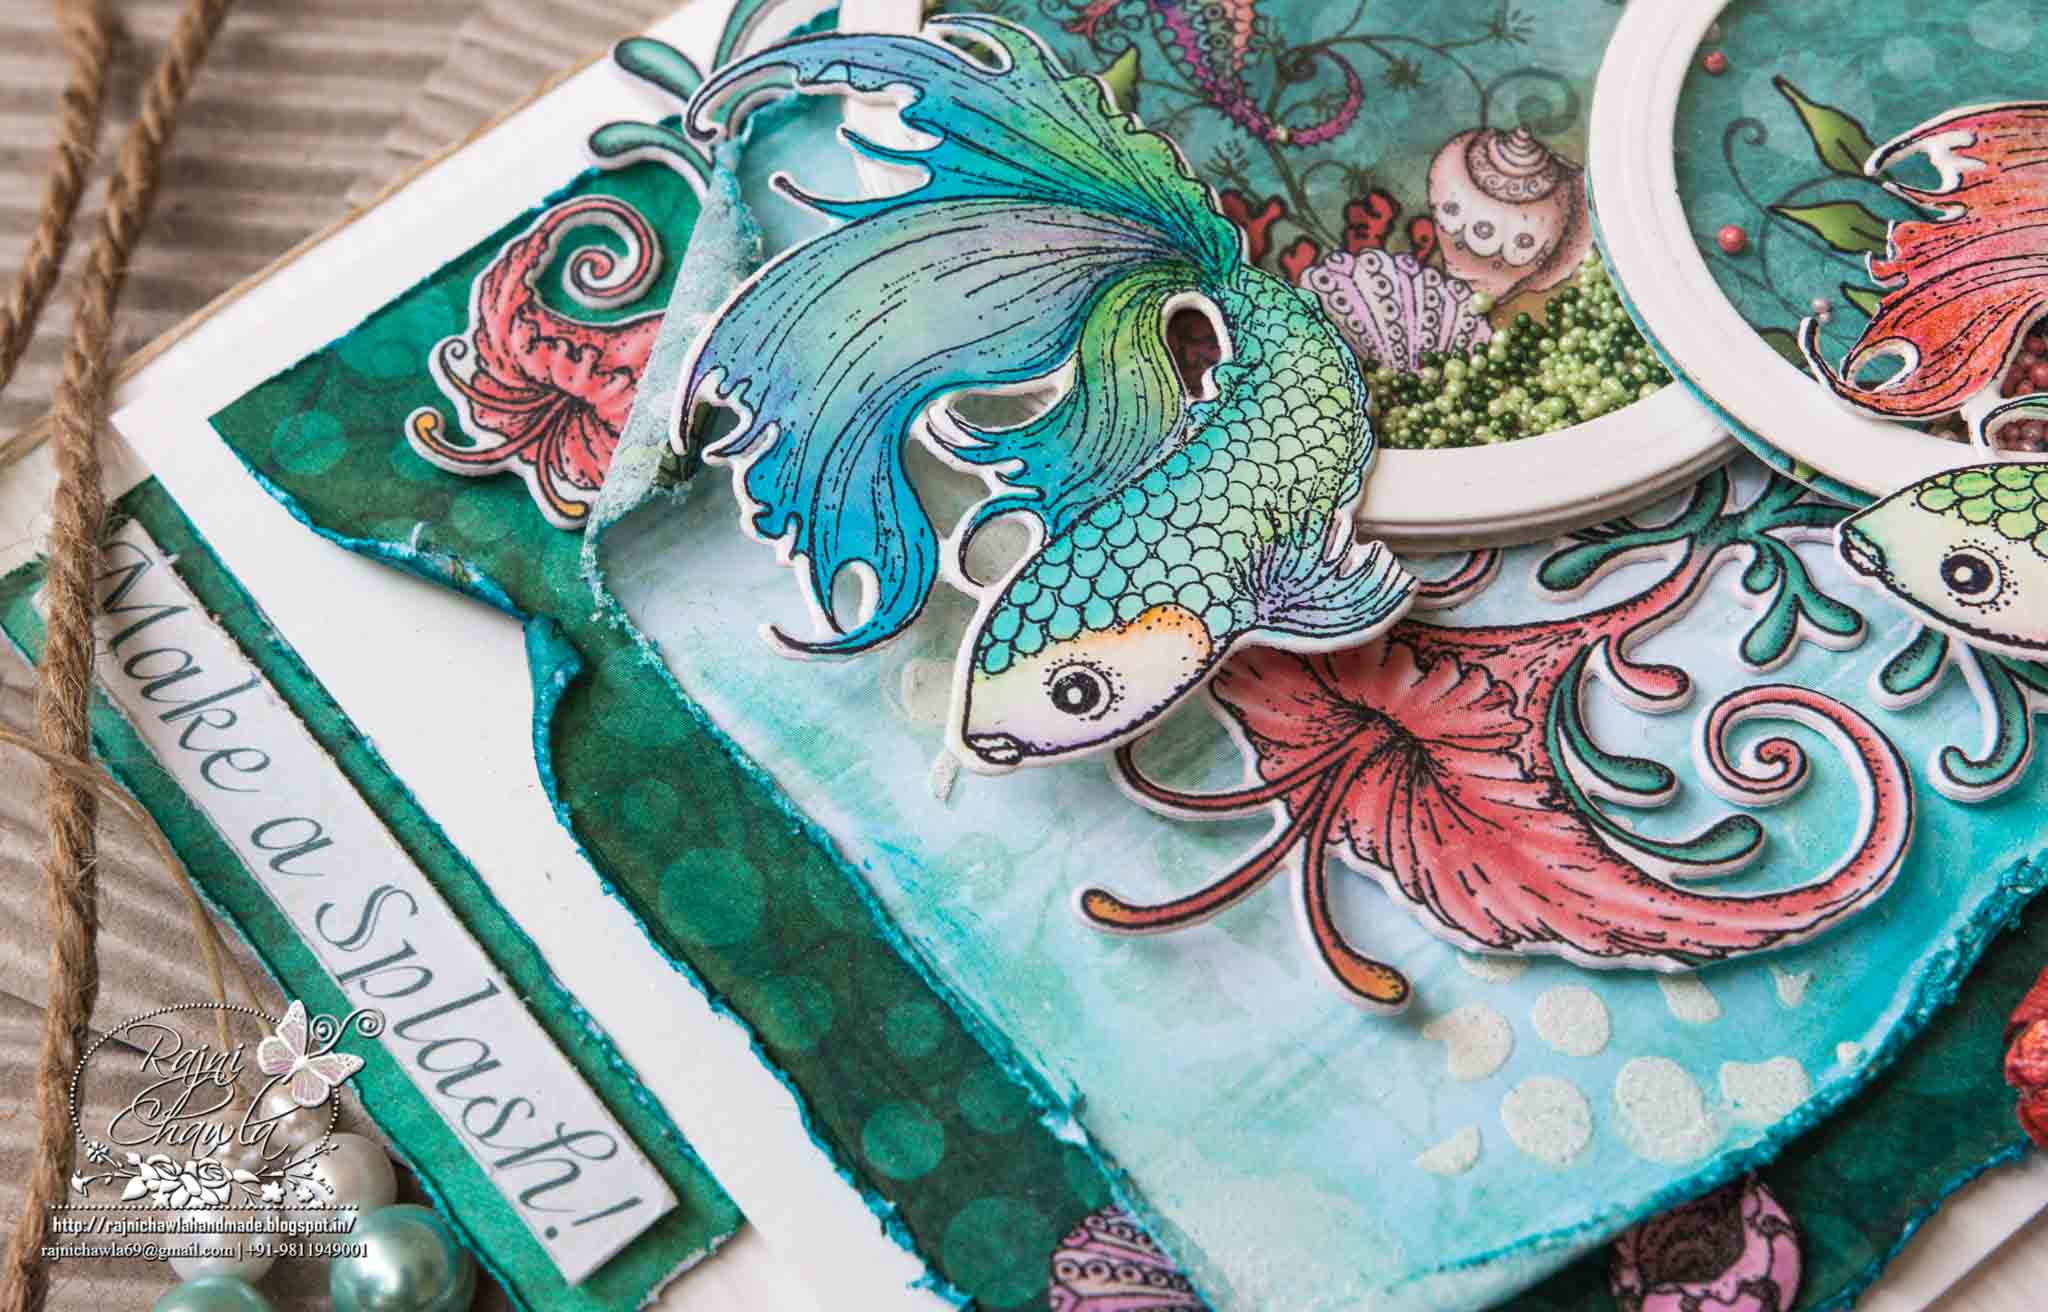
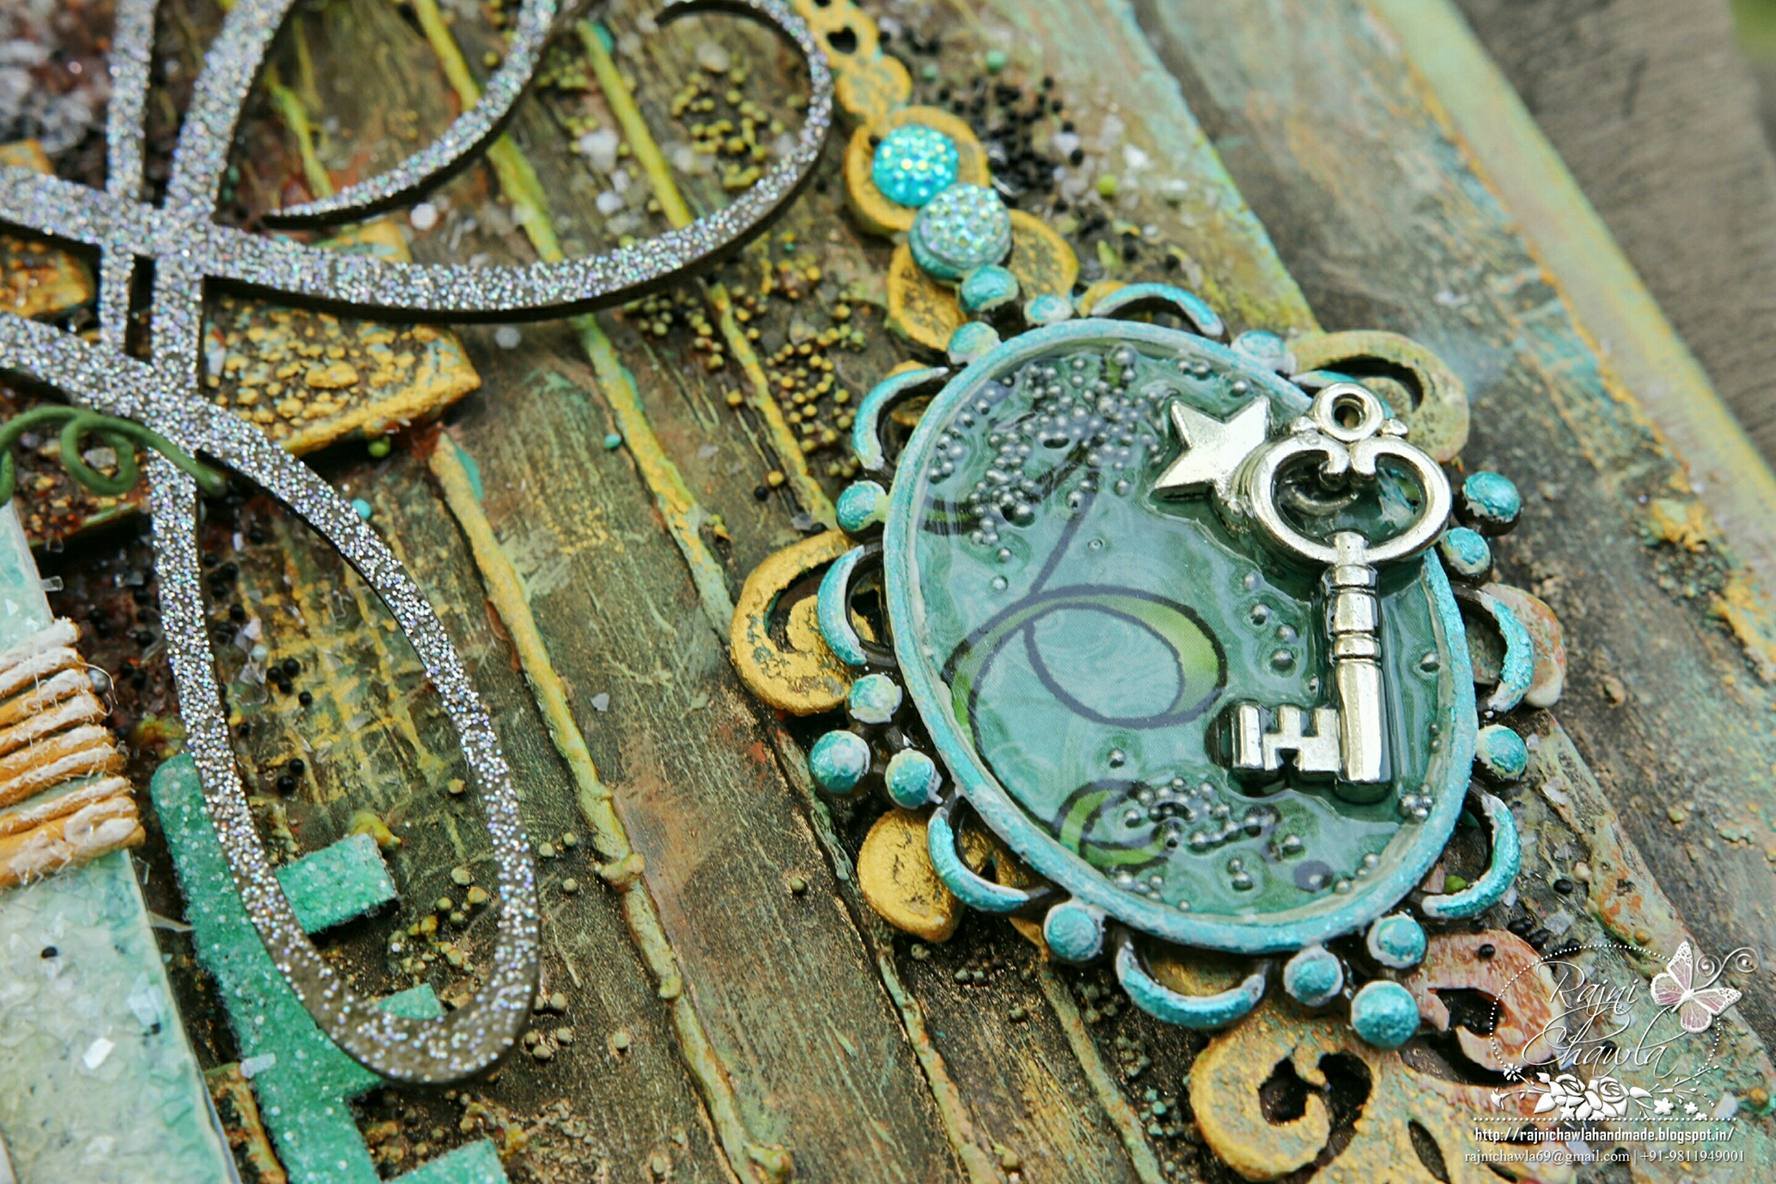
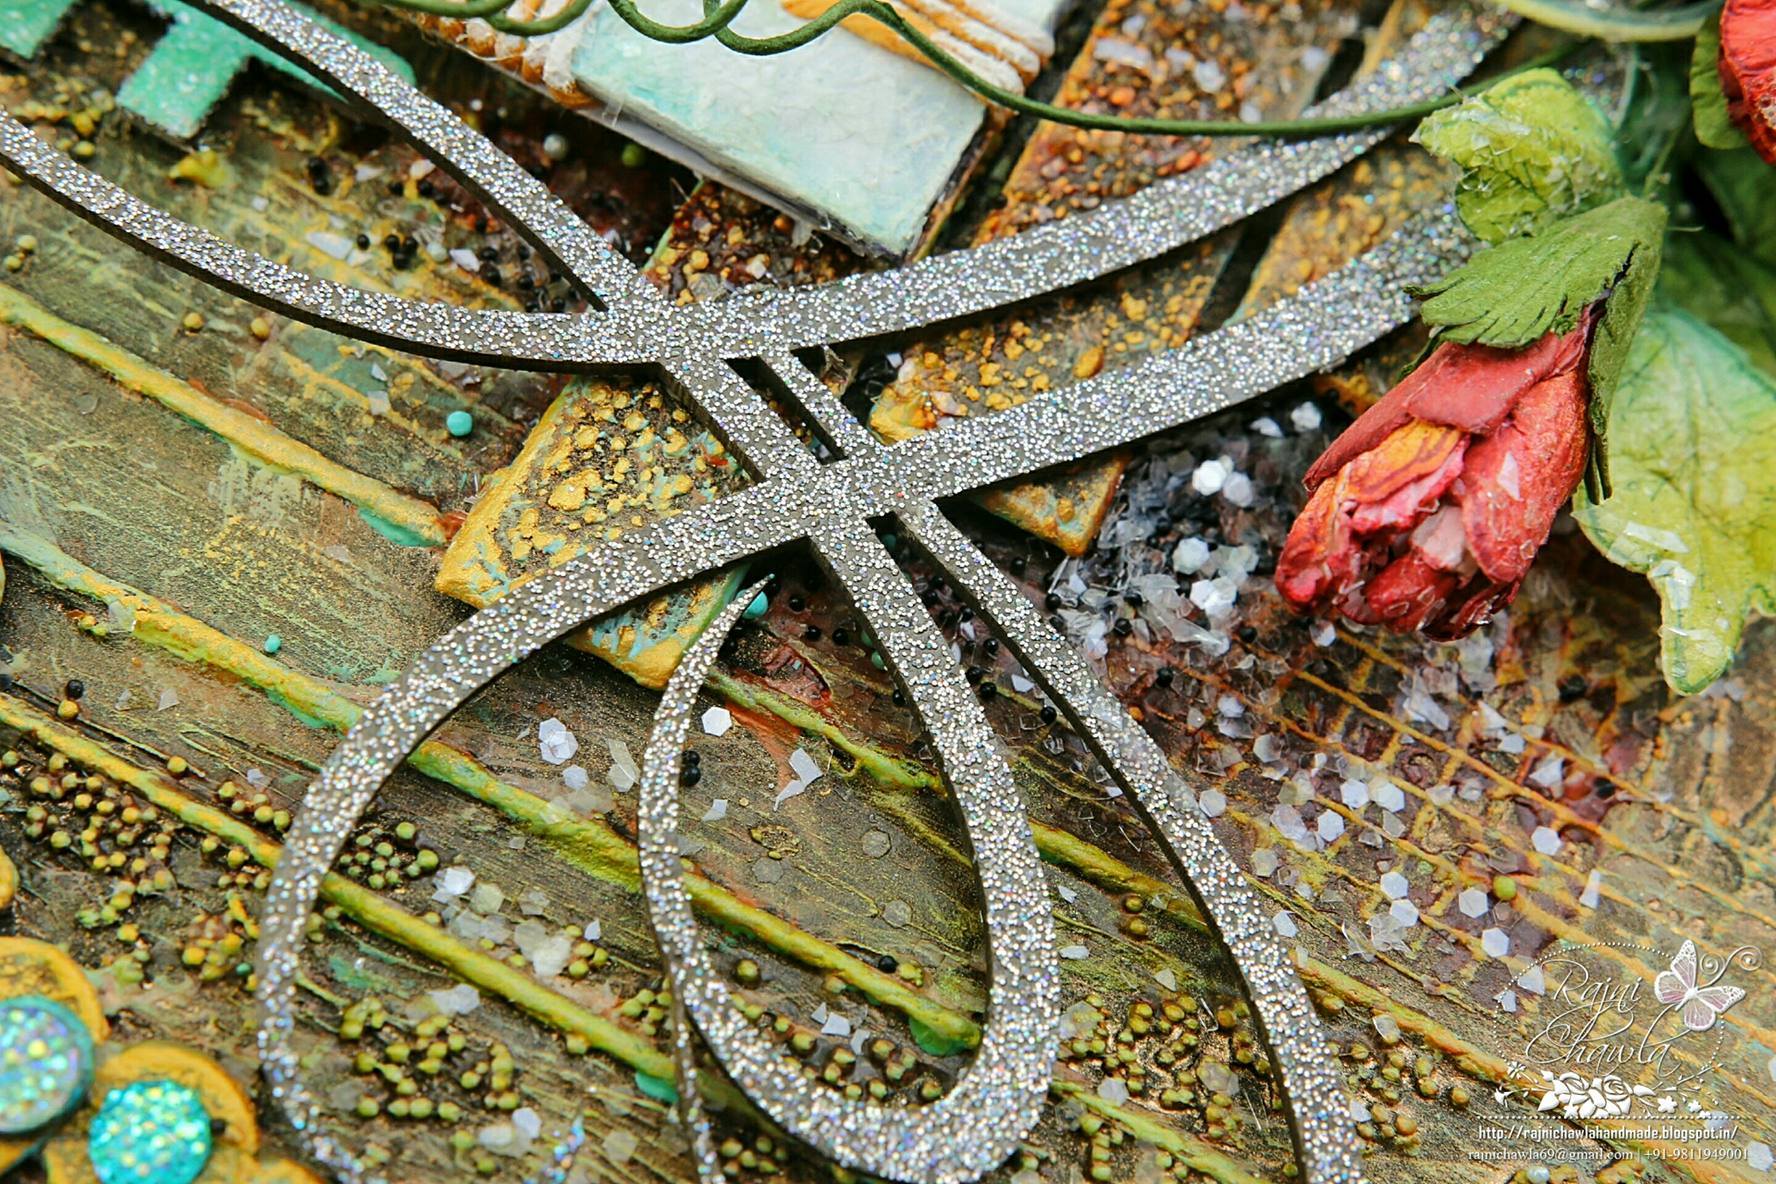
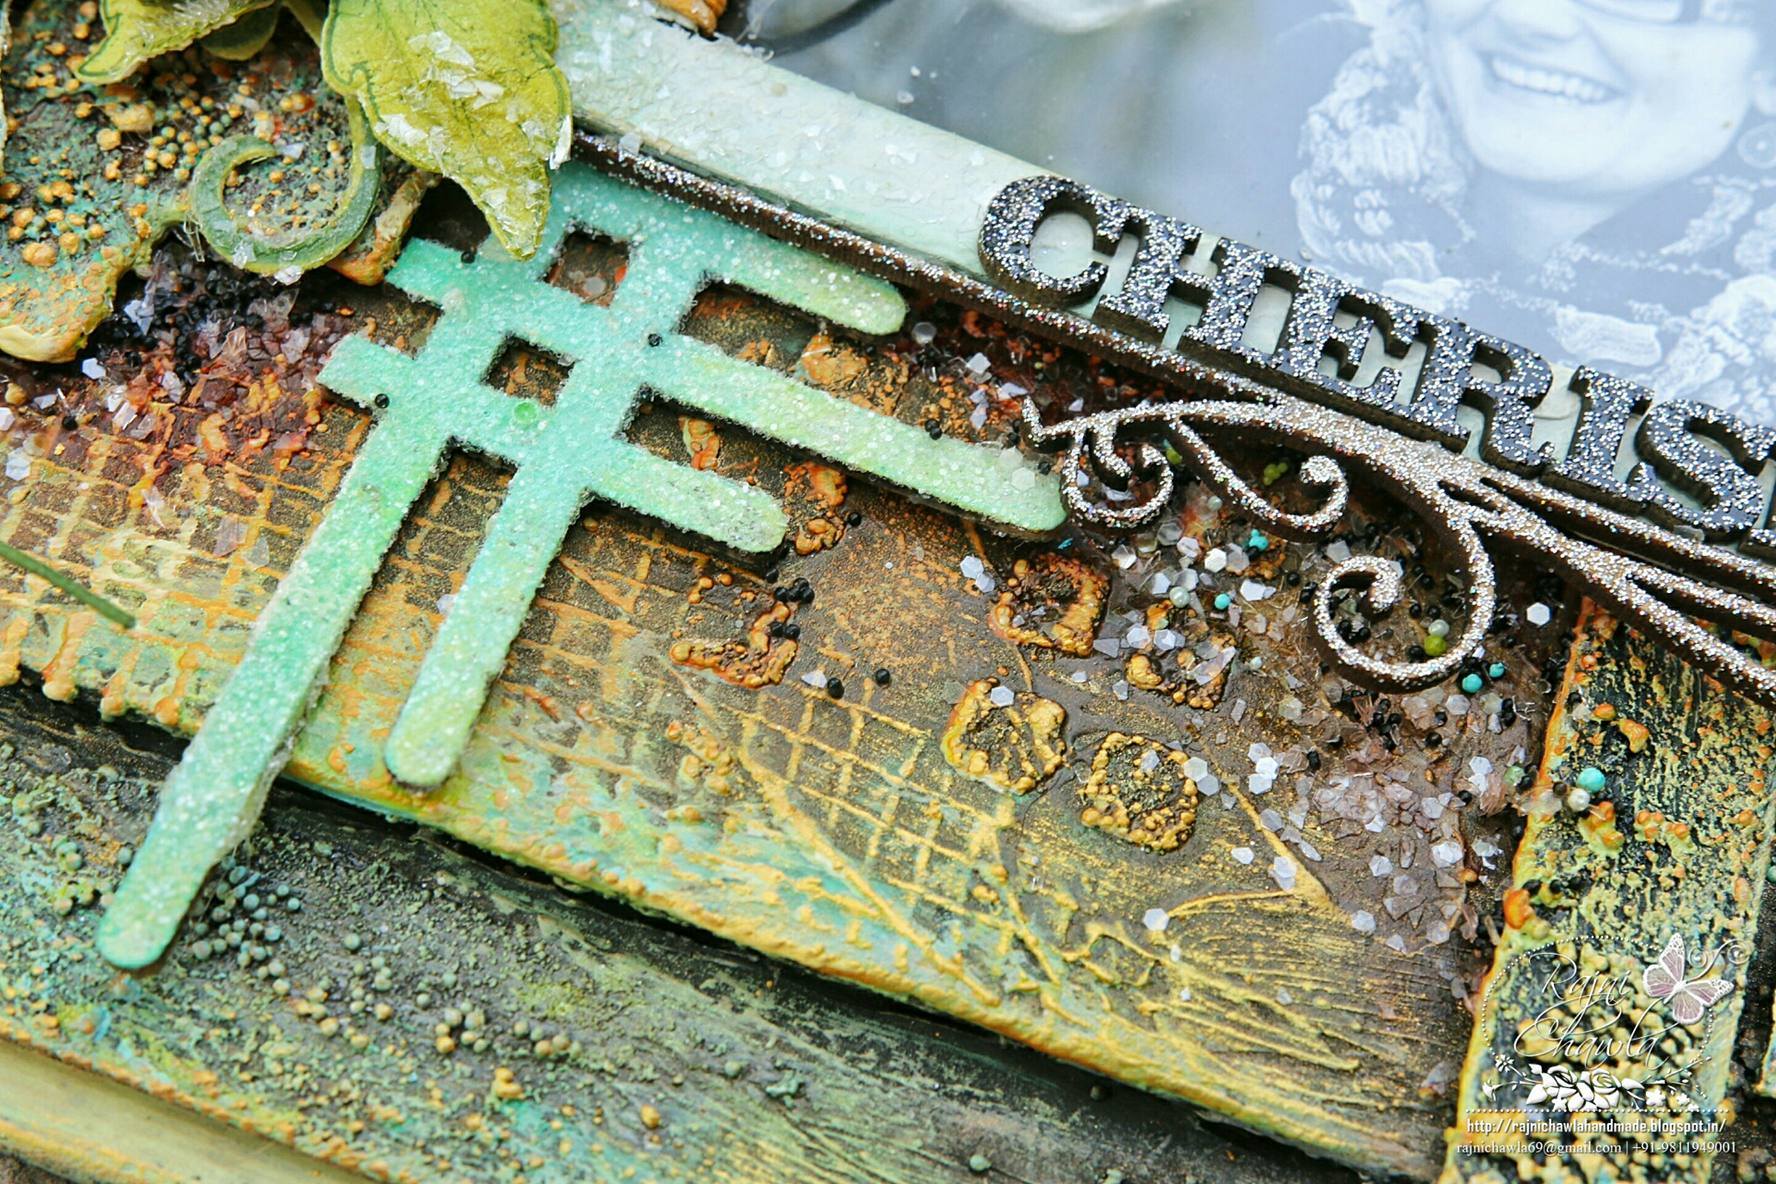
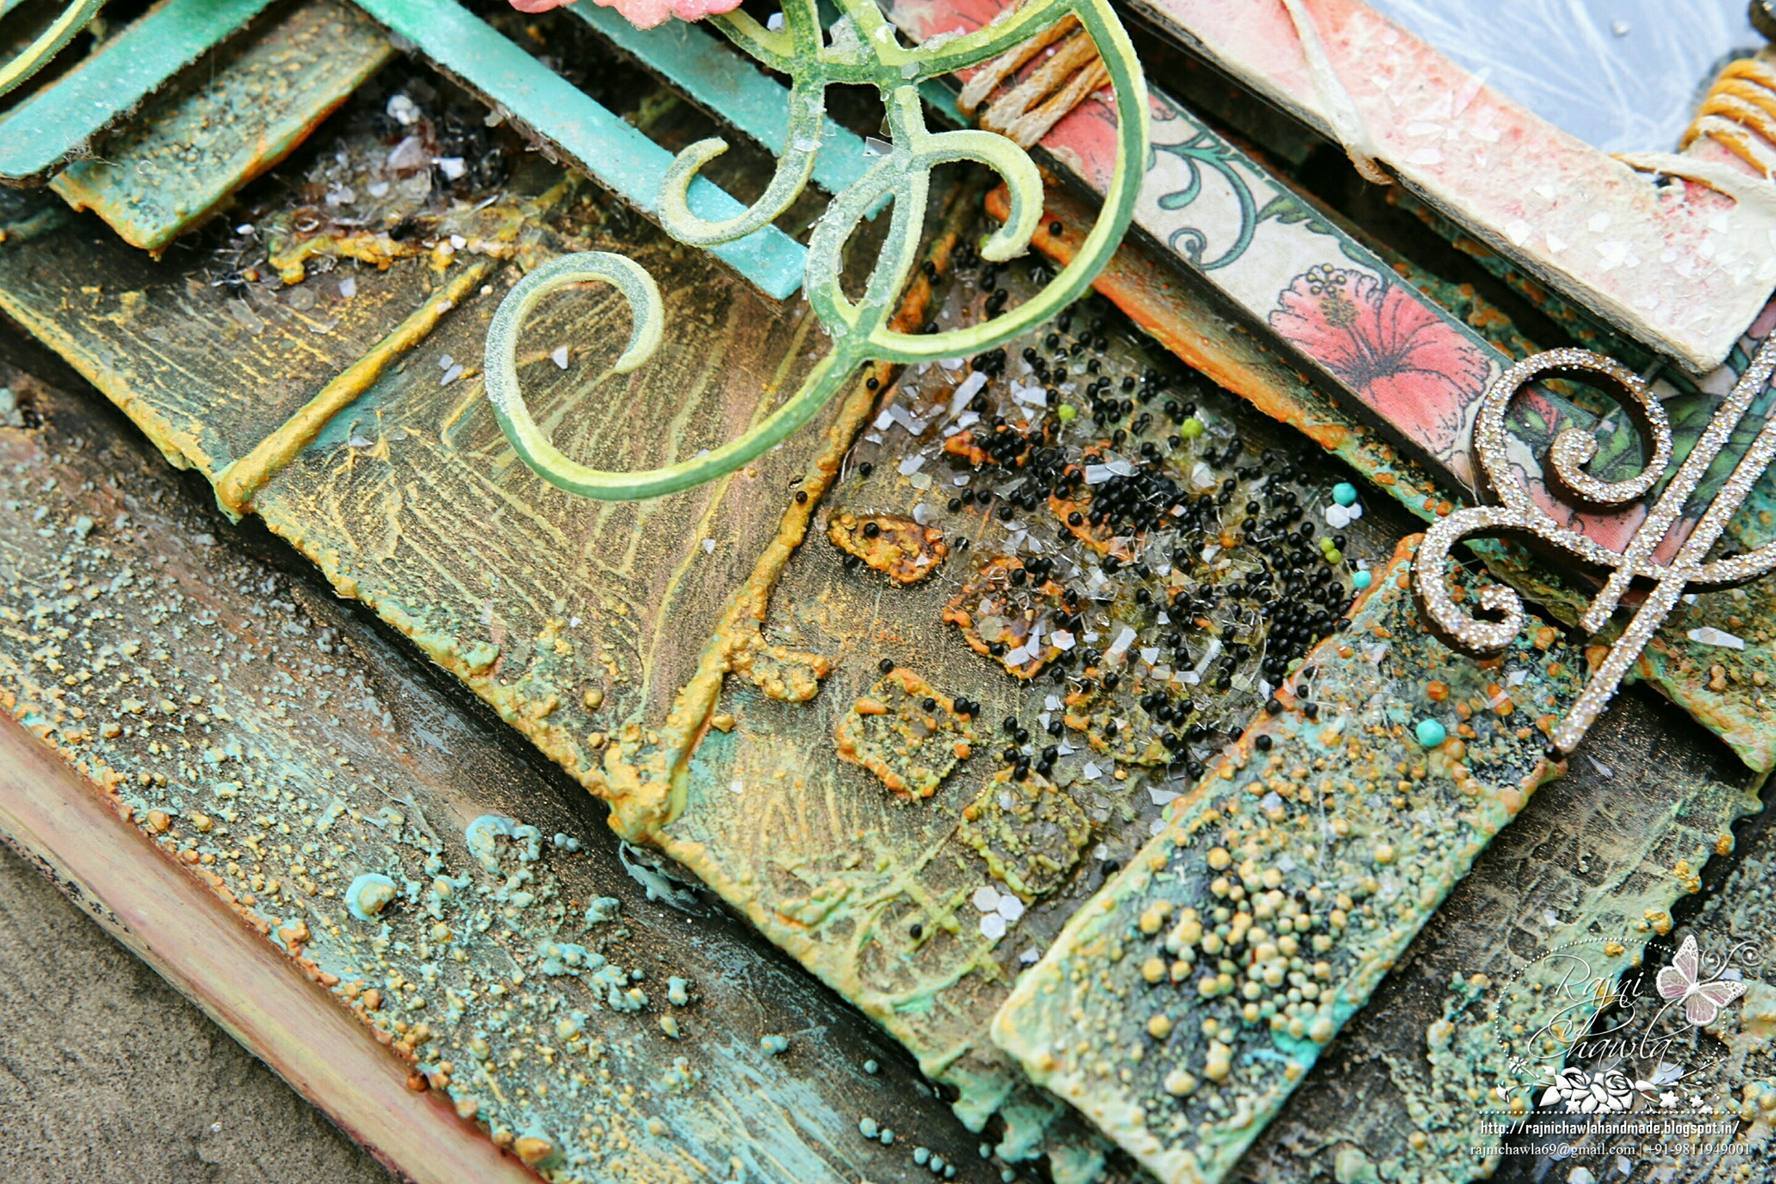
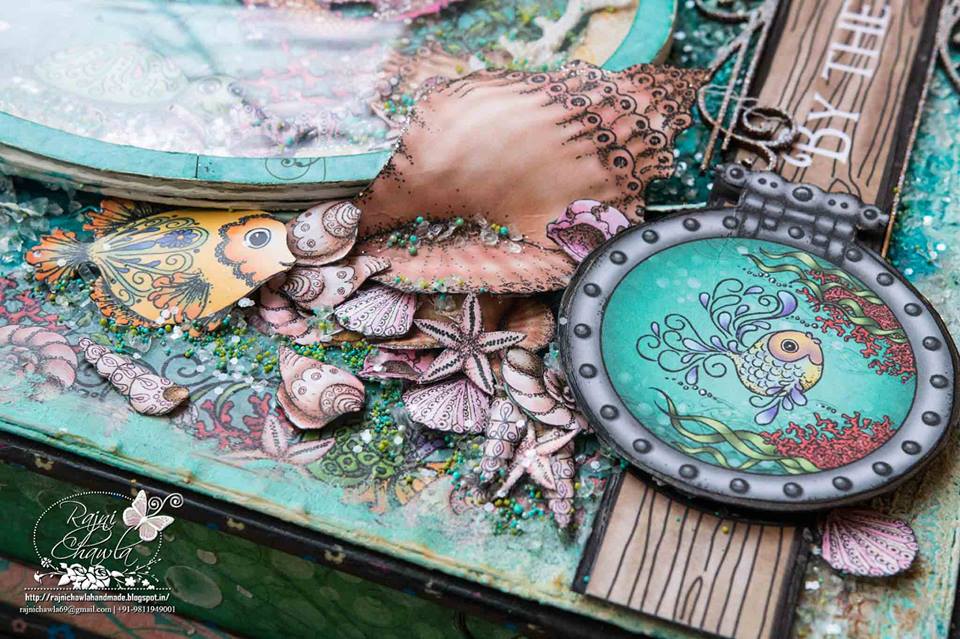
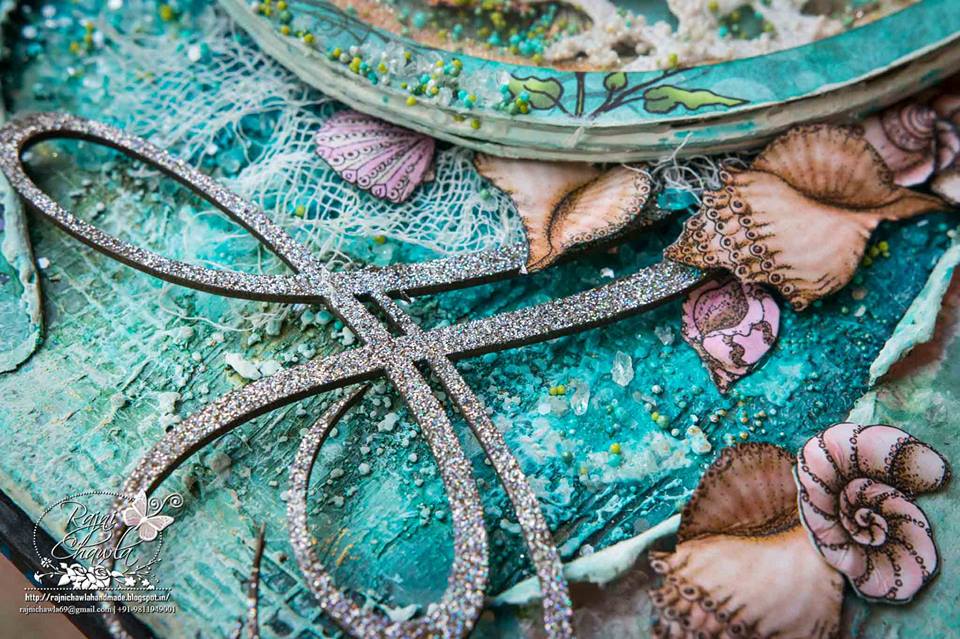
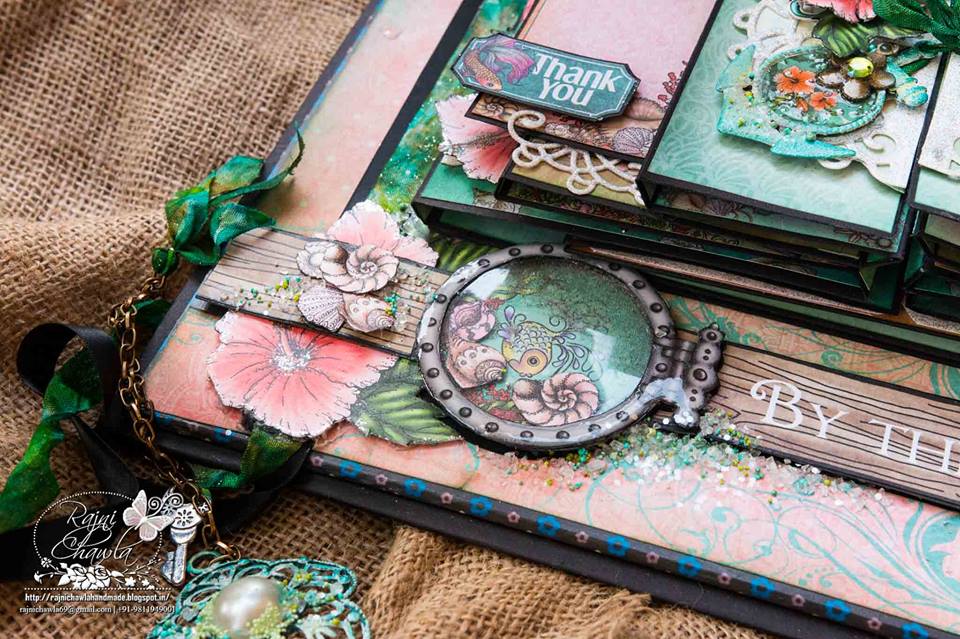
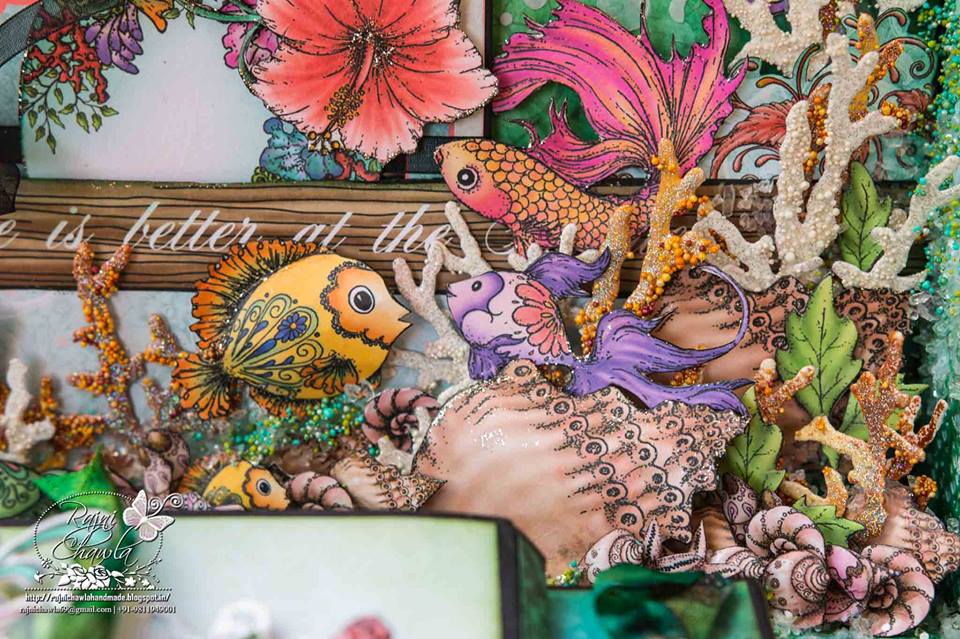
Here are few close-ups to show all detailing of the Aquarium on the cover:
Look at the 3- dimensional shapes of shells and fishes. They really looked amazing. I never thought of that I would be ever using my HC Flower Shaping kit for shaping shells instead of flowers.

12910888_10207807405799811_1312736699_n

A Little more decoration with Dusty Attic chipboards...GORGEOUS, GORGEOUS!! I can't resist myself from using them.

12920967_10207807405839812_338621274_n


I loved the textures on the background too.....all created using various mix media mediums. 

12919088_10207807405159795_1942181429_n

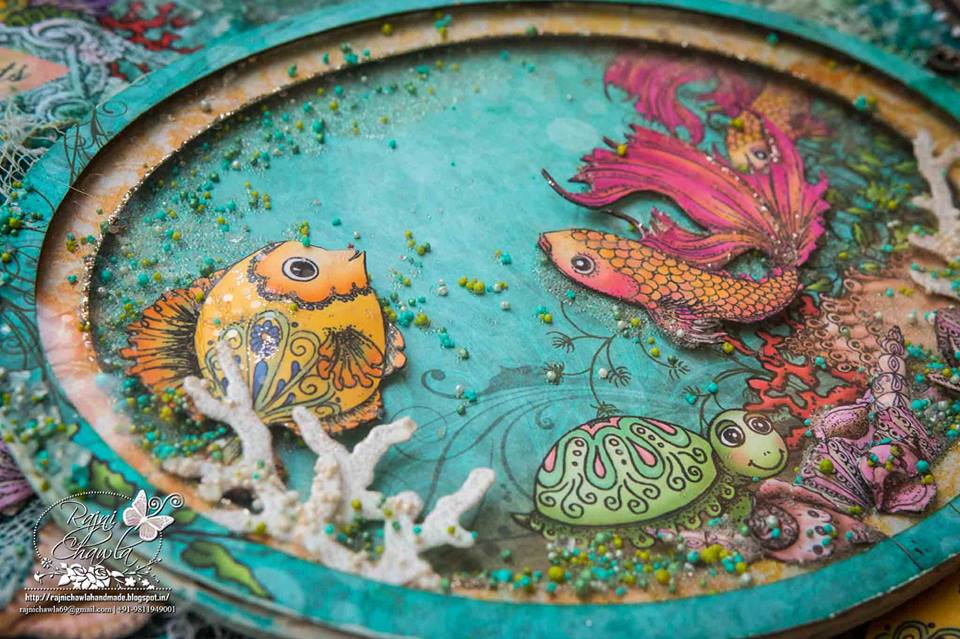
Instructions for oval aquarium on the cover:

Adhere designer paper on thick black cardstock. Cut a base layer using Spellbinders Grand Ovals die. Cut 1 piece of a ring by nesting first two dies and another using 1st and 3rd die of the same. Attach acetate sheet behind the top layer. Create under the water theme by using fussy cut fishes and shells and add prills and micro beads for decoration. Glue them together on the base layer using foam tape and close the aquarium.
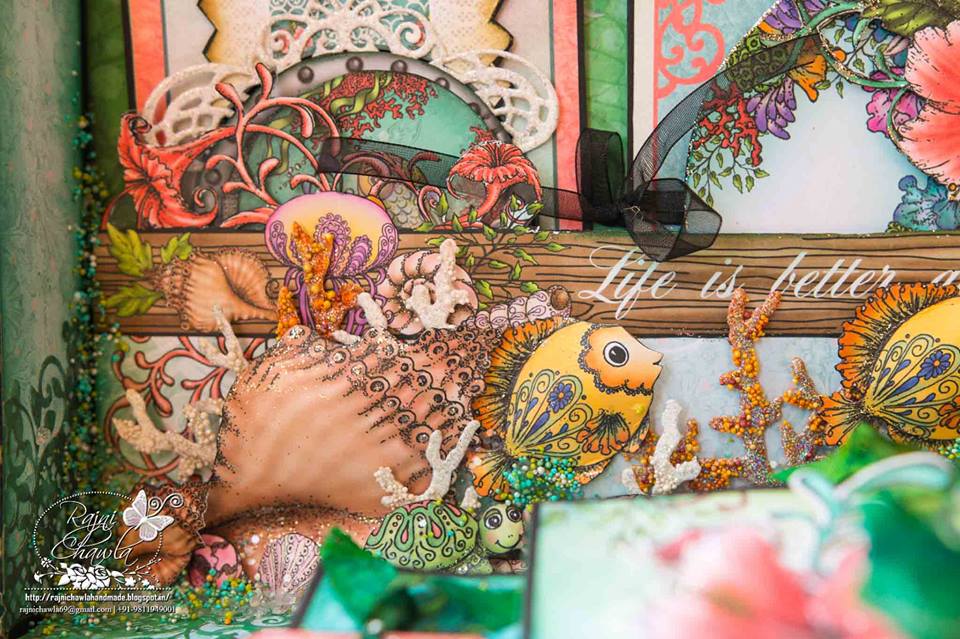
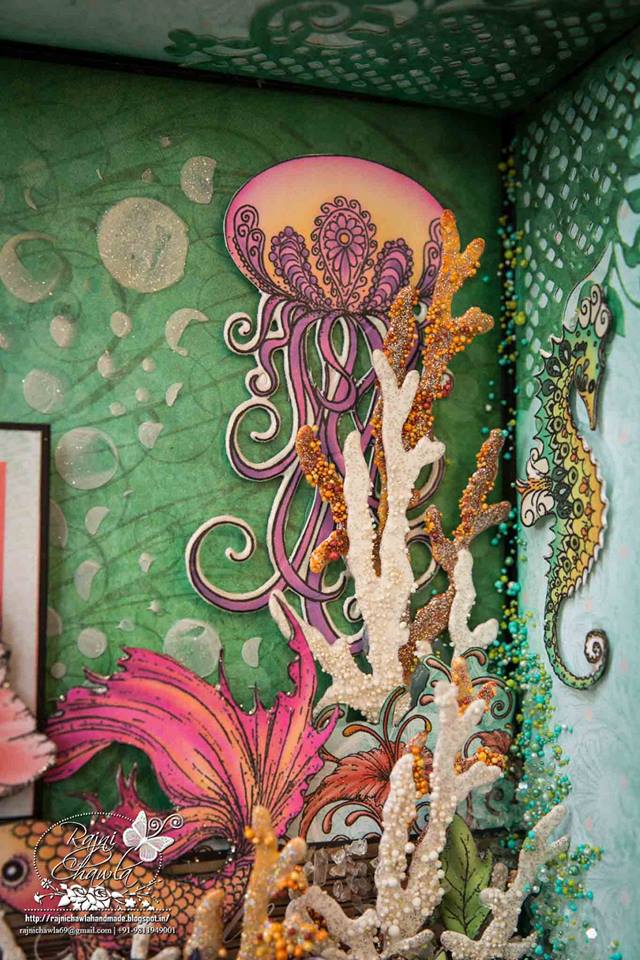
I used HC Leafy Branch Die to create corals. I heat embossed the cutouts with different shades of heat embossing powders and sprinkled prills when hot. You really have to be little quick here. You cam heat set them again if necessary.


12919194_10207807405879813_2077499391_n


TOP VIEW OF THE BOXED ALBUM WHEN OPENED...


I did a little bit of stenciling with texture paste using bubble stencil on all the sides and inside of the lid.
Can you peep inside the box?
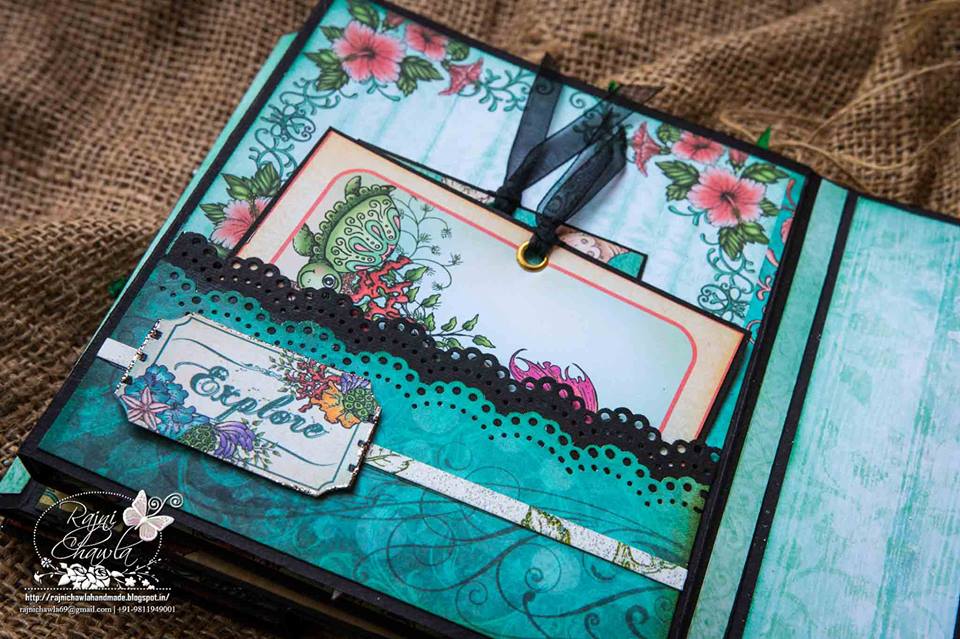
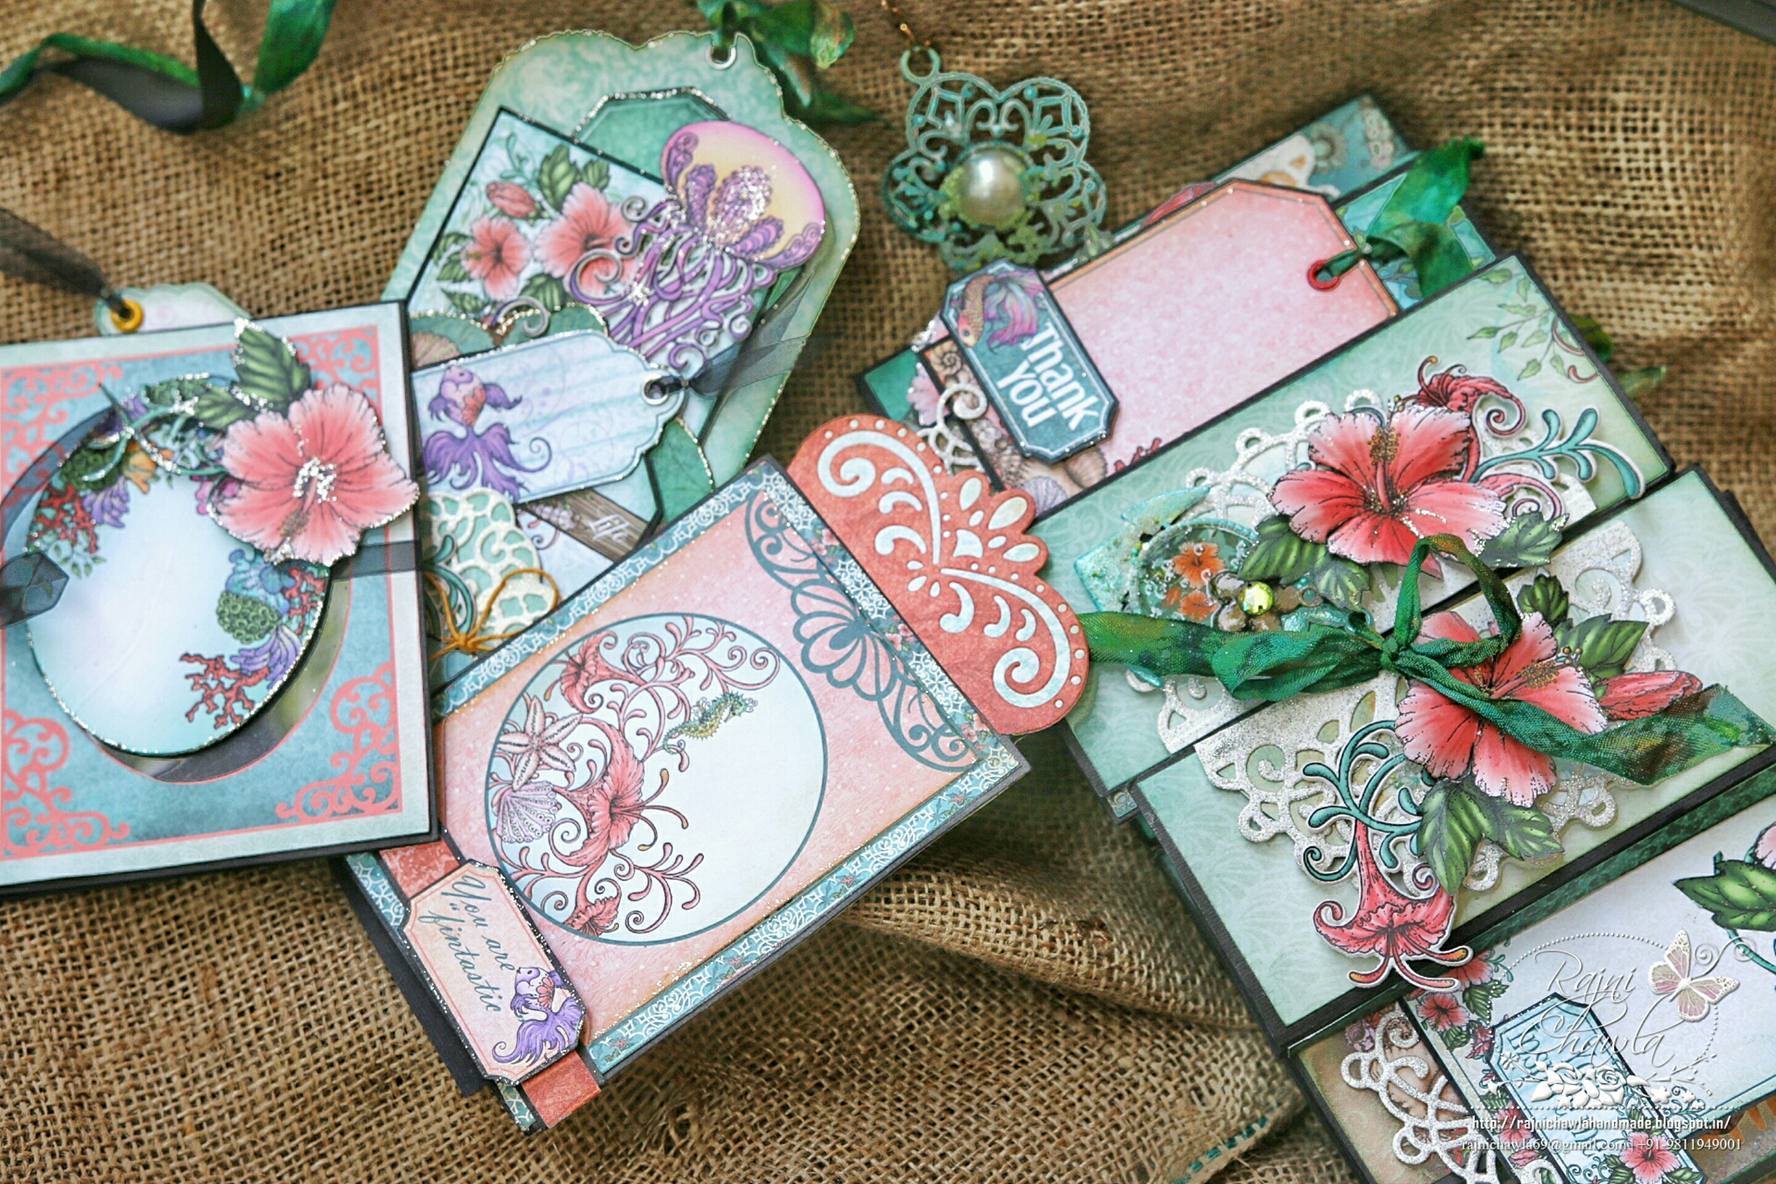
There is huge one more aquarium inside the lid with a huge magnetic pocket to hold all the fancy tags which can hold lots of photographs and messages. I designed a step fold mini album.

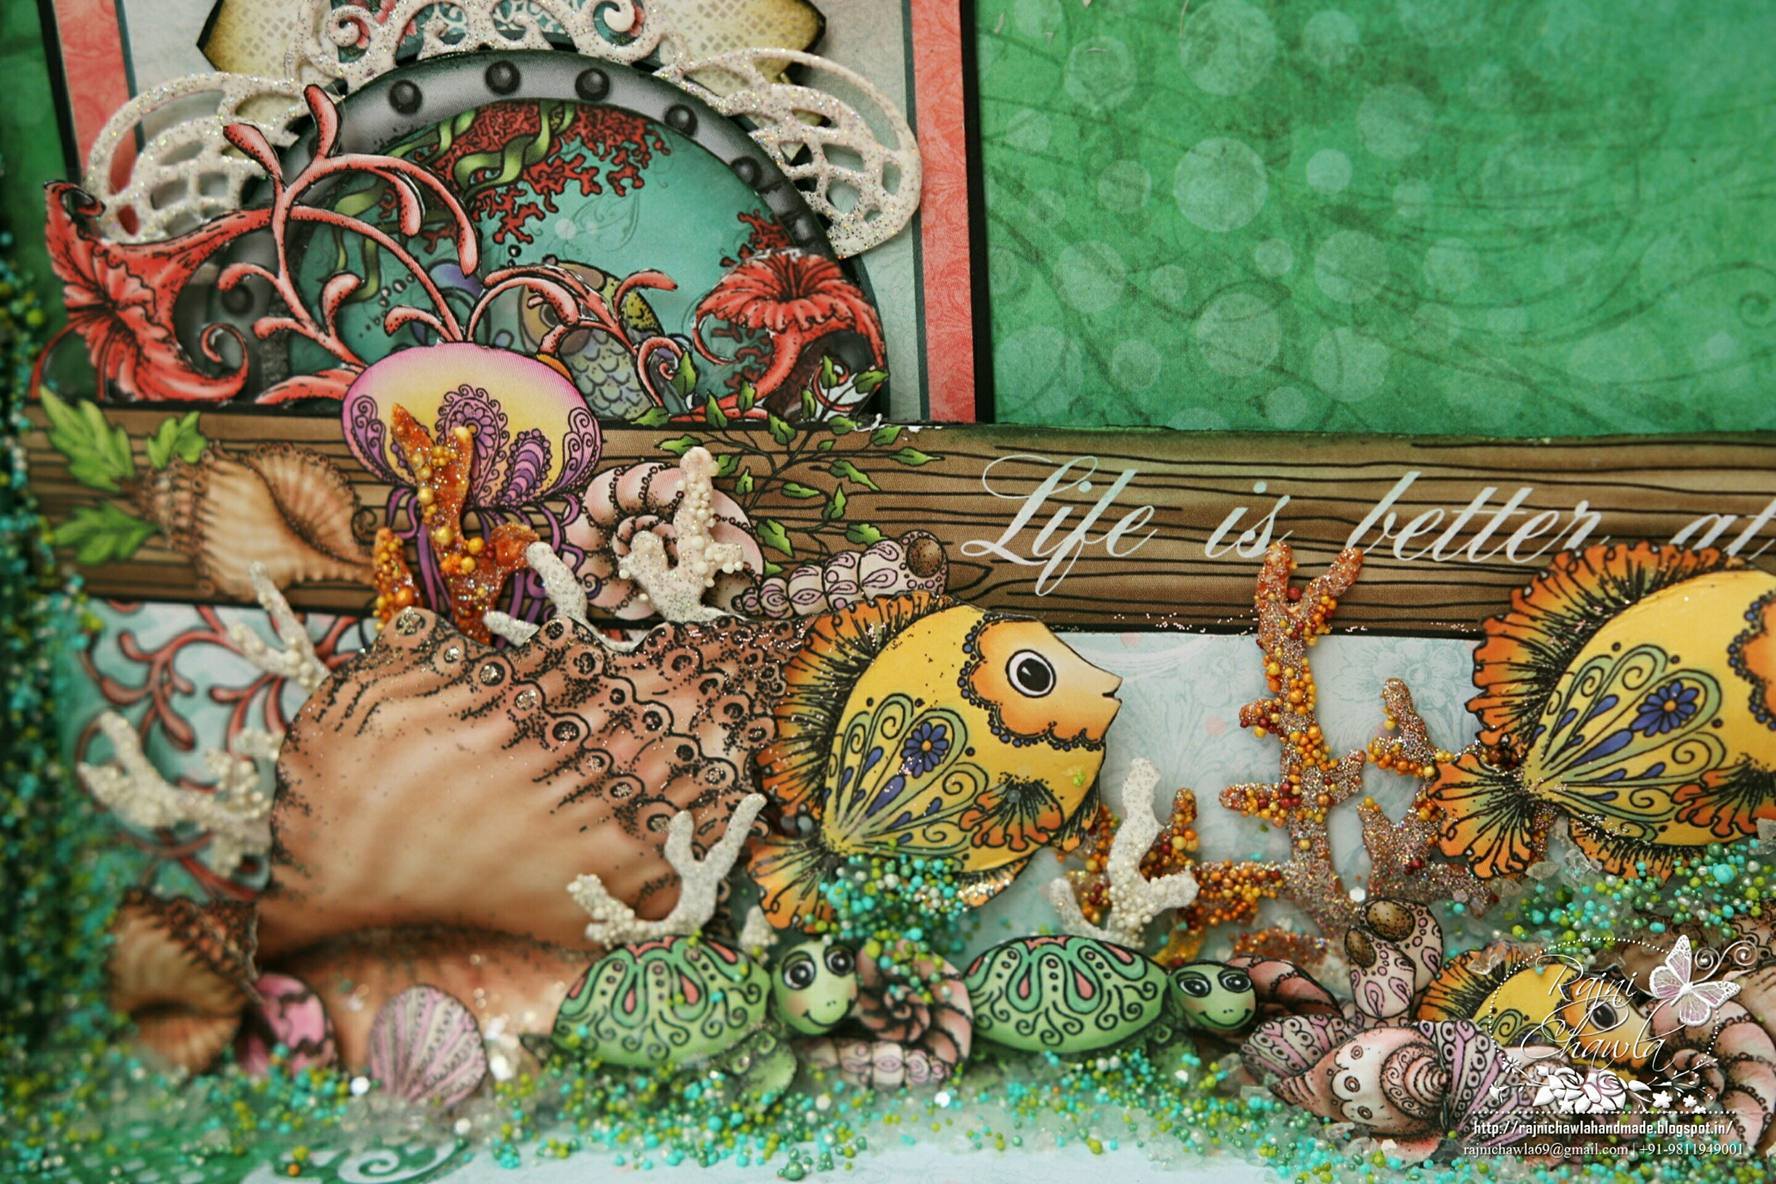
Instructions for the aquarium inside the lid: 

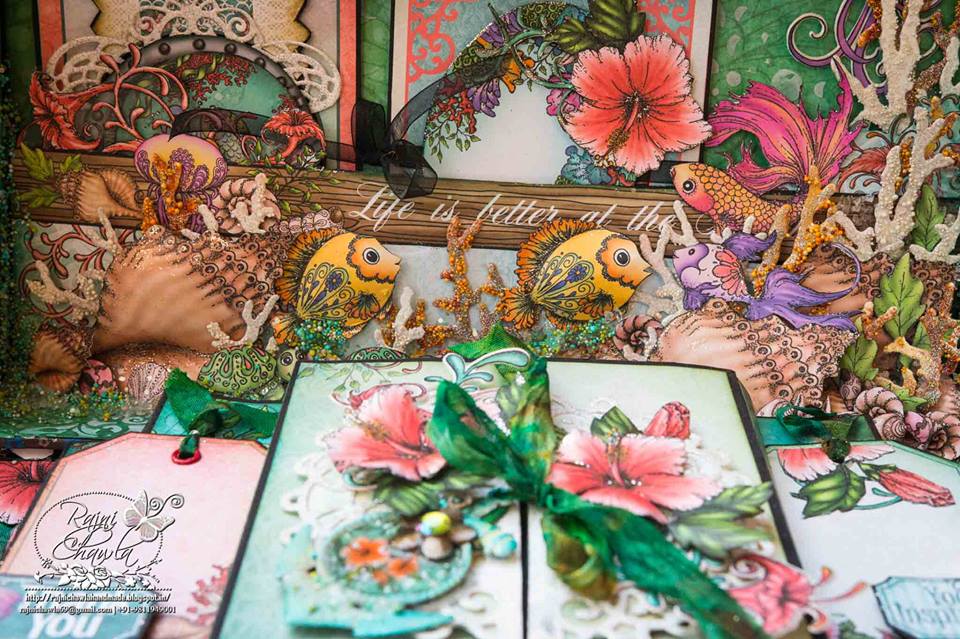
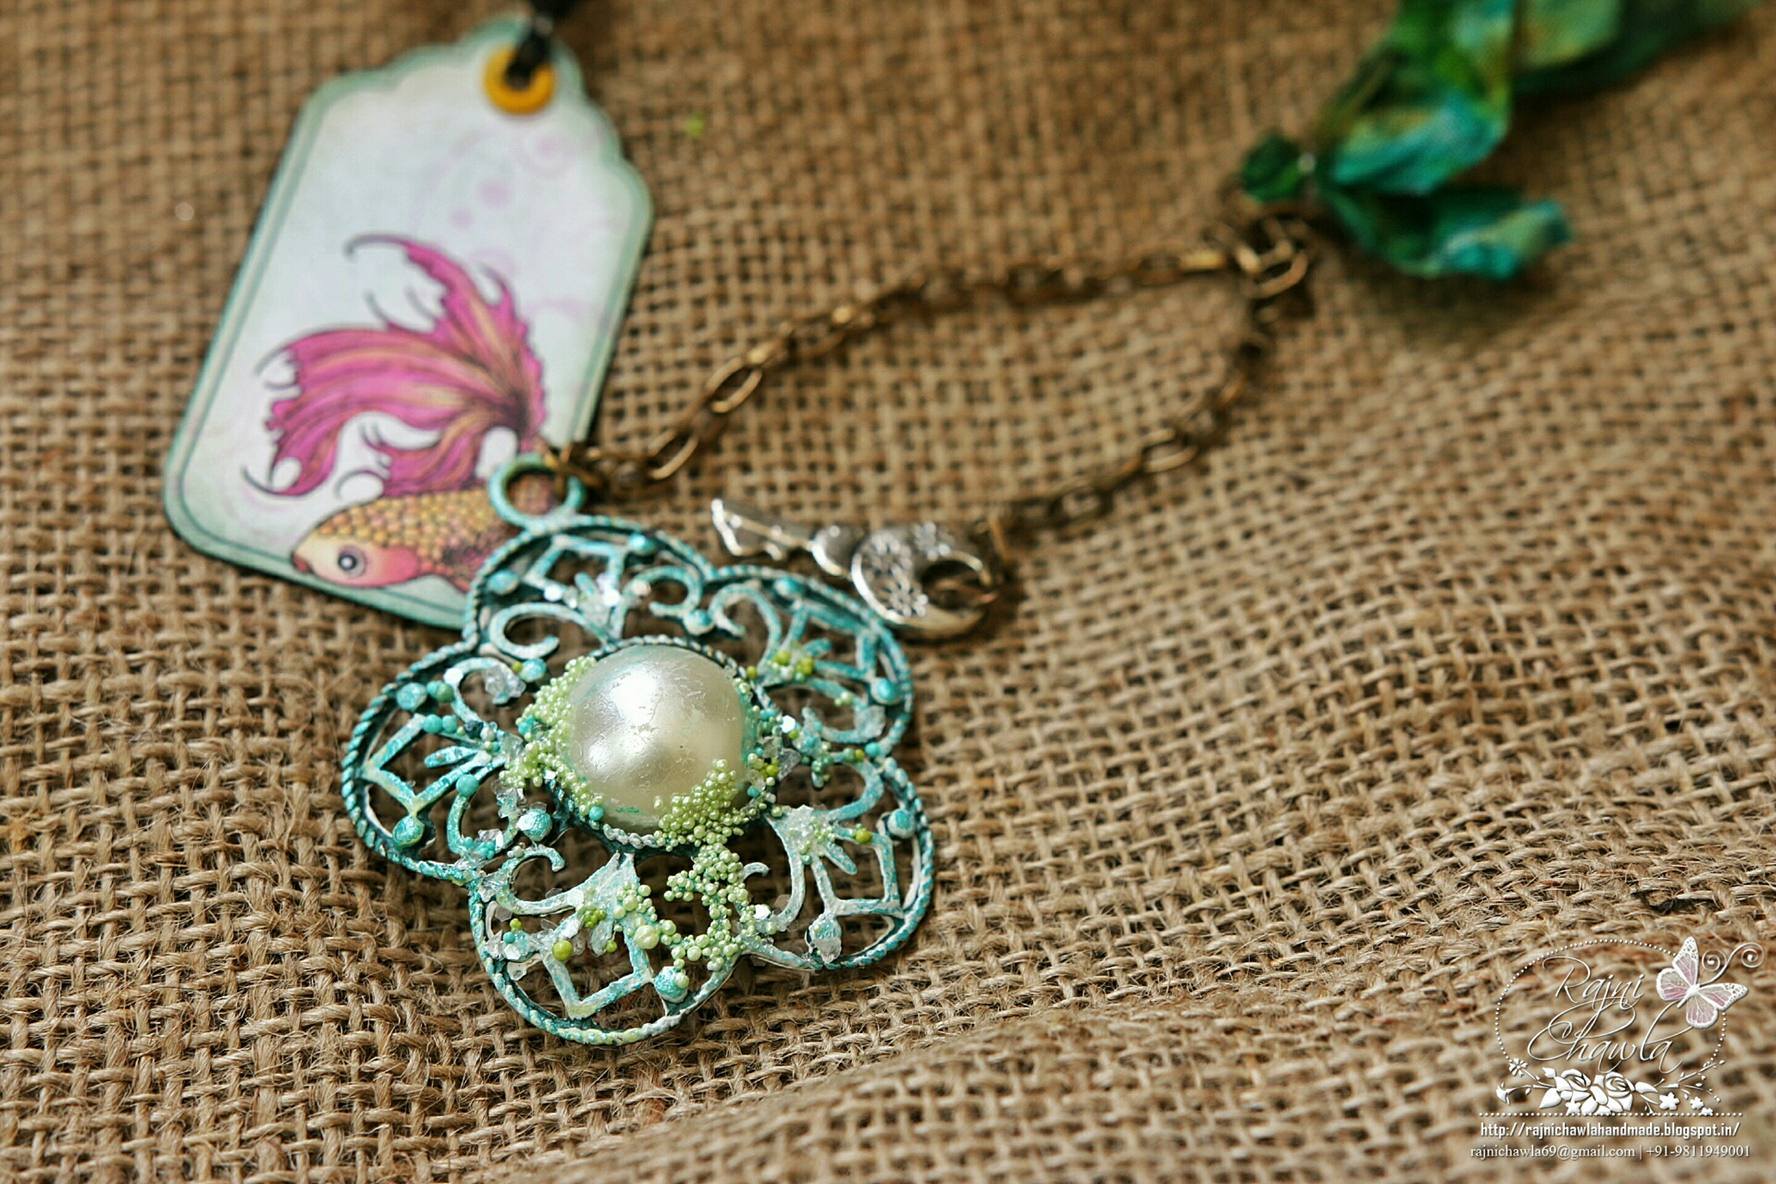
I made a huge magnetic pocket in the lid of the box which can hold lots of multi-fold tags and photo mats. All the tags and photo mats are magnetic so that they can stay stuck in place while opening the box. the whole 2 inches depth of lid is used to create different layers of an aquarium which is decorated with all fussy cut embellishments. All the embellishments were coated with the multi-medium matte to add extra strength. and also glittered using golden stickles.
12895498_10207807405479803_2066724429_n
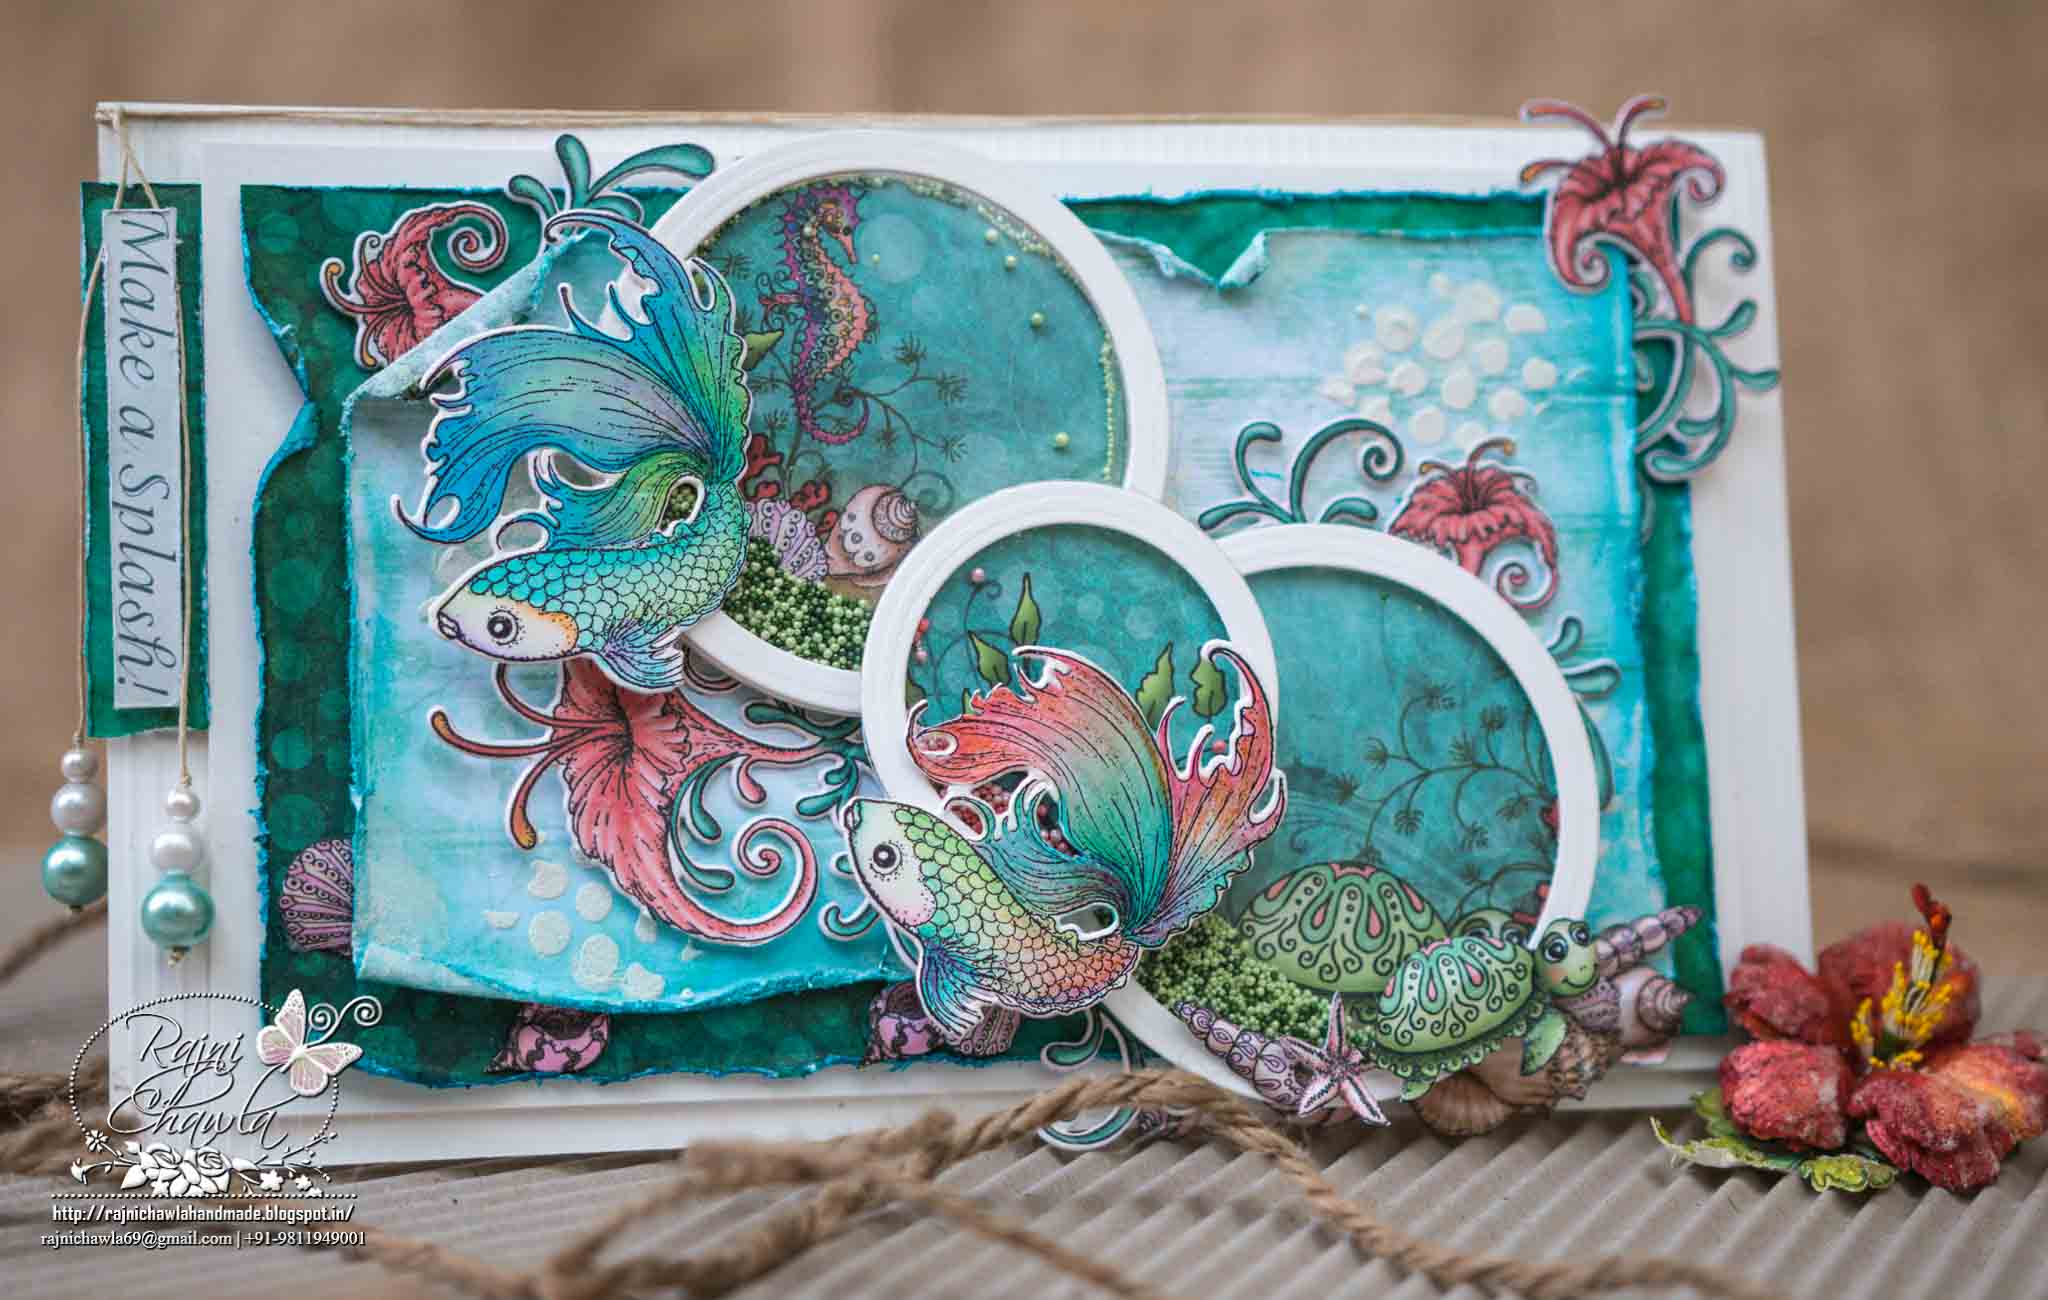
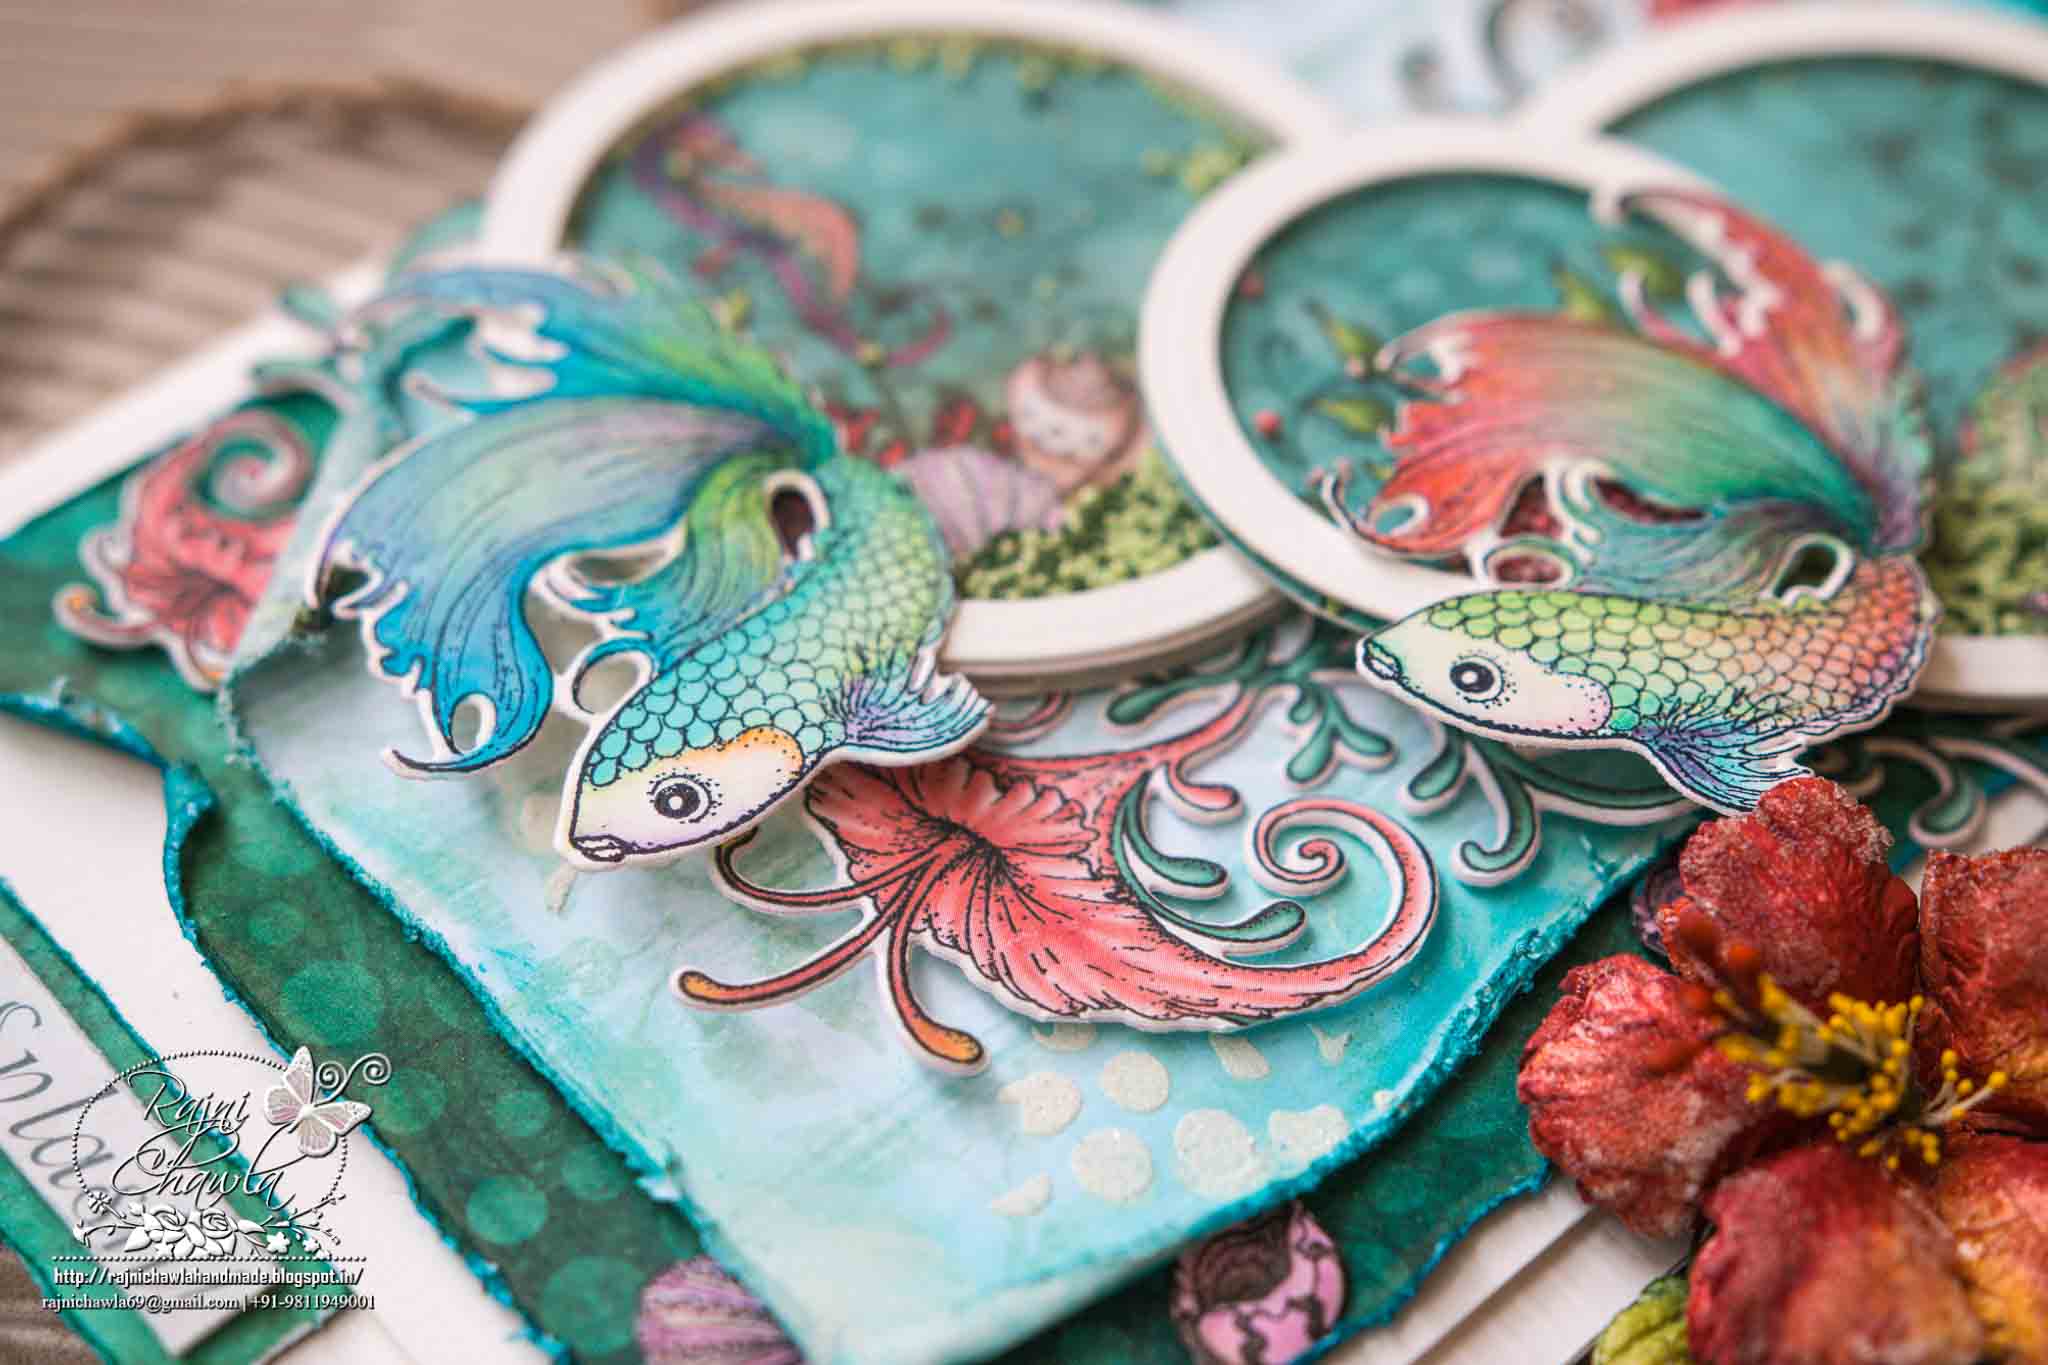
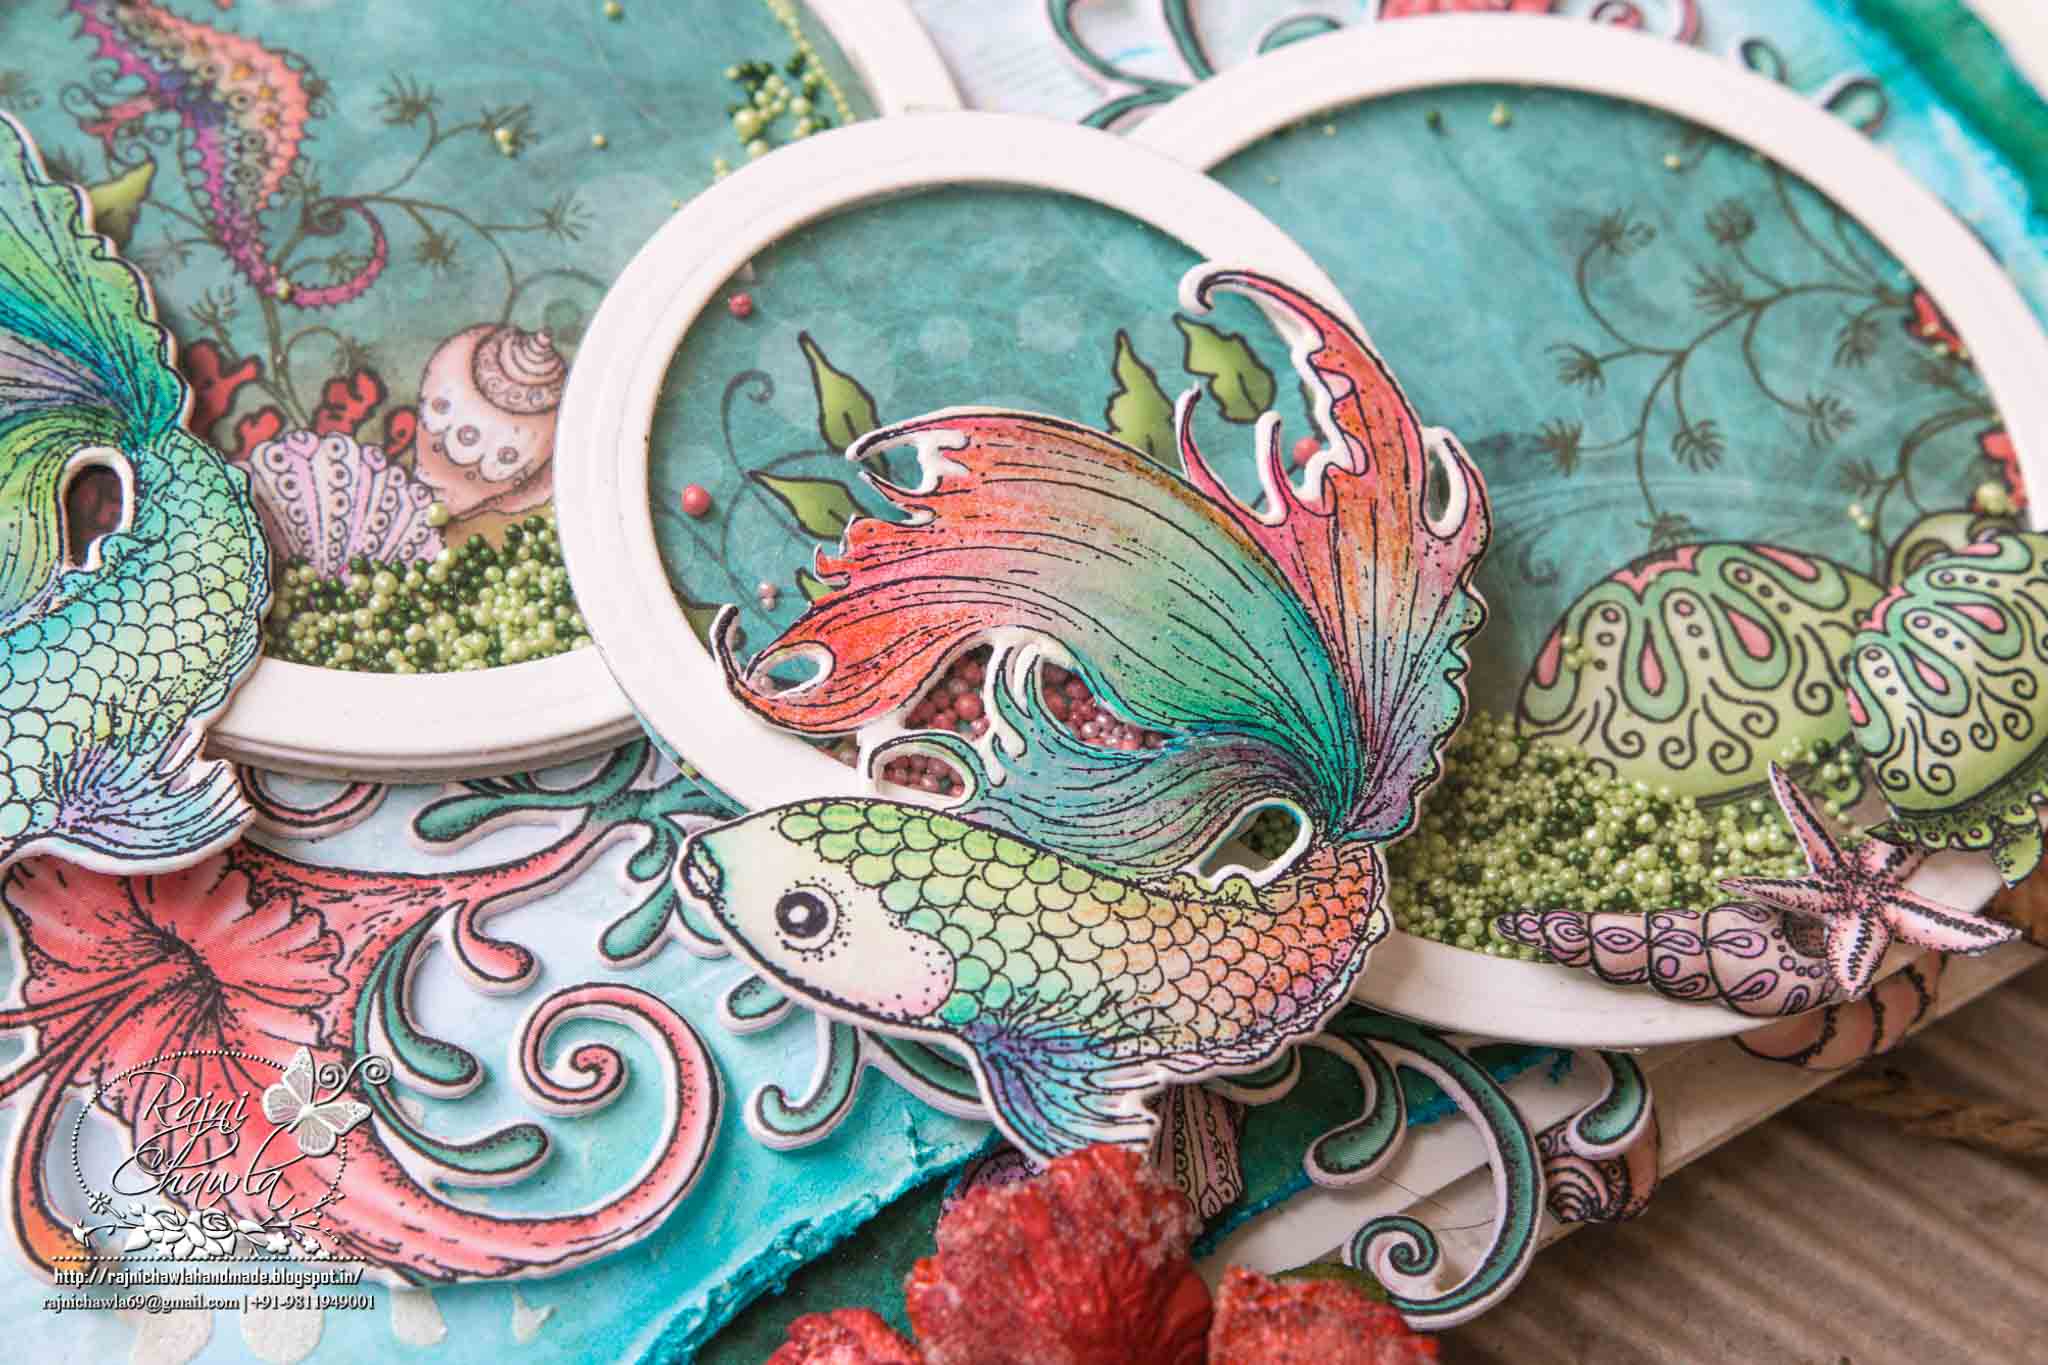
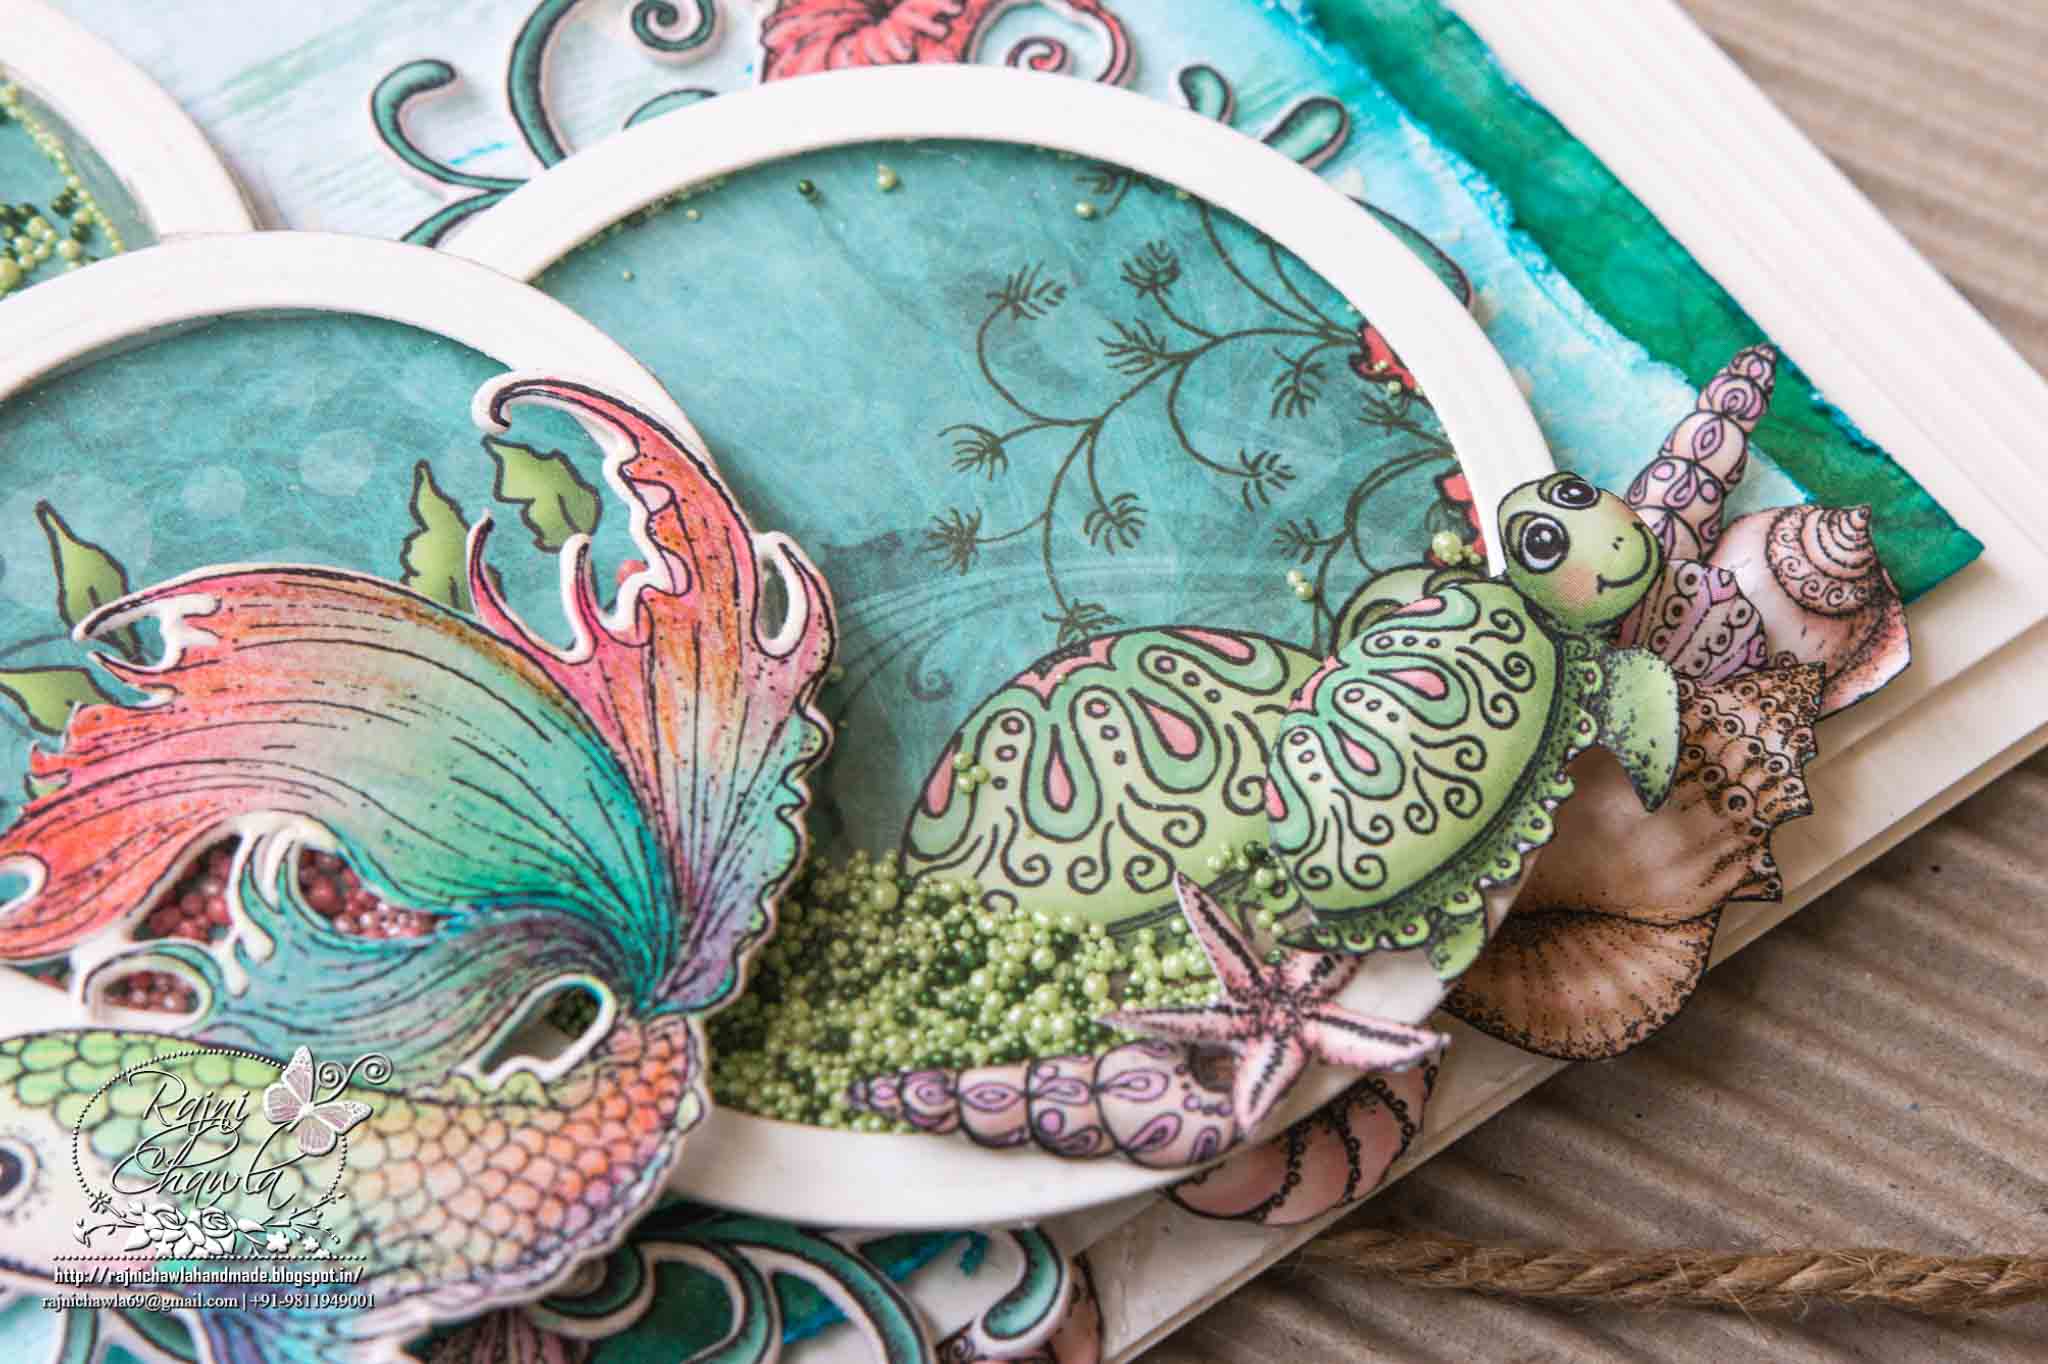
 Instructions of round aquarium inside the box:

This aquarium is simply fussy cut from the same gorgeous collection. Cut the separate layers and mount them on thick card stock. Stick an acetate to the back of top layer and  decorate the base layer using prills and fussy-cut shells. Now close the aquarium using 3-D foam tape.
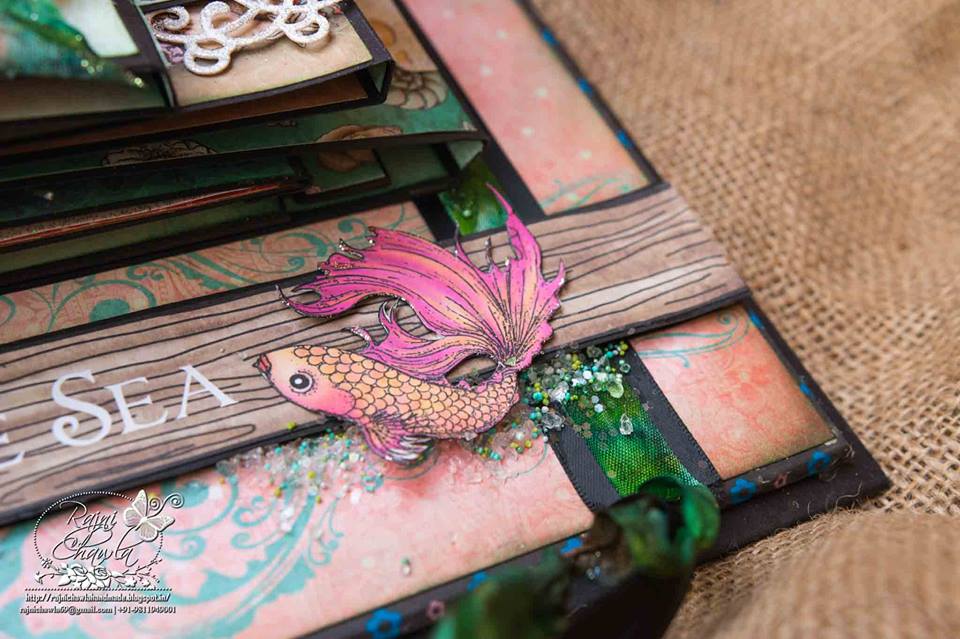
On the right side, I used fussy cut fish as an embellishment and decorated the base with prills, micro beads and glitters.

12920953_10207807405679808_675291803_n
INSIDE TOUR OF THE BOX ALONG WITH THE ALBUM DETAILS...

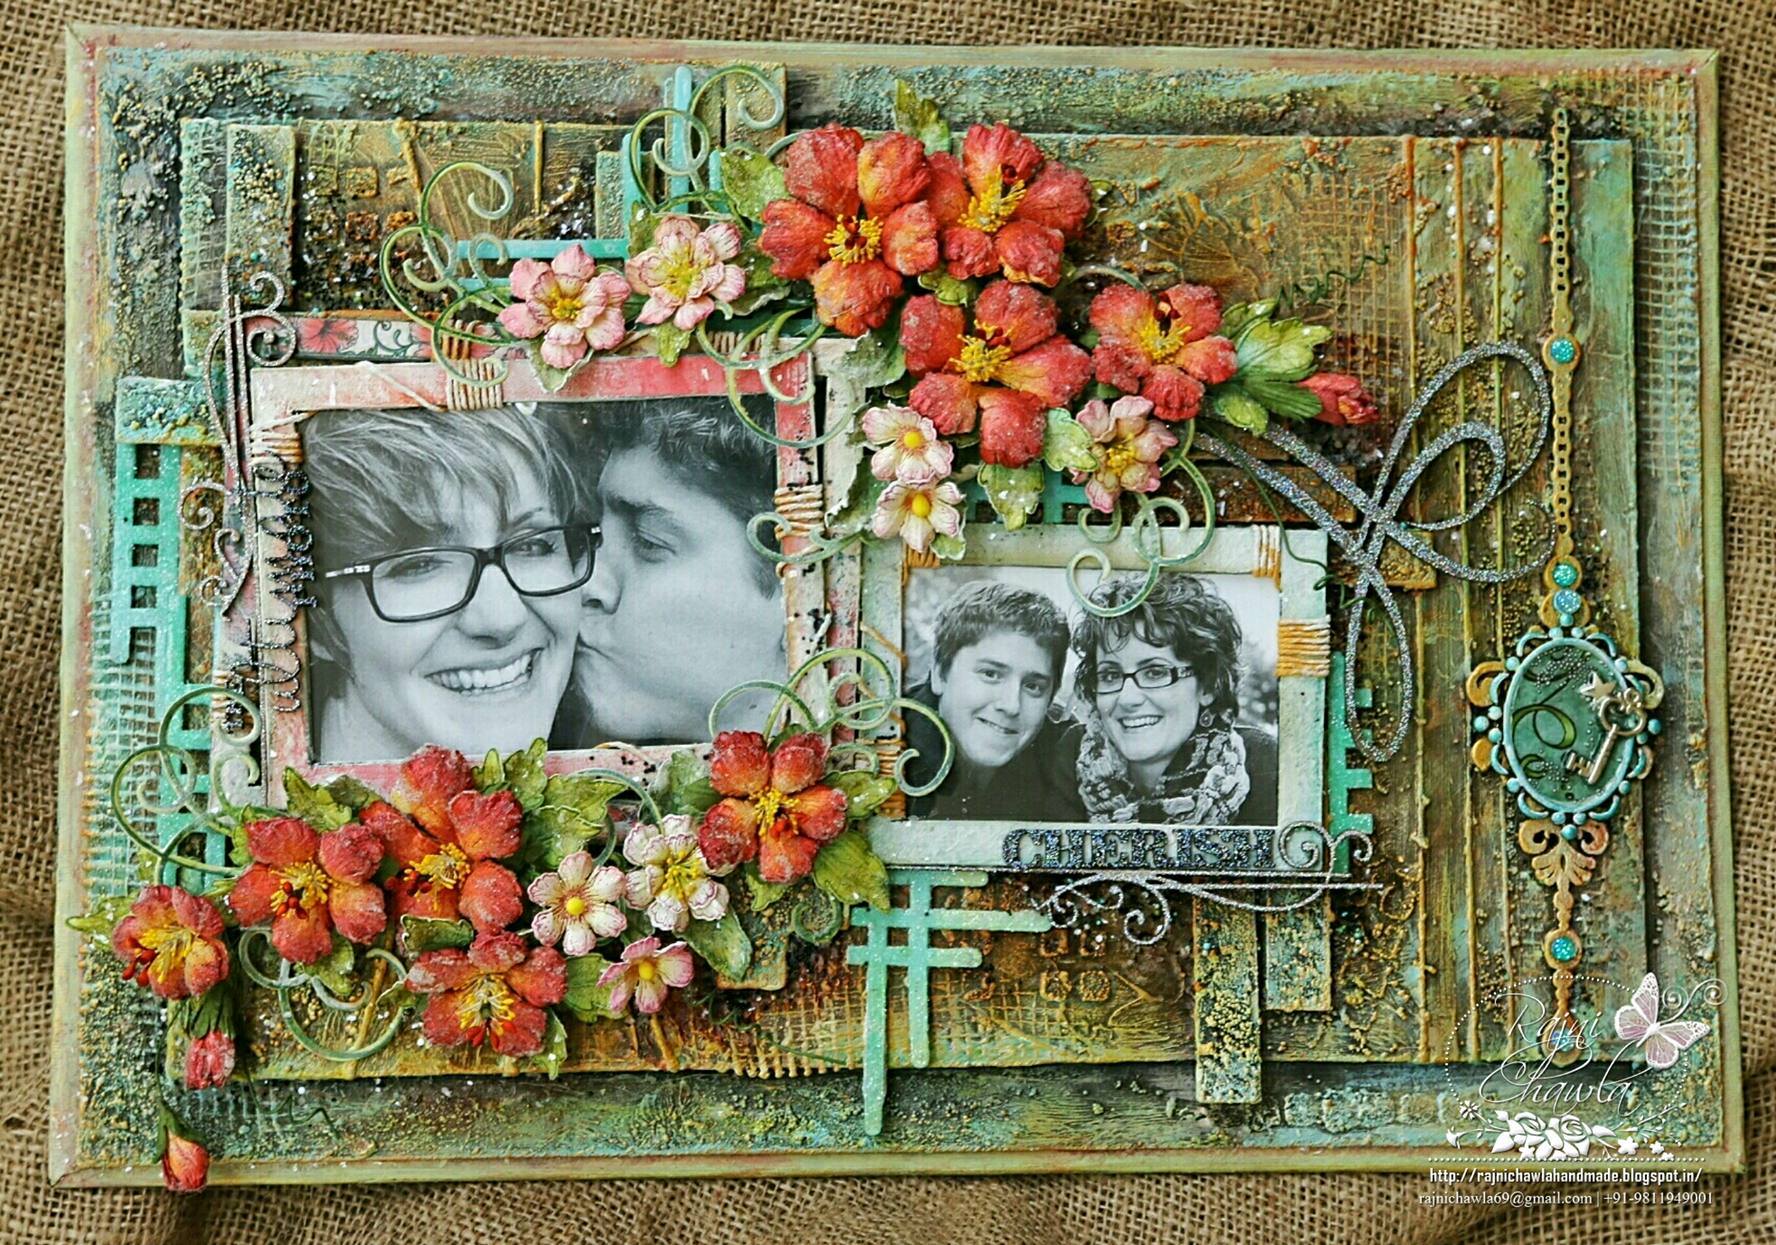
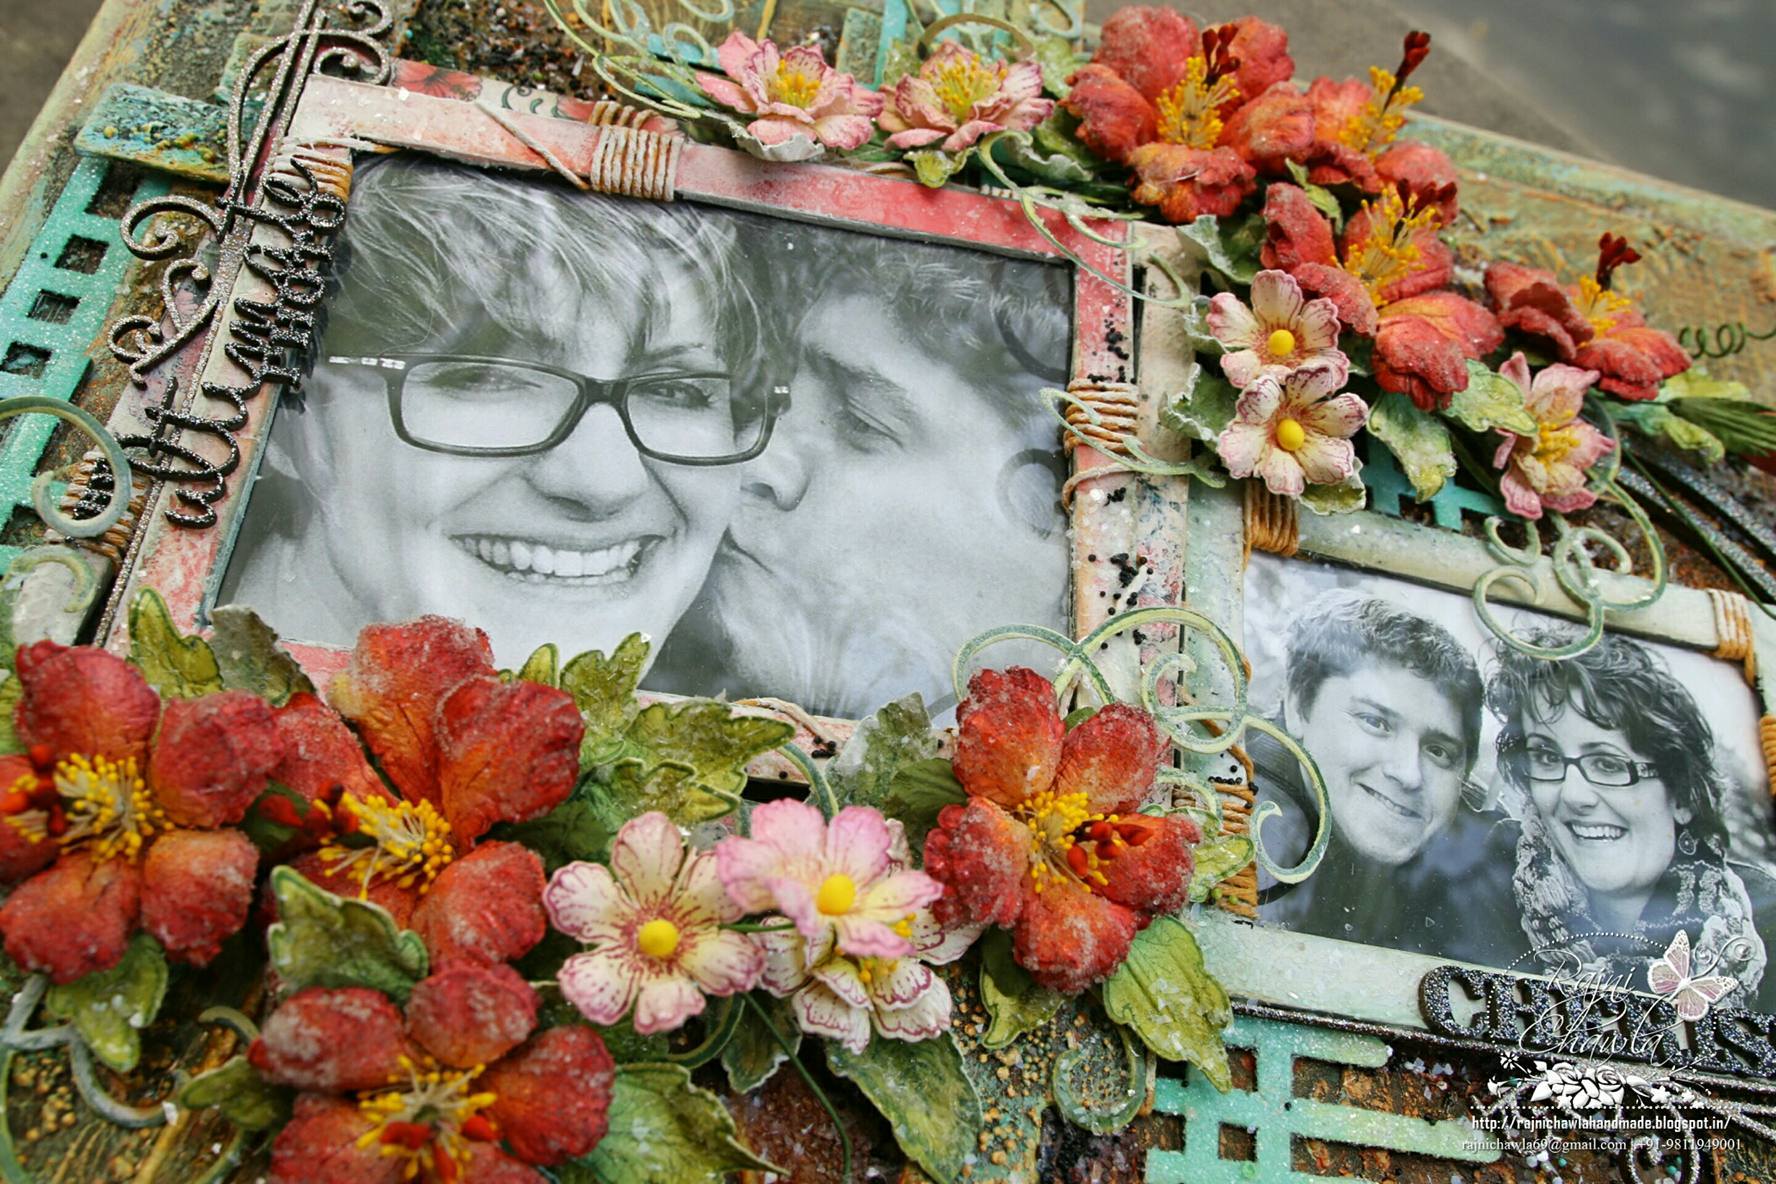
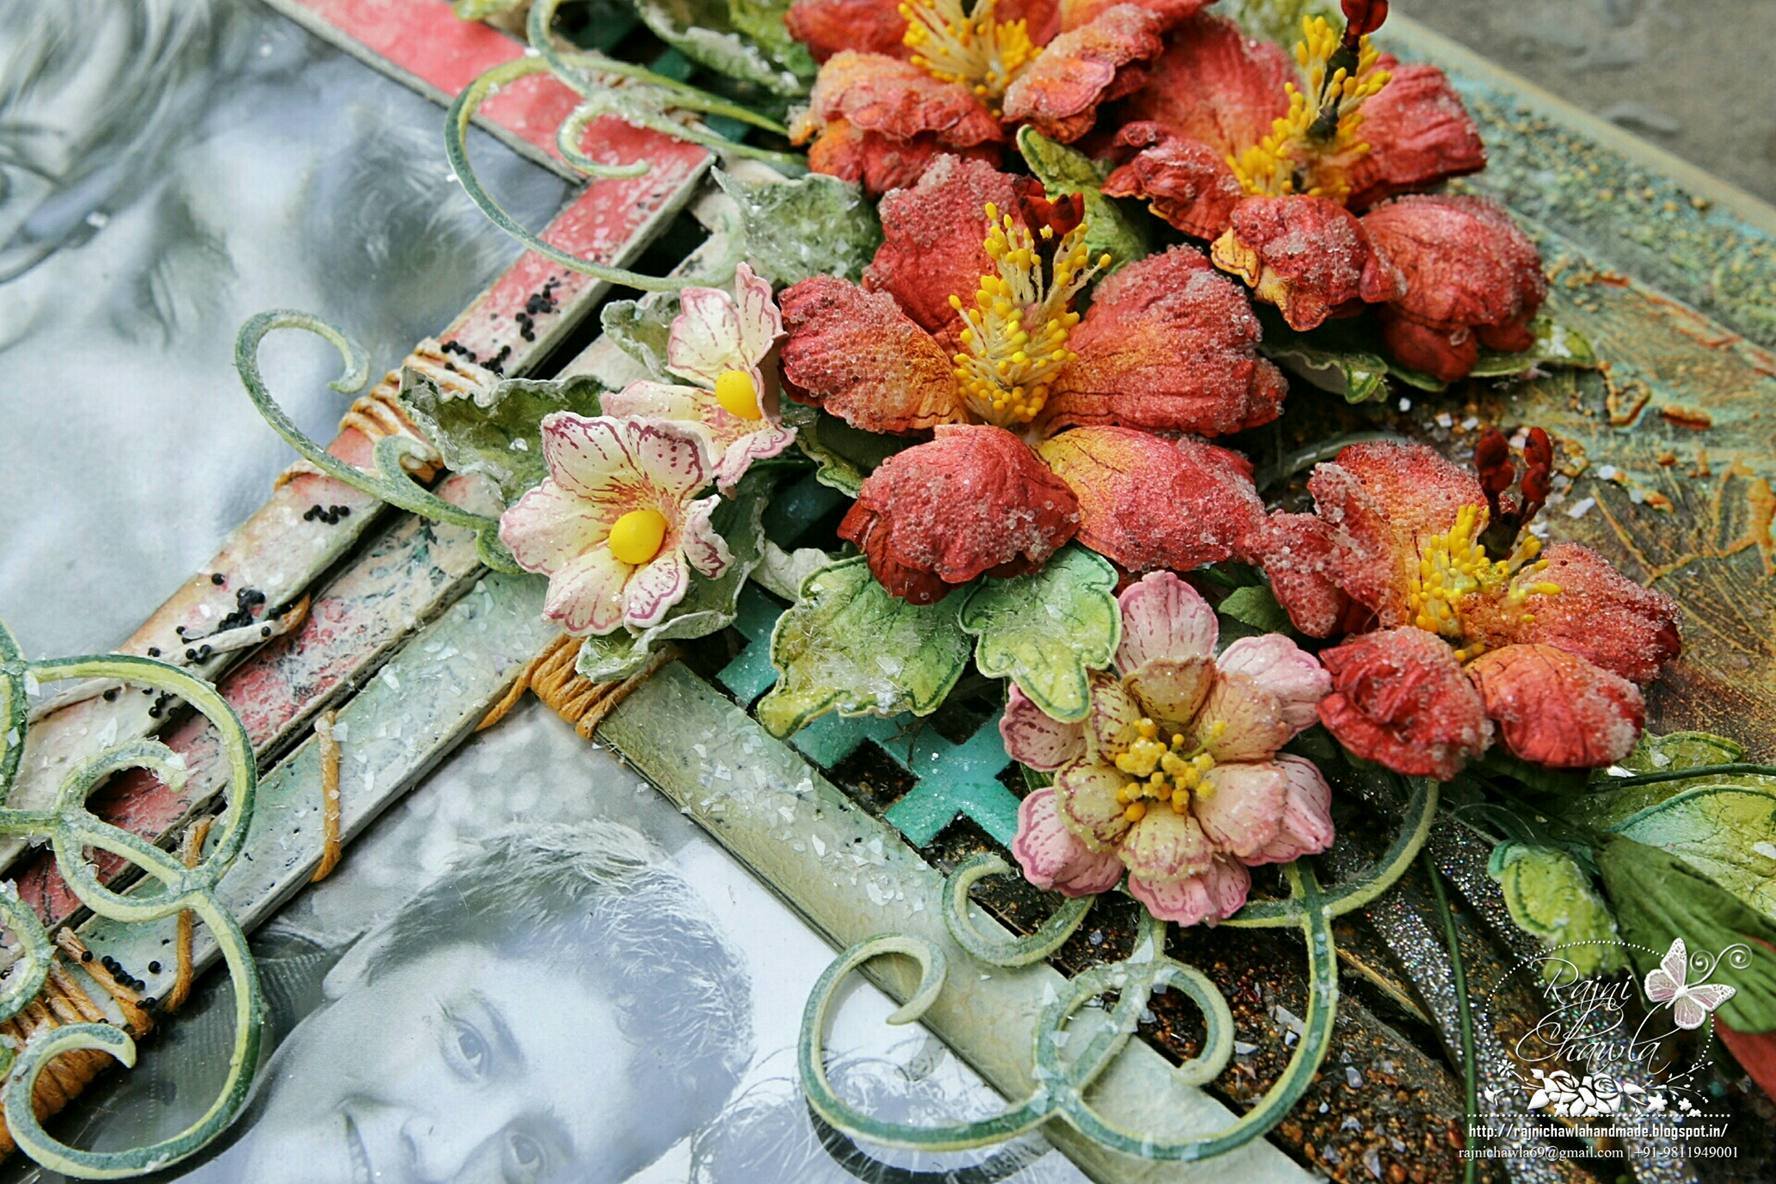
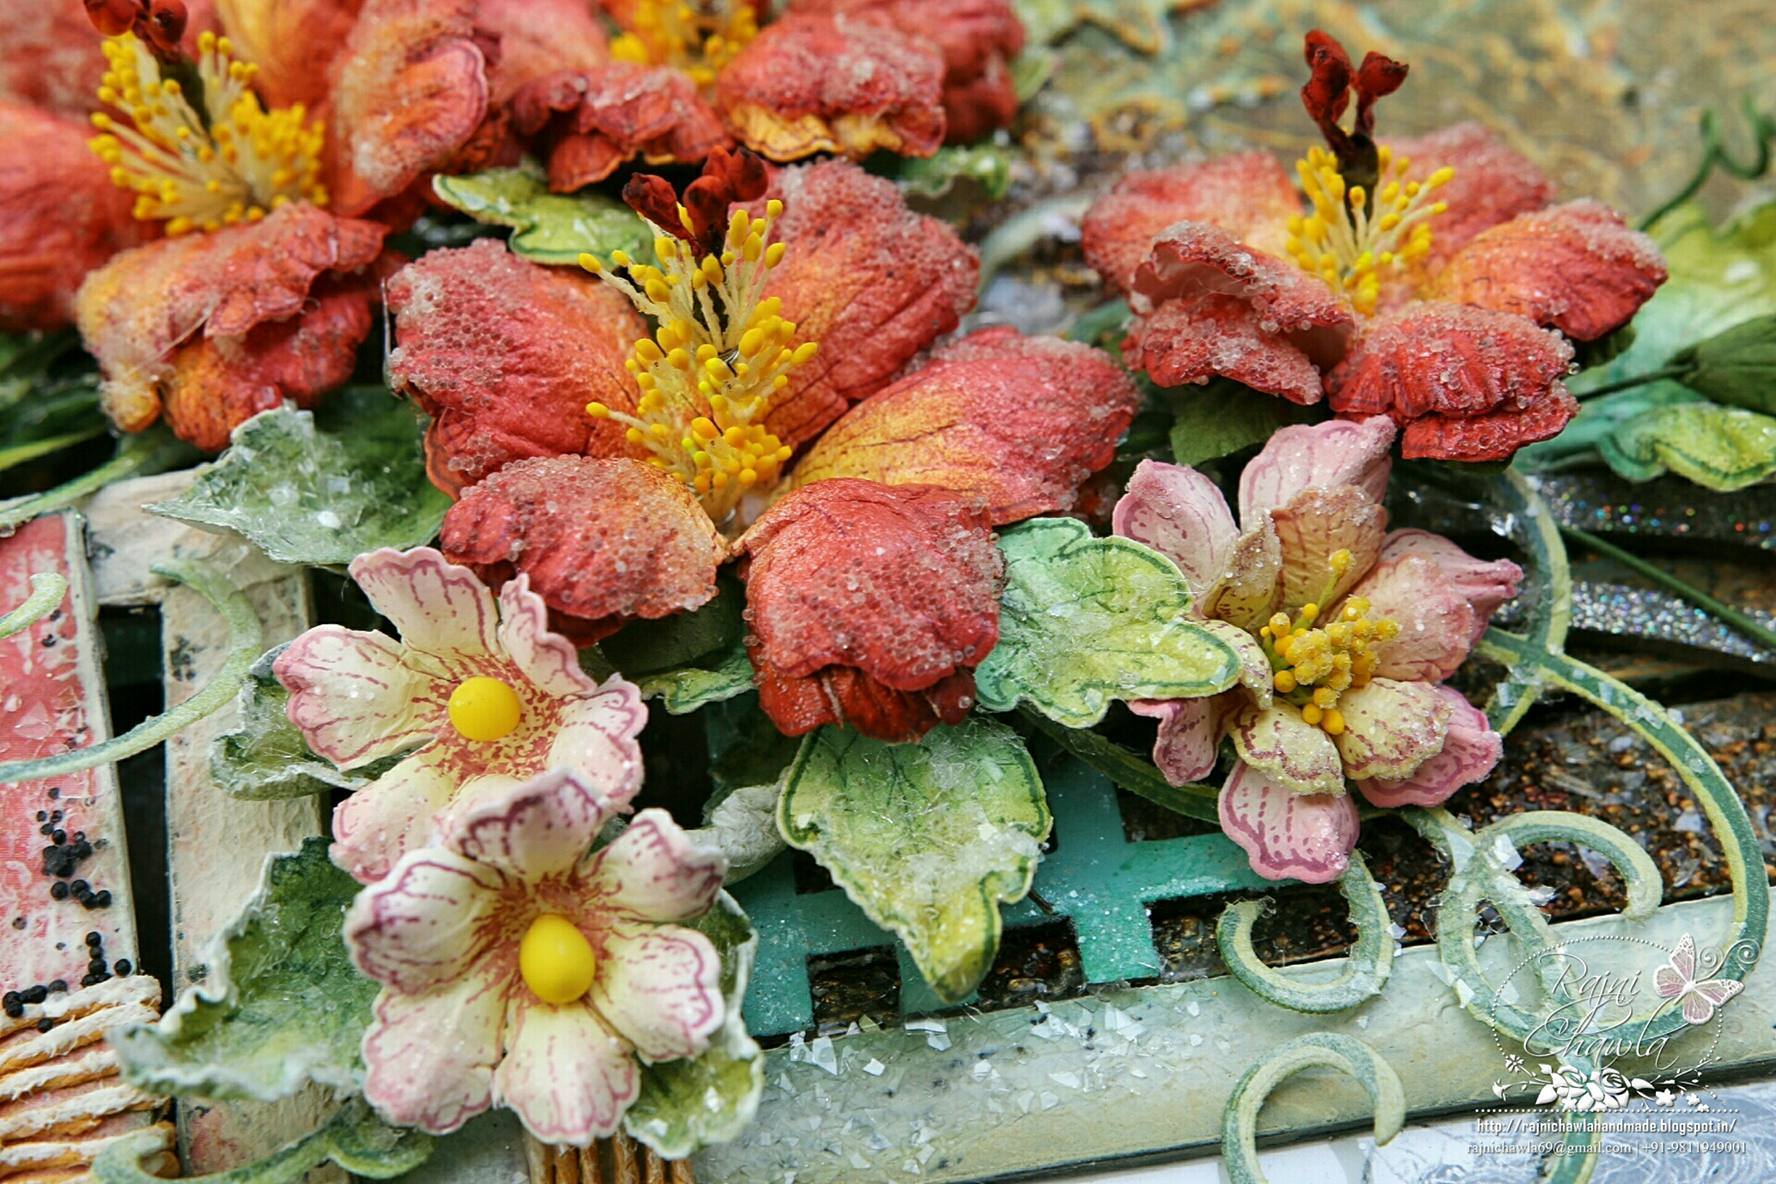
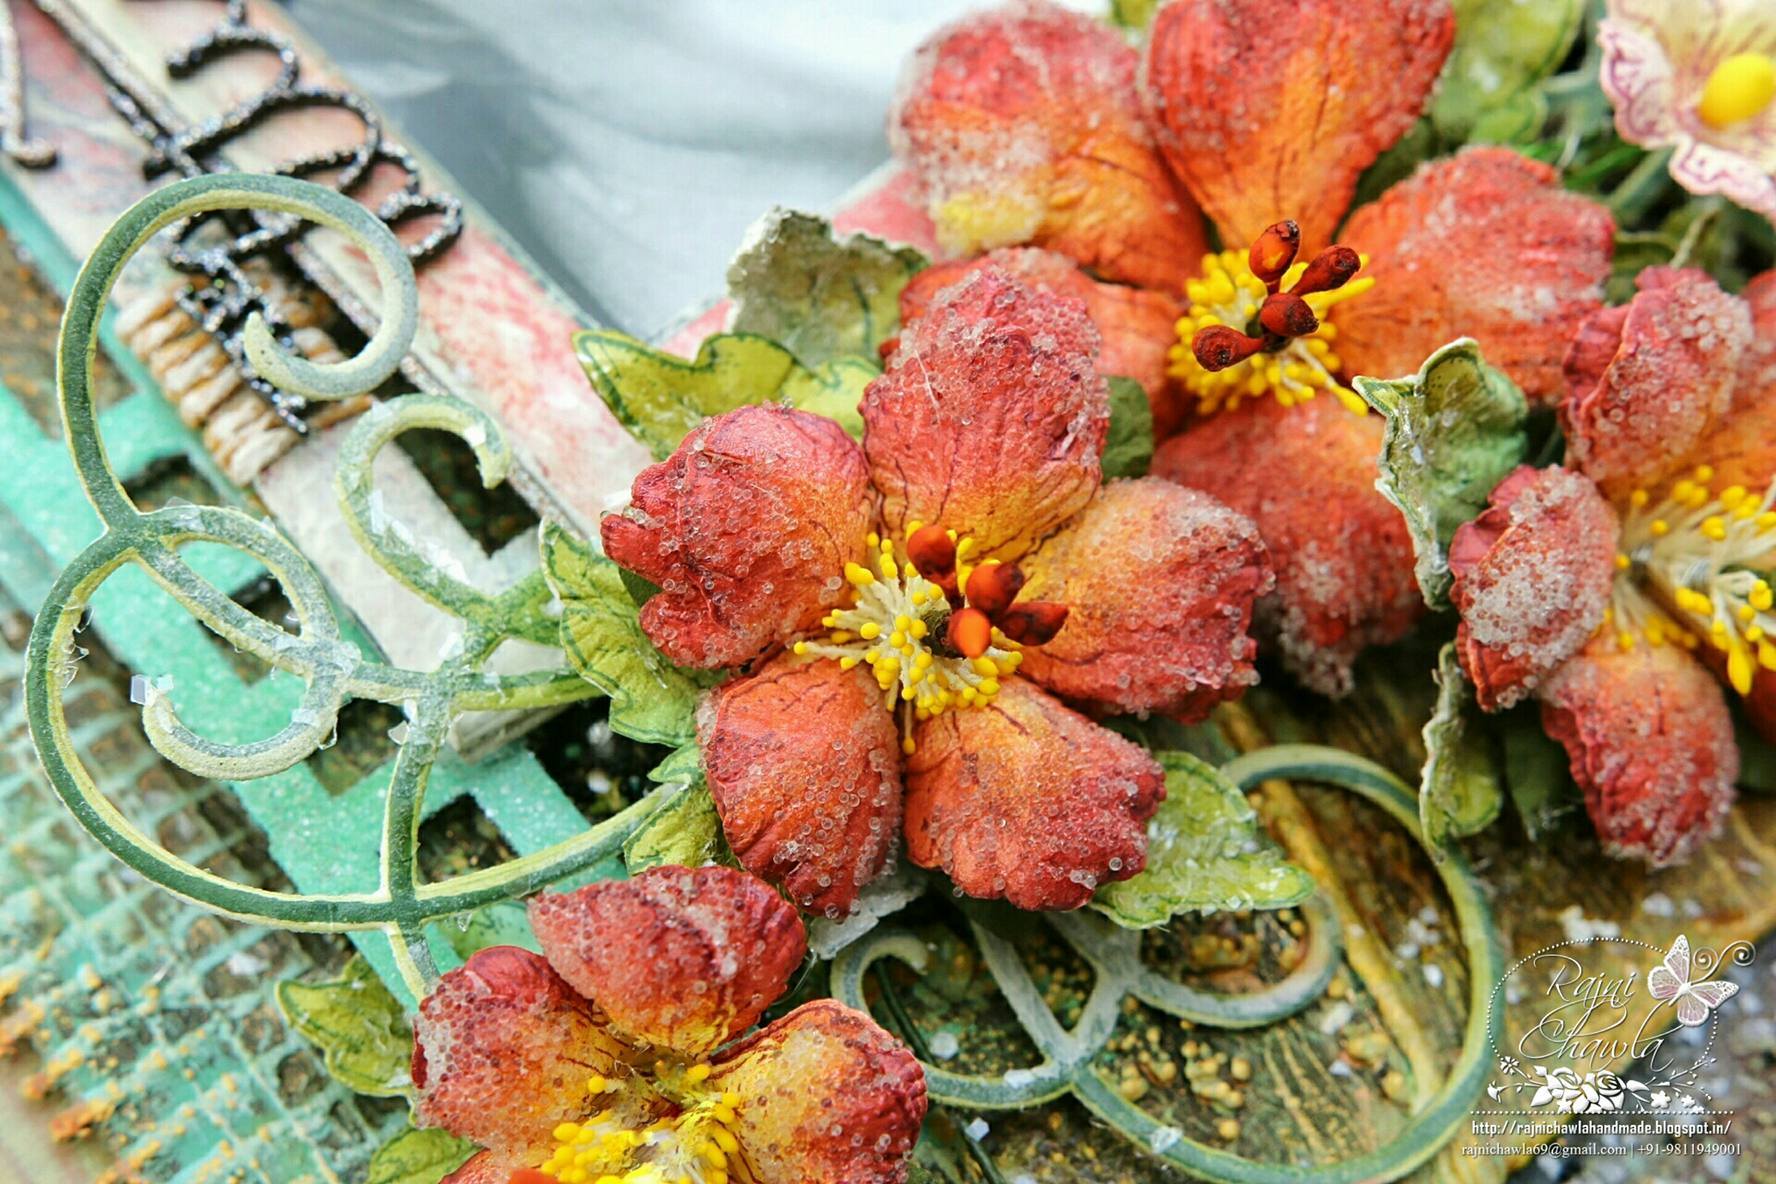
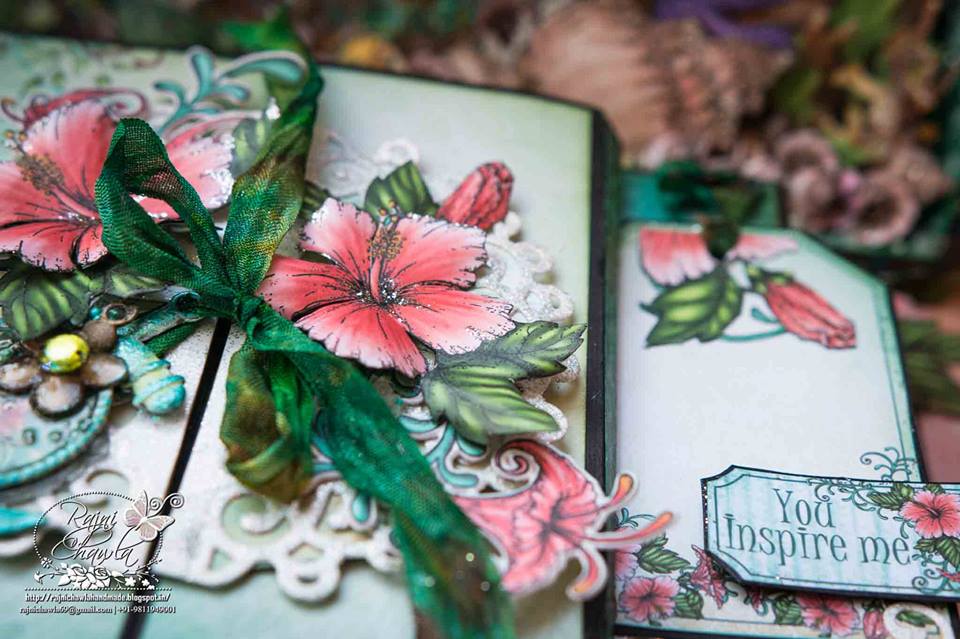
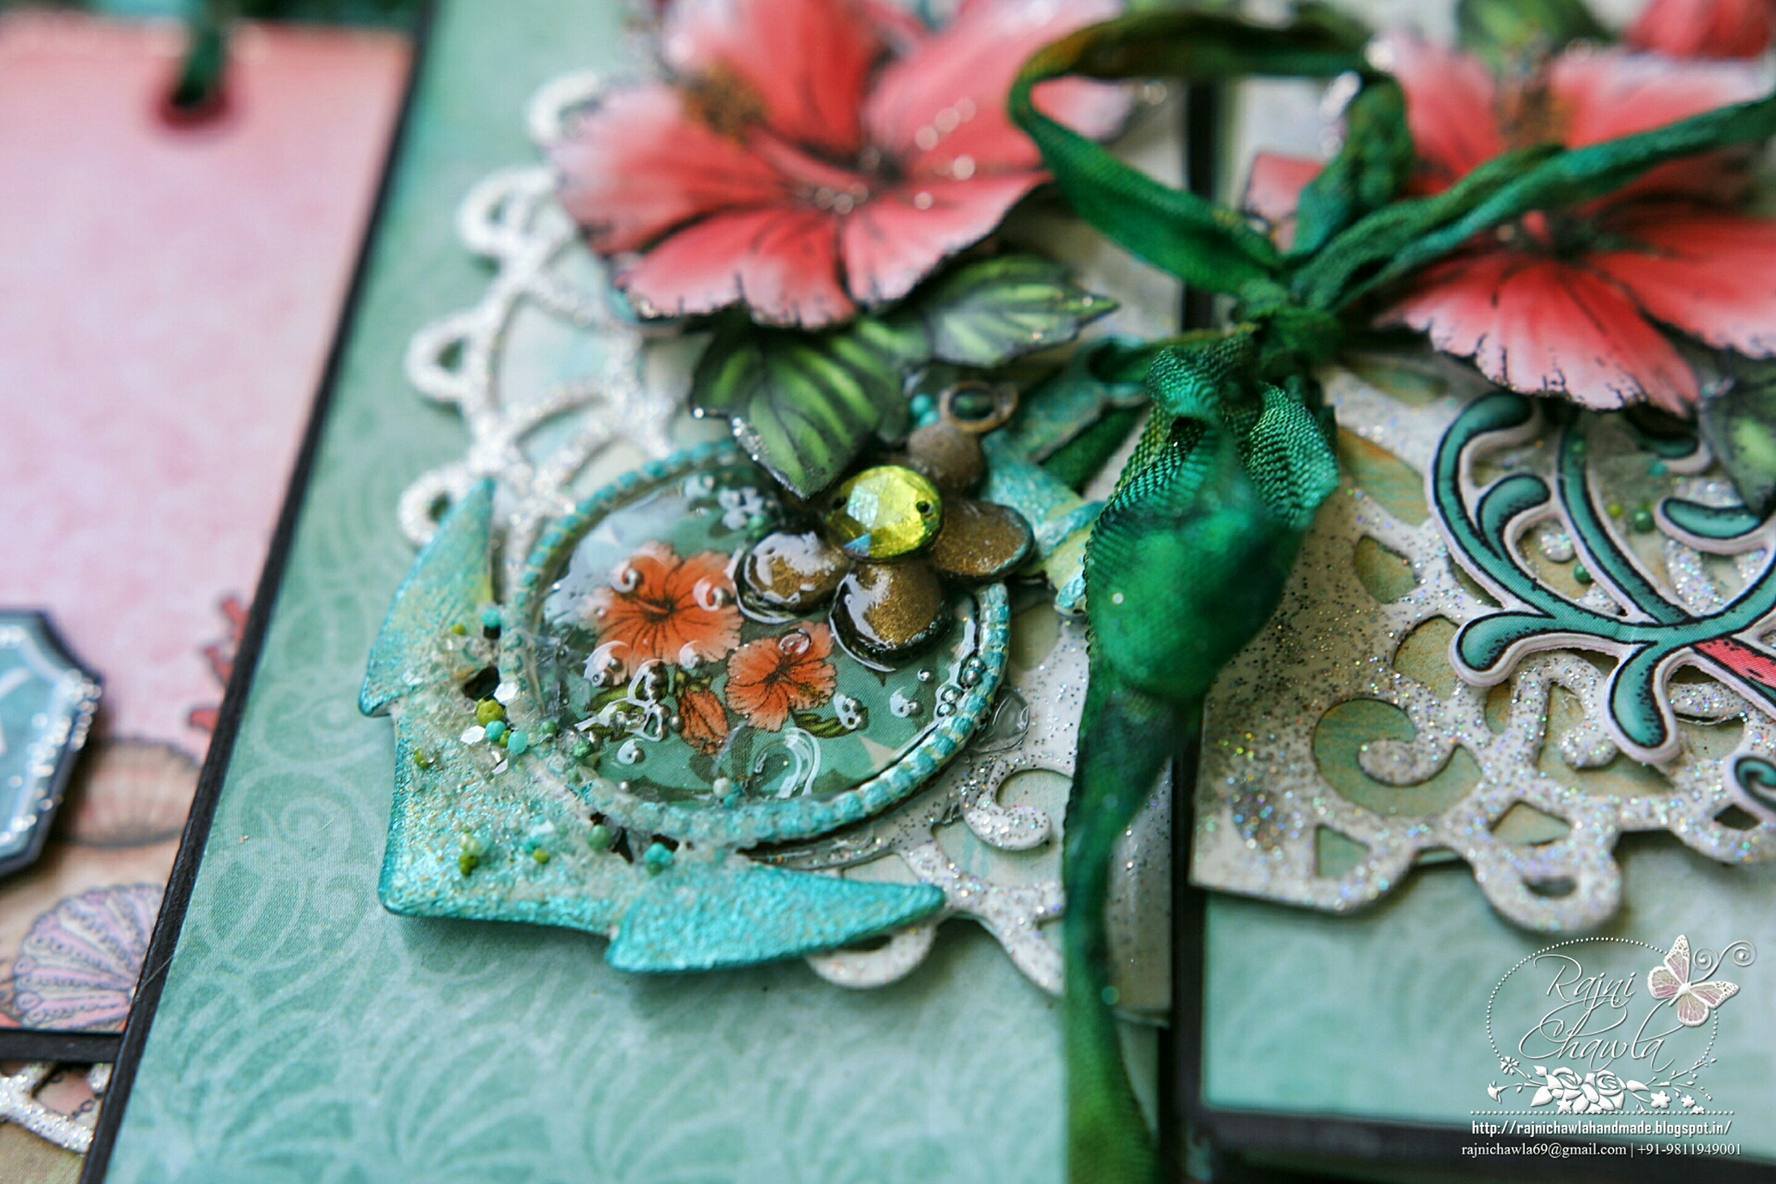
Flip Fold album in front...with beautiful fussy-cut Hibiscus, embellished with fussy cut Hibiscus flowers and a metal charm with the same blooming theme....a 3-dimensional aquarium in the lid of a box with a huge magnetic pocket holding lots of multifold tags. Oh...so much of work it was!! It really looked amazing to see those beautiful layers. I used the entire 2 inches depth of the lid for creating different layers of the aquarium.

12884483_10207807405399801_690711692_n

OPPSS....I forgot to take the side click showing all the layer.  This is the front view.

12899916_10207807405639807_193413055_n


12910782_10207807405599806_1010282471_n


12914856_10207839232035447_682626525_o

When the tags and album are all out ....

12903828_10207839234635512_277233611_o


A beautifully cut Octopus using Under the Sea Coral Die. I have used Fleur Border and Pocket Die on the corners.


12900080_10207807405719809_1529365178_n

ON TO THE ALBUM NOW...

The size pf the album is 10 inches by 5 3/4 inch. Since I wanted to add lots of folds and extra embellishments inside the album I followed Heartfelt Creations Pocket and Flip fold inserts Pocket A and customized my own 2 pieces keeping an extra hinge of half an inch between all the folds.  The album is decorated using panels from the same collection.

Instructions for the construction of album:
The size pf the album is 10 inches by 5 3/4 inches Since I wanted to add lots of folds and extra embellishments inside the album I followed Heartfelt Creations Pocket and Flip fold inserts Pocket A and customized my own 2 pieces keeping an extra hinge of half an inch between all the folds.
You will need one piece of black chip board measuring 10" x 5 3/4" for the base. For the rest, you can use anything, chip board or thick black stock. I prefer using chipboard as it makes the album more sturdy. If using chipboard, you will need 2 pcs of 5' x 5 3/4' (one each for right and left panels), 4 pcs of 3 3/4' X 5 3/4' (2 pcs each for both right and left panels),4 pcs of 2 ½’’ x  5 ¾’’ (2 pcs each for both right and left panels)  and 10 pcs of hinges with black cardstock measuring 1 ½’ x 5 ¾’ neatly scored at  ½’’ and 1’’ ( 5 pcs each for right and left panel. Now separate all the pieces for both panels. Adhere red tacky tape on both the outer sides of all the hinges. Take out releasing paper of one side of the hinge and stick to the left side of chipboard piece that we have cut for the base and the other side of the hinge to 5' x 5 3/4'. Now stick another hinge to the same piece on the same side and stick 3 3/4' X 5 3/4' . Again attach a hinge to the same and stick the second piece of 3 3/4' X 5 3/4'. Continue using rest of the 2 pcs measuring 2 ½’’ x  5 ¾’’ in the same way. If it seems little confusing do check the picture of an opened album on my blog or take the reference of HC Flip fold inserts Pocket A.
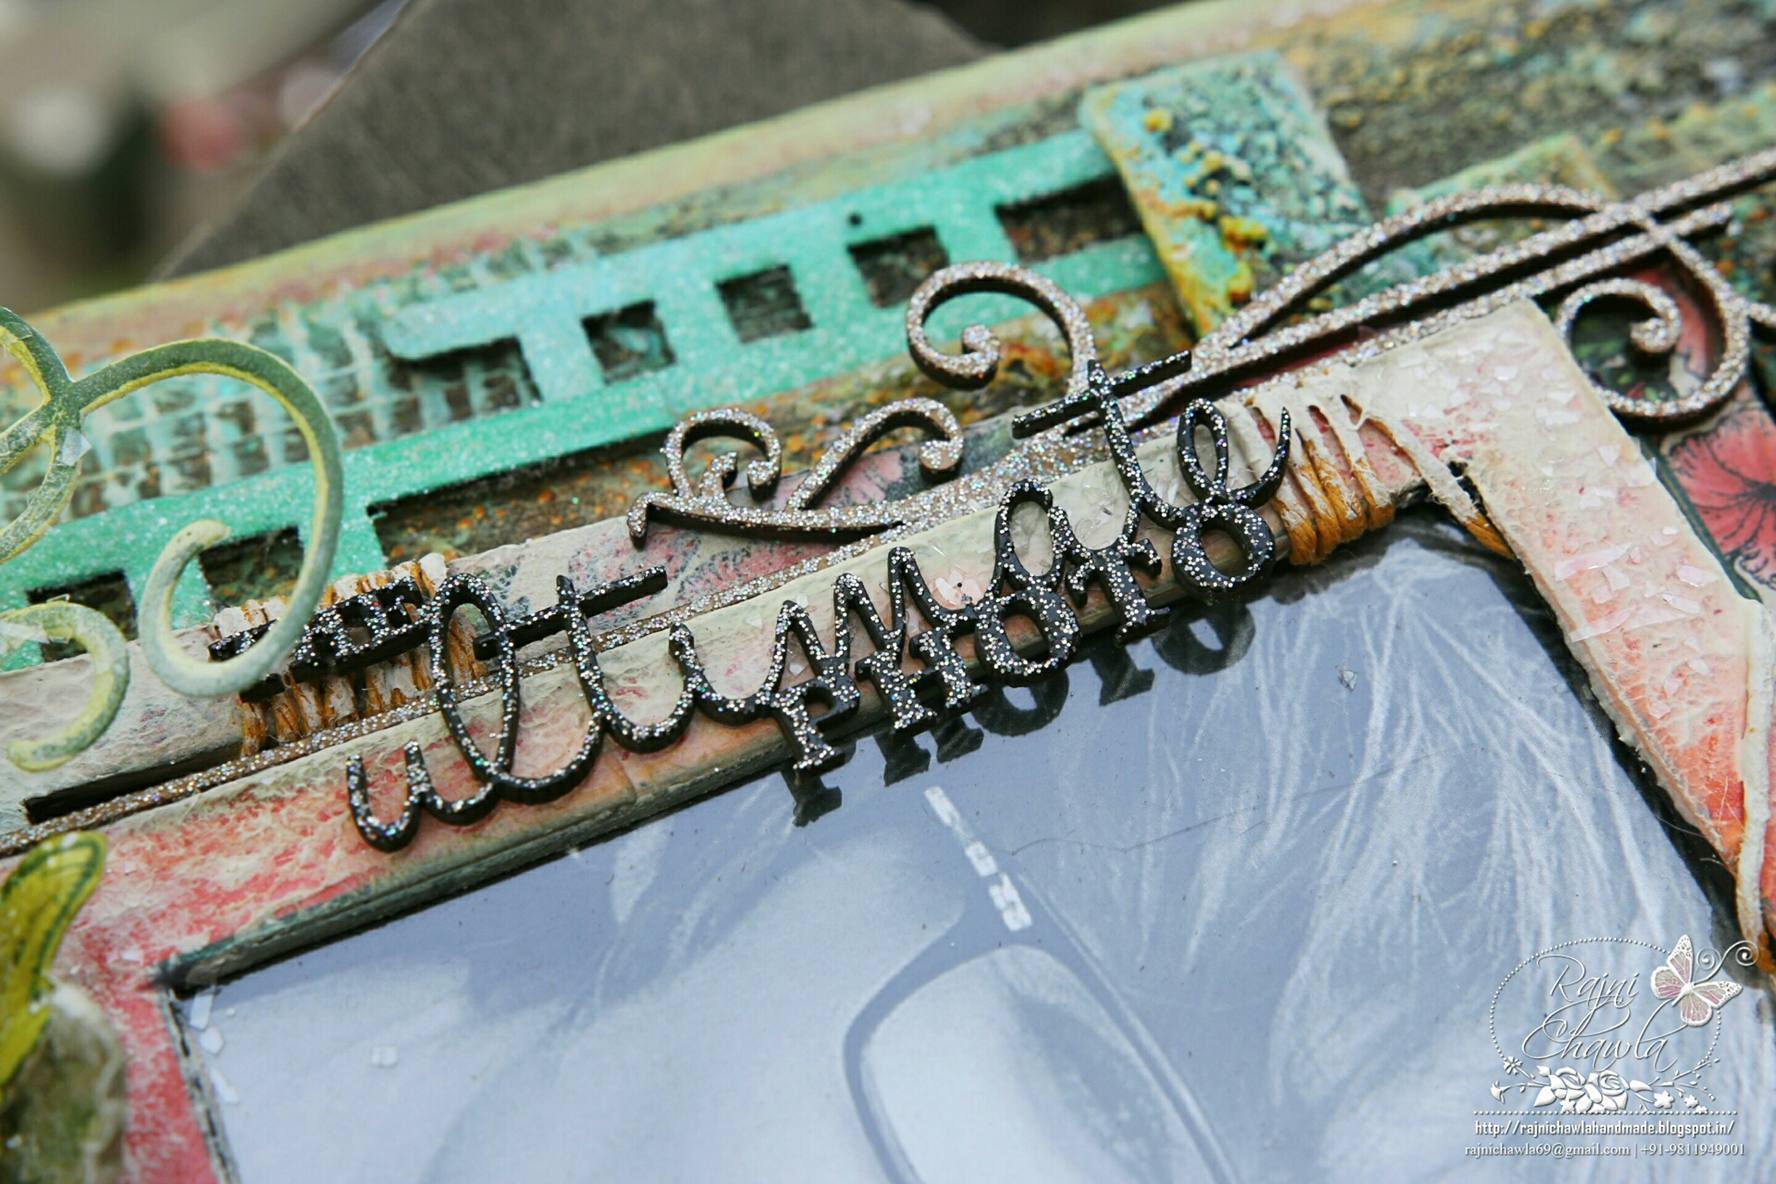
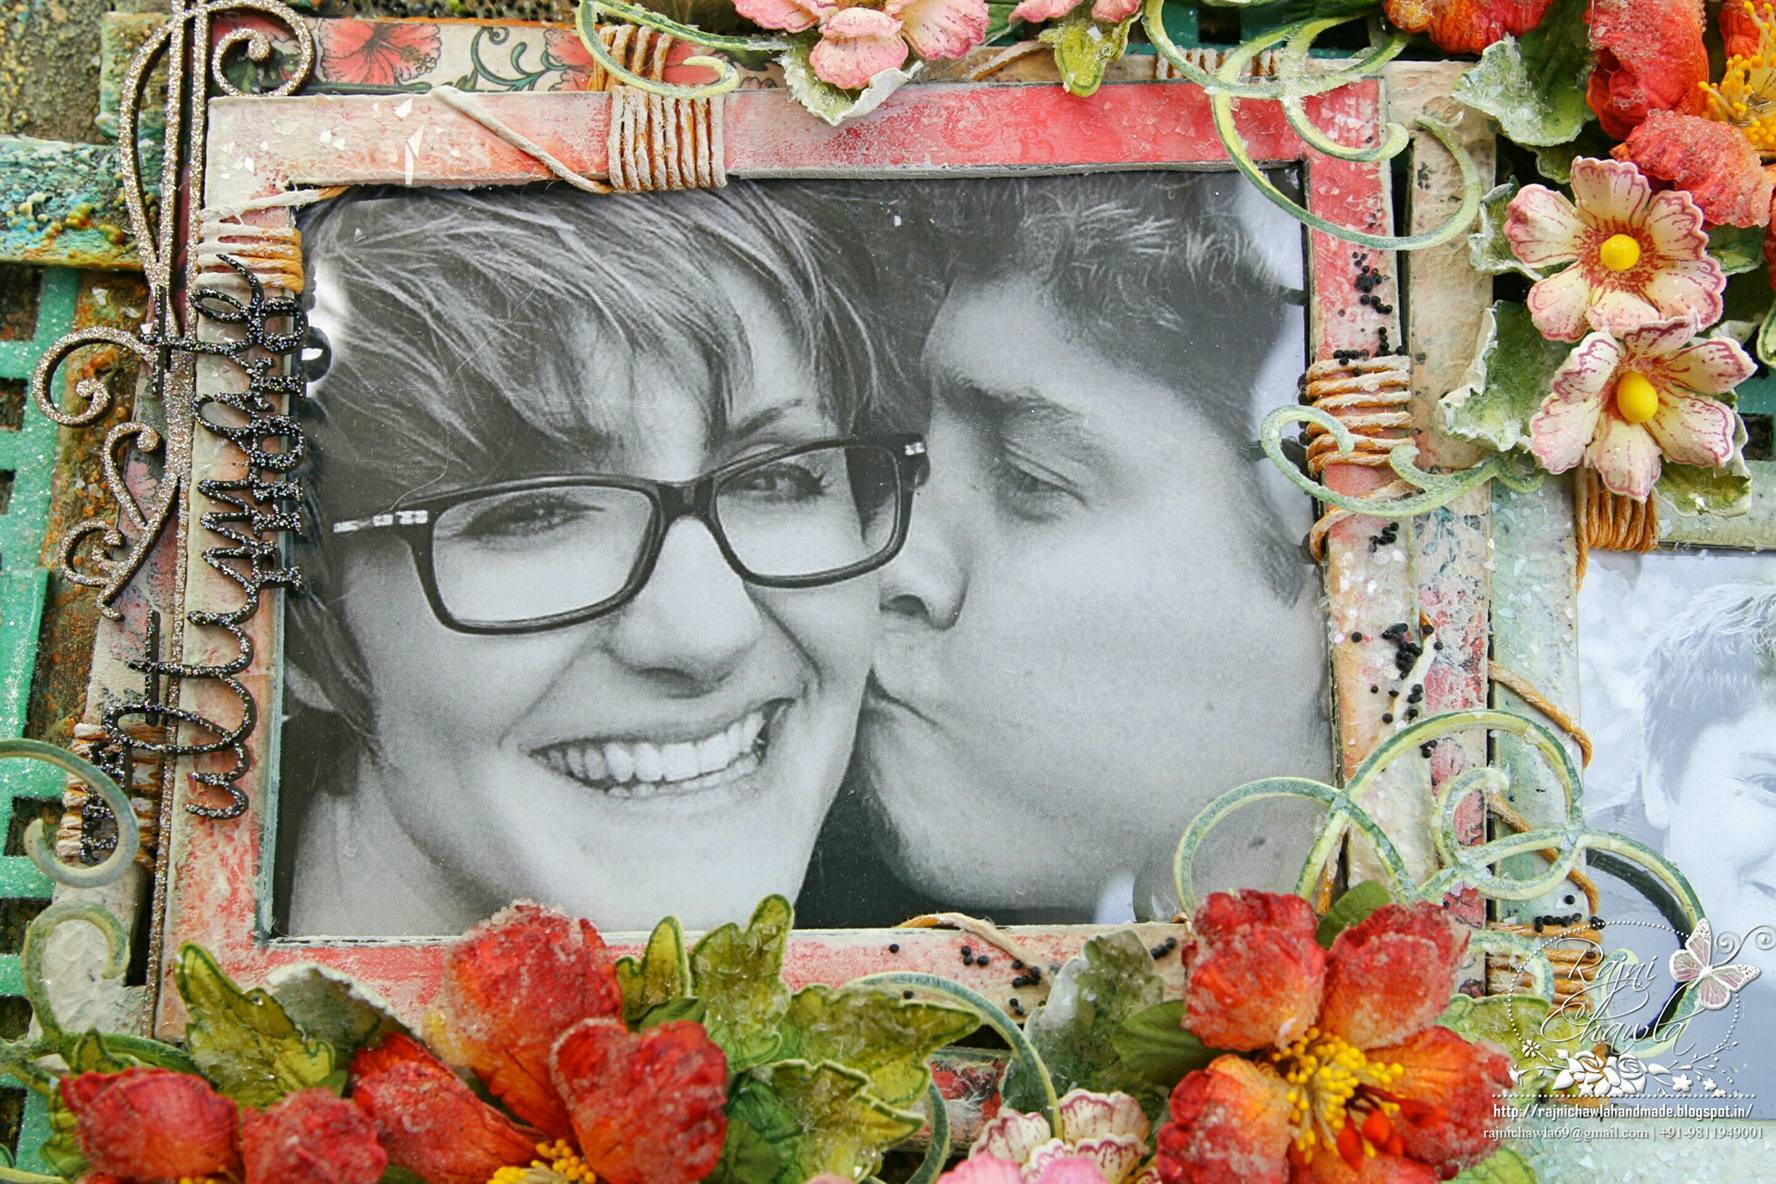
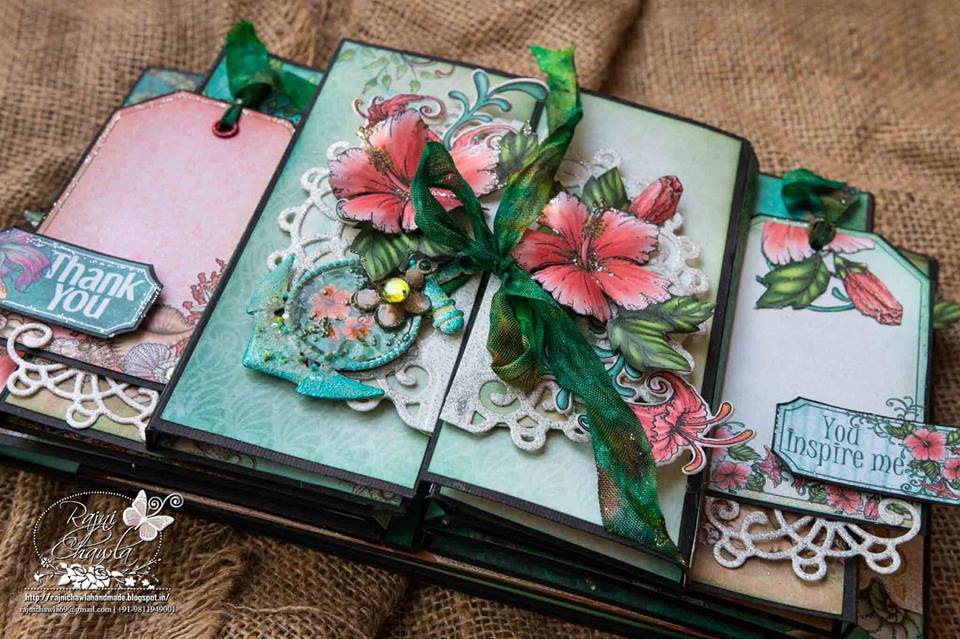
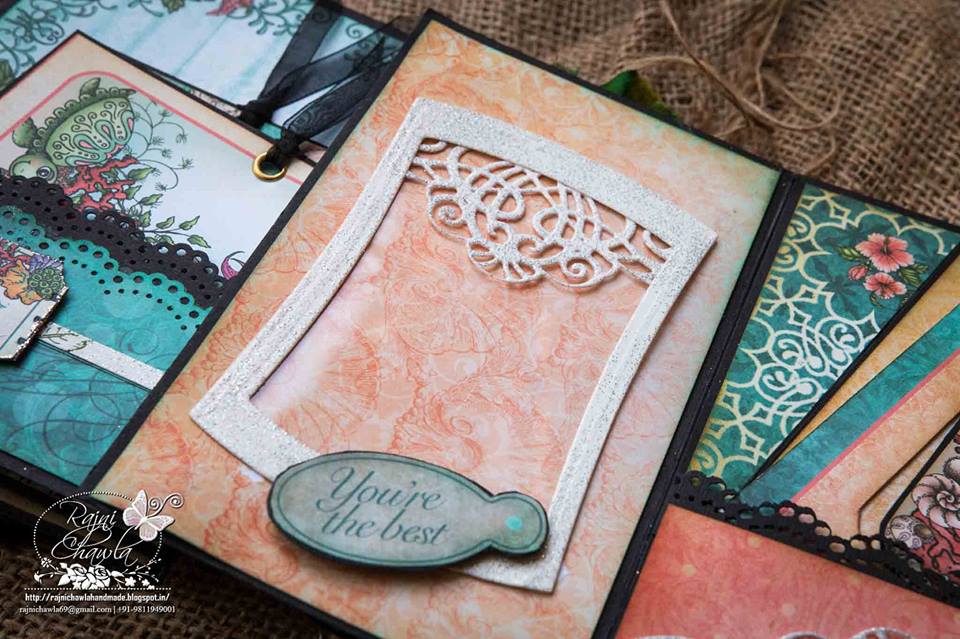
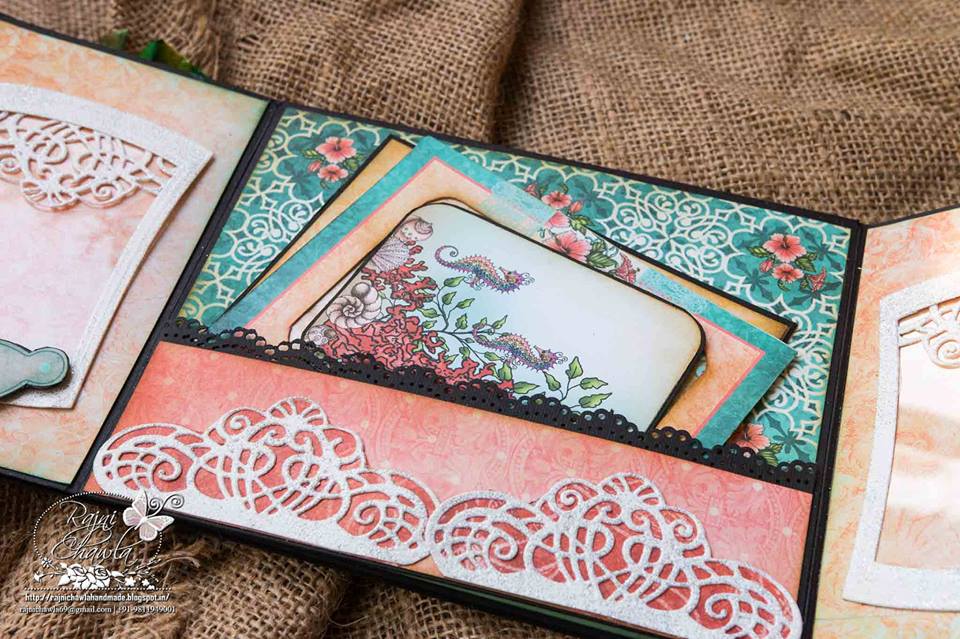
All the inside pages of the album are decorated using panels from the same collection.  I have heat embossed cutouts from Spellbinder’s Wonky Rectangles, HC Layered Elegant Swirl Die and HC Ornate Border and Pocket Die to create pockets and photo mats for the album. The top Most panel is decorated using fussy-cut hibiscus from the same collection, heat embossed HC Layered Elegant Swirl Die.
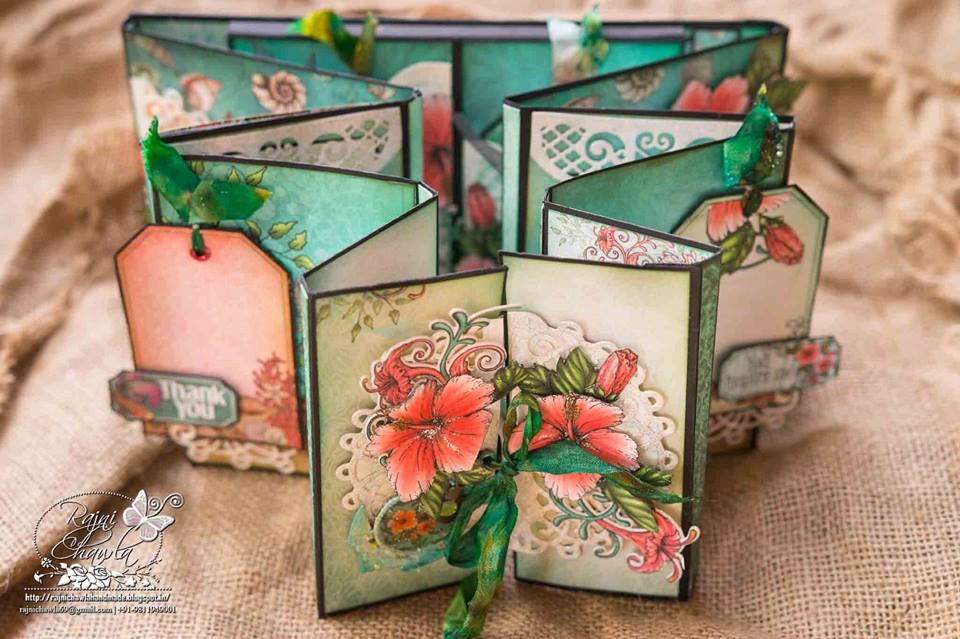
Here is the top view of the album showing all the folds. Lots of pockets and tags are added to hold pictures and messages. Most of all the pages are embellished with fussy cut hibiscus flowers.

12910344_10207807405919814_629456853_n


12910504_10207807405759810_718897448_n

Here is the picture showing how the album opens. It's a  step fold album. Lots of flip folds are there on inside pages. 

12919034_10207807405199796_1506701348_n


12894545_10207839250475908_614386618_o

FEW OF THE INSIDE FOLDS :

12919055_10207807405319799_1854592568_n


12921103_10207807406119819_1416105613_n


12884597_10207807405959815_1088277200_n


11101936_10207807406039817_410749830_n


12910182_10207807405999816_1491310866_n


All tags and photo mats out...

12903690_10207839235955545_2063874964_o


12894530_10207839251715939_1364665284_o

So...thats all for today's super lengthy  project.

I will never forget the experience of creating this project....how much worried I was to finish this project. It was very difficult for me to sit on the bed with continuous watering eyes and my both feet lifted up on pillows and working on a small bed table and calling for each little thing from my daughter. Just a small thought in my mind that this project is reaching a person whom I admire the most, kept me going. Big thanks to both my  kids who supported and helped me for each and every little thing and the good wishes that I got from all my well wishers.
Hope you enjoyed looking at all details, the way I enjoyed creating it.

Thanks for stopping by.

15 comments:

Dear Reader,
Thank you for your precious comments. They are extremely valuable and a source of continuous motivation for me. I really appreciate the effort.
Love,
Rajni