Spritz of Water (Distress Inks)
Posted by Rajni Chawla
Hello friends!!
This is my another post as Dt for CCC Blog. Hope you all enjoyed watching inspiration projects on Distress inks. For those who missed what our Dt's created to inspire you just click.....here. Hope you all know about my blog reaching 100 followers and my announcement of a unique giveaway.......you might find answers to your questions on this very post regarding the techniques I use while creating backgrounds for my projects. Thanks to my team members for giving me an opportunity for making the first very post on distress inks.
So many crafters have asked me about my blending techniques while using distress pads. So here is a little guide to get you started with the distress ink pads and blending, if you have not dabbled with it already. May I add that....I have not been using these for long myself. This post is mainly based upon my experience of working with distress pads and what I have learnt from watching tutorials from you tube and by reading few blog posts.....so your experiences may indeed be different.
Mind it...my post won't be helpful unless and untill you practice and give yourself a try on these.
So without taking more blog space as i know my post would again be lengthy.... lets get started with the basic introduction to these inks and the basic tools needed with them .
What are these inks??
Distress Inks are a product of Ranger's which are acid free,water based dye inks ,used for scrapbooking and card making.These are fade resistant ....that means if you store your projects with little care,the inks will last for a long time. The inks are also non-toxic. The ink pad itself is made of raised felt. The ink pad is not "squishy" like some ink pads are. They are easy to use and store.....can be stacked one on top of each other. Due to vast variety of shades newbies are sometimes confused while purchasing them. You can click here to see the selection and storage of distress inks. The colors are all outstanding, and they generally work well with each other when they are used together in projects.
Distress Inks are versatile, and they can be used to create a variety of effects and techniques. The most obvious use for them is stamping, and they work well for this purpose. They can be used with both clear stamps and rubber stamps. You don't need stamps to make effective use of Distress Inks, however. You can ink directly on papers, fibers, ribbons, embellishments and photos. Like the name suggests, you can use these inks to create a distressed look, or to "age" your papers and create a vintage or antique look. Distress Inks are well worth the money for all scrapbookers.
What all we need while using distress inks ??
ink applicator tool and ink blending foam....
Firstly, you will need an applicator tool and blending foam..... notice I said "blending foam". There are also "blending felt pads", however the felt pads are used more for alcohol inks, for the technique I am describing, you need the foam pads. These pads are foam on one side and velcro on the other. They just stick nicely to the velcro on the underside of the applicator tool.
Remember, do not throw away the pad once it has been used, as long as you use it for the same color, it can be used again and again until it gets worn. (this is what good crafters do...but when i work with distress inks i'm not good at all). As far as tools are concerned, that's all you need to blend distress inks.


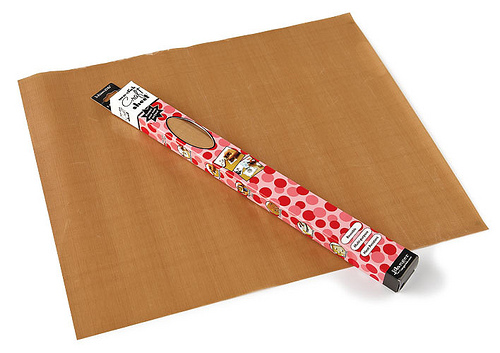
Non stick craft mat...
It is a must have product for all crafters. The non stick surface of this Sheet is great for use with different direct to paper techniques. As well as it offers a great protective surface when using alcohol inks. The Non Stick Craft Sheet can actually help produce great effects when using distress inks. The heat resistant surface is ideal for heat embossing and melt art and is also useful to put shrink plastic onto when shrinking. It is is non porous....and for me it makes a handy paint pallet also. Dab a couple of colors of water color paint or ink onto the craft sheet and mix away!
Mini misters....
Hold your breath...I' m giving a long lecture here.
Its long but you must read :)
Different spray bottles play different roles when working with distress inks. I have picked different sizes from local market before i got my mini misters. Here I want to clear few things about the sizes of different spray bottles. I know you are wondering why I m stressing so much about these small bottles. You will really get different effects with different sizes. Bigger the size of the spray bottle.... means more capacity it has. More capacity means more pressure you need while spraying and automatically it will result into heavy shower. You will get blotches of water with heavy sprays. Heavy blotches look good when dried with heat tool or if we simply iron them by keeping a tissue paper. But if you need a softer look of water splash....and little more blending of shades,you need mini misters. I love using Ranger's mini-misters. They just gives you the right amount of mist each time.....a very even shower. It never gives a big blast though they have a powerful spray. Together with the non-stick craft sheet, it is the best thing I ever bought when it comes to tools. You can choose the mister according the effect you want.
You can mix Perfect Pearls with water in the sprayers and create a shimmering surface to your projects. These are also perfect for making your own mists by mixing water and distress ink refills.....Great for water coloring, spritzing stamps,...and many more. You won't come to know unless n untill you try them yourself.
I am sorry...I could have made a separate long post on misters but since today I am sharing water techniques i wanted to make few things clear about these amazing bottles. All these little tips are going to help you while using your distress inks. I very well agree with Samantha .....she says"tool is there but it is up to us to use our imagination in order to figure out how we want to use them"
So very true :)
You can check this link how these misters work and what distance is best while spraying.
You can check this link how these misters work and what distance is best while spraying.
different sizes of bottles i have

I tried to hide the chewed handle of my bigger spray bottle.My pets love playing with it :P
Now on to Distress inks...How they work and why do we get patches while using them???
These are transparent inks. Maximum times we use them on different papers.......anddd papers are opaque. You are working with transparent ink on opaque surface.When you ink your paper it reflects underneath and tends to look like a patch.
Not cleared??
No problem....Lets make it more simple. Have you ever closely seen the opened ink pad and the blending foam??
Obviously...what a stupid question??
But never noticed....have a look again...

The ink pad is flat....and so is the surface of foam pad. The ink is inside the pad... and not oozing out...... RIGHT??
When we dab the ink pad with our ink blending tool the top layer of foam is touching the top layer of ink pad....foam pad is dry so it is not soaking the ink....moreover the ink is transparent in nature. So foam pad is only picking the top layer of the ink....I am stressing again on my words.... the blending foam is only picking a single layer of ink from the ink pad. When you touch your inked foam pad on a paper.......it is coming in contact with an opaque surface(paper). It will definitely leave a patch. You have to keep moving your tool in circular motion to blend it properly and to give it an even look. More intense is the color.....more visible will be the patch.
Here is the pic...though i tried to put so many layers but paper is still visible.

But what is the solution to all these patches???
No need to loose heart!!
Just give few more coats of ink and keep blending. I found that the secret to getting the blended look....is to just keep on going with the foam pad until there is no ink left on it....then keep going, even the empty pad will blend the ink nicely.
But what if you still get patches??
Just a little splash of water with thick brush or hands.....or a complete water wash (my fav) with big spray bottle.....and all patches are gone. Paper tends to curl when washed. Its ok as it straightens down when dry. Use heating tool to dry it. Here I love my heating tool as i can dry the color with its flow.
I can see them kissing each other......Wow so romantic!!
I can see them kissing each other......Wow so romantic!!
You will be in love with all patches.....I guarantee.
Just try
LOOK....I told you....you'll feel an artist in you.Also with practice, you will get to know what is too much or too little. Some colors are stronger than others, in which case you may want to dab the freshly inked foam pad onto a scrap piece of card to get rid of some of the ink. Remember, you can always add more.....but to remove a thick wet amount of ink is a lot harder.
I told you I'm bad when I'm working with distress inks....Look how bad I am :D
Sometimes I don't even change my foam pads while working on bigger projects....I do this for my bigger backgrounds only. I generally start with lighter tones first and then keep on changing the shades from lighter to darker. I sometimes use more then 5-6 shades...Its easier to blend two shades properly as residue of previous shade is already in the foam pad. Its a very small tip.....but really works for me!!
What about these messy foam pads??
Oh....I never worry about that. Sometimes I soak them in lukewarm water and wash them with a soft detergent or otherwise I keep them for my future use with darker shades. Though they are not as clean as as new ones but they never leave the residue of previous color if used again.
Isn't it cool!!
HOW TO USE DISTRESS INKS...??
In this post I will be linking you to few video tutorials that I myself followed while working with these inks. If you are a newbie and want to start from the beginning do check this step by step tutorial. Below are its text instructions also.
Step 1. Load the Ink on Your Pad. A little goes a long way, so start off with just a little, and if you need more, you can always dab a few more times.
Step 2 . Start on Your Craft Mat. Do not apply directly to your card stock or paper. Instead, rub the tool in a circular motion on your craft mat first, working slowly in towards the item you are inking Continue applying the ink gently along the edge of your item, always working in a circular motion.
Step 3. Continue Inking. Most of the time, it will not be necessary to reload the blending tool. Continue around the perimeter of the card stock or paper, always working in a circular motion and blending towards the item. You will get ink on your craft mat, but no worries – it easily wipes clean with a paper towel Your results will vary depending on several factors, including the color and texture of your paper or card stock. Do a test piece first and make sure you are happy with the results before proceeding.
What paper to use for distress inks...??
Another question that generally people ask me. I prefer using papers with delicate textures or regular paper also works perfect.....But love the effects I get on fabriano brusto. I use the same for my flowers also. Its easier to break the fibers and give the shape with fabriano. For coloring I use water color paper.
ON TO TECHNIQUES NOW !!
You can join Jennifer McGuier's Thinking Inking 9 week online class. It has 27 wonderful videos on the use of distress inks.
Instead of tags and cards this time I decided to make backgrounds for my envelops. I wanted to add little embellishments......few flowers and sentiments but skipped....just to show you how beautiful these patches can be. I have added glitter dust and rhinestone. It might strike you but I know when complete these look awesome. Click onto the given videos i linked along the technique I used and see what I created. Hope you all enjoy these videos and come up with something new.
Water wash techniqueNothing difficult. Just wash all the patches you get with big spray bottle and keep drying it with heating tool. I have used textured paper that's why i gave a little touch of my ink pad over it and got these lovely effects. Here you need bigger spray bottle.

Now this is washed and then dabbed directly with vintage photo ink pad.


Distress ink water bleaching technique.......click here for video
Here you specially need mini misters. With heavy shower water may seep under the template fast I tried one with crafter workshop template and few with my die cuts. I love using my die cuts as templates. Since paper itself soaks water.....instead of misting directly on die cut i wet my foam pad and pressed once to take off excess of water. Now pressed it on the area to be bleached and look at the awesome results I got. The first one got little messy but not too bad....other ones were perfectly fine for me. You can make as many layers as you want.


The first one with bleaching technique din't turned out well...i stenciled it with darker tone and fussy cut it .Below is the one what I created with that.

Just ink and water.....Click here to check the video

As I told you I prefer using textured paper.....here i used the one with little striped textured. On the blue envelop i just dabbed vintage photo direct with the ink pad after layering it with two shades of blue.
Distress inks with gesso and water splash.....click here to check the video.
I really loved this one. Its a quick way to add dimension to your background. I used a thin layer of gesso and used my heat gun to dry. You can leave it to dry naturally also. then used different distress inks to color my BG. In the video you saw she just wiped the gessoed surface gently with wet wipes but with my BG;s I gave a little twist by splashing little water with my hands and touch of another color. Have you seen how few droplets of water can change the look of whole background. Isn't it amazing!!

Soap bubble technique I couldn't find any video for this. I first tried it with plain water and detergent but it din't worked.....Then added vintage photo re-inker.
Step 1 Fill a cup with approximately 1 Tablespoon of dish detergent, 1 teaspoon of water and few drops of vintage photo ink . Use a straw and blow into the solution until bubbles appear over the top of the cup.
Step 2. Lay white card piece over the top of the bubbles, allowing the bubbles to touch the card. Pull up and pop any attached bubbles, leaving an ink residue.
Step 3. Continue in this manner until the whole BG has been coated in a bubble texture.
Step 4. Now I used wild honey and distressed the whole BG.


The other two in green and pink I did reverse....I first gave blending of two or more colors and then tried adding soap bubbles on top.....just a little twist and results were different. There are lots lots more with water.....but I know you are tired of reading my post now. I will try to cover the rest in my upcoming posts.
Do you like my ways of distressing.
Do you want me to share the complete look of my envelops??
If yes...do drop some love and keep connected :)
Also leave a comment if you still have queries regarding patches you get. If you have other techniques or ideas on how to use Distress inks with water...,please do share! I would love to hear more ideas. Don't forget to participate in our this months challenge..Spread your wings with distress inks. For any kind of craft supply mail at priyacrafty@gmail.com.
(hugs)


thnx a ton :) i m just starting my career in distress inks :P and this compilation is perfect...:)
ReplyDeleteHow the hell I missed this post... lots of useful info :) Thanks a ton this post answers all my questions :)
ReplyDelete