Showing posts with label handmade flowers. Show all posts

Friday, February 19, 2016

Have a Wonderful Day !!

Posted by Rajni Chawla


Hello all....


"Participate in your dreams today. There are unlimited opportunities available with each new day. Take action on those wonderful dreams you've had in your mind for so long. Remember, success is something you experience when you act accordingly.” 

Here I am with my next project with a wonderful day card. Hope a gift of new day is always devine  for you all. 


PROJECT 2 
FLIP FOLD PHOTO N CARD BOOKLET 


Heartfelt Creation supplies used :-


Other supplies used :-

Die cutting machine, Spellbinders Wonkey rectangles die, Spellbinders Fancy Lattice die, Spellbinders 5"x7" Mystical Embrace die, spellbinders Fancy Tag 2, fussy cutting scissors, clear rock candy glitter, Elezabeth double sided adhesive sheet, glue, glue dots, seamed binding ribbon, 3 shades of distress inks Spun Sugar, Seedless Preserves, Scattered Strw, Peeled Paint and Aged Mohaghany, Plum And black archival inks. 

Instuctions :- 

Front panel of the card :- 

I have used Spellbinders Mystical Embrace die as a base for the front panel of my flip fold card booklet.Mat a diecut with designer paper from Cascading Fuschia Collection and fussy cut neatly. Cut out two frames using spellbinders Wonkey rectangle and adhere elezabeth craft double sided adhesive sheet in between. Sprinkle clear rock candy glitter and dust extra. Burnish a little with your fingers for extra shine.Don't forget to chk the close-ups pics of the same. I promise you will fall in love with these. 

Layered flower :- 

For the main focal image stamp the image from HFC Fuchsia Cluster 6 times. Visualize the image , paint separate parts of the image taking the complete image as your first layer and top leaves and sepals of the flowers as final layer. Adhere all the layers with glue dots. You can use any medium to color the image. I have used various shades of distress inks like Spun Sugar, worn lipstic and Picked Raspberry for flowers and Peeled paint, Scattered Straw and Aged Mohaghany for leaves. 

Card base :- 

For the card base I have used 7" x 21" panel from HFC Pocket and HFC Flip Fold Inserts B - White kit. I adhered an extra panel of 6 1/4" to the back and kept it open from the top so that it can be used as an  additional  pocket to hold larger pictures. A die cut from HC Regal and Pocket die is attached on the top of the tag which can hold 2 pictures. All the inside panels are layered with HFC CascadingFuchsia  Designer Pattern Papers. . I have added an extra dimensions to the front fold of the album with fussy cut images from the designer paper itself. 

3 -dimentional Fuschia flowers : 

 I have  made these flowers using HC Fuschia cling stamp and HFC Cascading Fucshia die. The images are first stamped with plum archival ink and then aligned to cut through cutting machine using Cascading Fuschia die. For full instructions on how to shape Fuschias follow Emma Lou Beechy's video HERE.  

Ribbon : 

Squeesh Seedless Preserves and Spun Sugar Distress Inks on the craftsheet, roll seemed binding ribbon, mist it with water and heat set it. Adhere the ribbon below front fold panel in the front and below the back panel. 


Here is the card how it looks from the front. 


This pucture shows the complete detailing of different layered Fuschias. Little patience and practice can make you get these results. I have adhered readymade pollens in between the layers. Also chk the beauty of clear rock candy glitter layer in between the diecut layers. 
I promise its more beautiful if seen in person. 


Top view showing all the dimensions. 


A fussy cut layer from the designer paper is adding extra dimensions behind 3D Fuschias. 
Oh....I love these. 


Few more pics to show you all the layers that I have created to the top panel  and between top panel and front fold of the booklet. 
Yes...I love my fussy cutting and love doing it too. 


The butterfly and the sentiments are fussy cut from designer paper itself and are adhered using glue dots. 


Here is the pic to show how it opens. 
Did you notice something ??
I have adhered an extra half die cut of Mystical Embrace on the back of the top panel. Its adding an extra neatness on the back of my card too :) That's something that I never avoid. 
On the inside pages I have attached die cuts from Fleur Borders and Pocket Dies To hold extra photo mats. 


The inside 3" panel has 2tags hanging down with a natural colour twine. 


Few more close-up shots!! 


GORGEOUS!!!
Aren't these ??
I loved this die. 


Back side of the card booklet. 


It has a pocket to hold extra photo mats. 
The sentiment from HC Moments For You Cling stamp is stamped on designer paper with Plum archival and adhered on the tag from Spellbinders Fancy Tag 2 die. 

Chk the close -up 


Another sde view...


This is how the photo mat comes out from the top. 


I hope I was clear with all the details given on the project. 
Also I hope that you enjoyed your visit here today. 


Sunday, December 29, 2013

In love wid blues...

Posted by Rajni Chawla

Hello all
As you all know I am always  in love with my distress inks.Can't stop myself from using them. Today I'm sharing two of my cards that I previously made in different colors but tried this time in blues on clients request. I have used salty ocean, broken china and peacock feather to ink the backgrounds of my cards. Here are the pics...


CARD 1..


CARD 2...


Entering my first card to Lulupu challenge #22 ...."Cook it up' and blog hop.
(I have cooked my recipe with stamps ,die cuts and embellishments)
Ladies...don't forget to participate in blog hop at Lulupu...so many chances to win...so many categories to choose) 


Wednesday, October 30, 2013

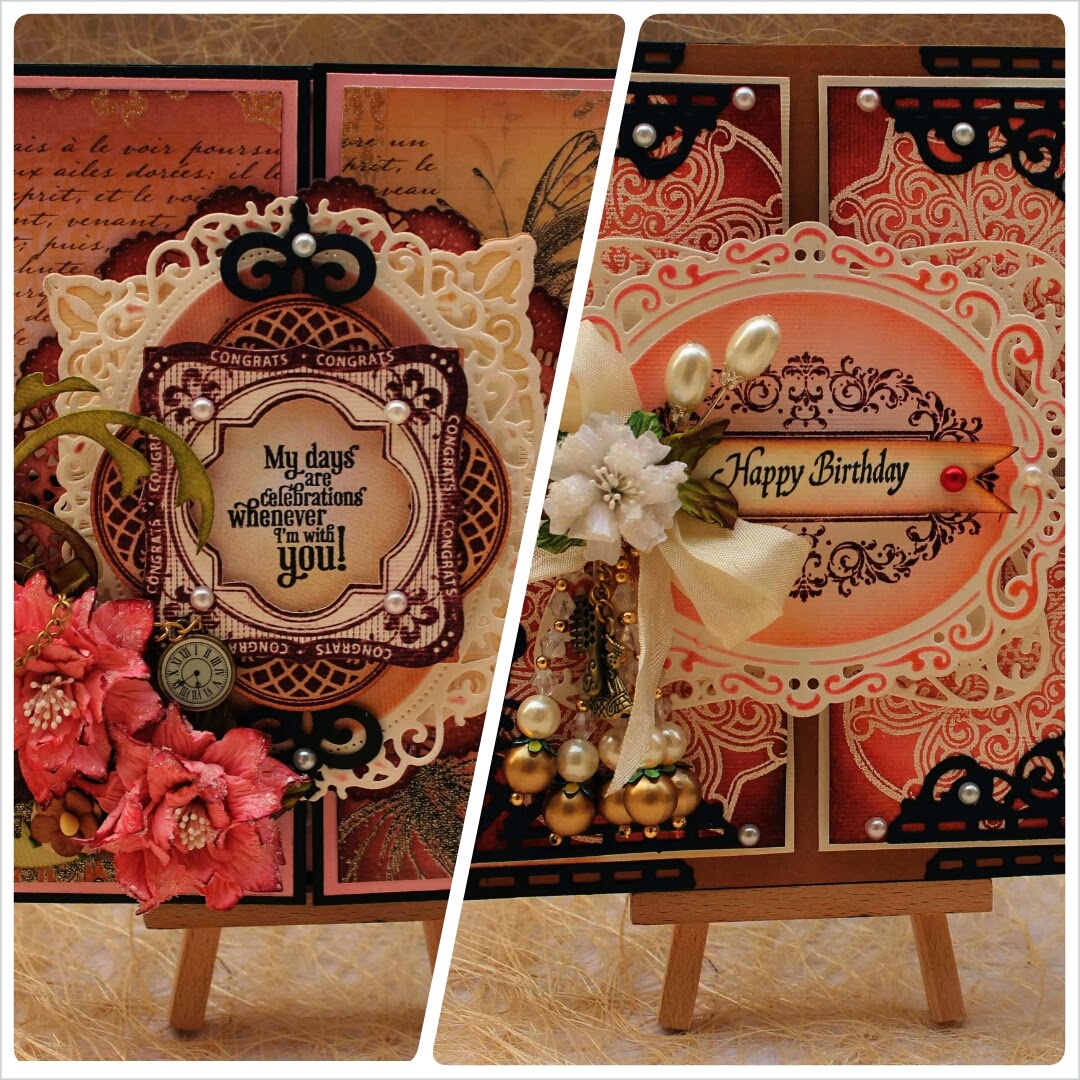
Happy Birthday

Posted by Rajni Chawla


Hi..


Though I was satisfied with the previous card that I specially created for Justrite Stampers Challenge 108.  But was not sure that whether it fits and follow all the rules of the challenge or not so gave myself another try.


This time without making any change  I created the background of my card with heat embossing using white heat embossing powder, distress inks and justrite lace vintage label three. I also restricted myself to add more handmade flowers to the card and decorated  it with beaded tassels , card head pins. metal charms , ribbon and pearls.


Here are few close ups of the card...


Side view...


The sentiment saying....Happy birthday!!


Loved that metal embellishments....a dress piece and a little comb.

(Sorry couldn't catch the proper picture of comb)


And the collage of the different close ups together..


My both the entries together..... Justrite Challenge #108 


Thanks for dropping by my blog :)

Entering...

Justrite Challenge # 108
Sentimental Sundays Challenge #178


My days are celebrations....

Posted by Rajni Chawla


Hello peeps!!

All the effort in the world won't matter if you're not inspired......and inspiration can come from anything and from anyone. Playing Challenges was not my passion earlier but lots of crafters playing different challenges around me have inspired me a lot for doing the same....specially my facebook friend Anita Kejriwal. I have seen her growing with every challenge she played.
Thanks for inspiring me Anita. 


I think while playing with a well known brand......we feel more confident and more creative as we try to take out the very best out of us. The same is the feeling that I am getting these days......more confident with each and every creation I make for Justrite Stampers.. It is an awesome feeling when I see my creations in their gallery and as Honorable Mentions. Its just getting new wings to my creativity.

The card I'm sharing today is designed for justrite challenge #108


This is the third challenge that I am playing with Justrite Stampers and is  a sketch challenge. Never ever played such challenge earlier but I wanted to give it a try. Hope this card of mine follows the sketch given to us.

I have tried giving a little twist to the card and tried to make an elaborated card which can also be used to capture memories. It's a gate fold card, the inside of which can hold photo mats and tags. I have layered loads of spellbinder dies and cheerylynn doily to enhance the main sentiment which is from justrite stamp.....celebrations labels one and bracket borders.


Here are the pics. 

The first one is the pic of closed card...


A little view while opening it.....


Oh !!

Damn Pretty...Isn't it???

I can hoard it for ever.....have to think hundreds of times to gift it to someone very close even. 


Beautiful  tags inside.... 


Another sentiment....exactly on the back of  main pendant again using spellbinder dies and justrite stamps and gorgeous  golden butterfly. 


Closer view of the front pendant decorated with handmade flowers and metal charm.  


All combined look....!!


Hope you all like my card the same way I lenjoyed making it.....really loved the final out come.


Thanks


Wednesday, October 16, 2013

Celebrate your day...!!

Posted by Rajni Chawla


 Hello!!

Aaah!!
This is my last and final entry for Justrite Challenge #107. It was amazing experience coloring the background of lace oval frame with worn lipstick distress ink using koi brush. Again the flowers are handmade except the small mulberry fillers....But this time while dressing my flowers I added a little glitter to diamond dust. 

 
Front view..


 Side view...


Close- up of the flowers.....made with spellbinders rose creation.
Can you see the glitters....trust me these look hundred times better when seen personally :)


Close up of stamped background and the sentiment..


Supplies used :
justrite cling stamp...vintage oval labels
justrite lace oval frame
spellbinders rose creation
Becca freeken filigiree corner dies
cheery lynn fancifull flourish
cheerylynn tropical flourish
Challenges Entered...

Justrite Challenge #107....easel card
Cards galore challenge ....flowers
613 Avenue create....anything goes (pile it up )

Sentimental sundays
Challenges for everybody....(25 oct)
Toptip tuesday...challenge 112(black n white with splash of colors)
Fussy and fancy challenge 

Congratulations....!!

Posted by Rajni Chawla

Hi..


Making another post for my third card....for Justrite challenge #107.
Hope I soon get activated on splitcoatstampers.....I feel its easier to create a new card rather then to write a new post with every entry.

Here is my third entry for Justrite Challenge #107

The background is all handmade on acetate sheet with alcohol inks. Sorry could not catch the proper picture of the shimmer as the pic was not clicked in day light and my client was in hurry to pic her card.


All the blooms are handmade....inked with aged mohaghony and dressed with diamond dust.


Now the close-up of the sentiment....


 The collage of my entries again....


Challenges...

Justrite challenge #107

card galore  
Sentimental Sundays
Challenges 4 everybody...25th oct
fussy and fancy challenges 

Friday, September 27, 2013

Rose Tinted Blooms...

Posted by Rajni Chawla


Hello all!!


I'm dedicated to my work ....and I want the best for it...really want to see it grow, and flourish, so I work hard on it....really really very
 hard !!
And I think we all do the same.
Today I'm super excited to share a wonderful news....the best birthday gift I ever got. 
My handmade paper flowers that I named Rose Tinted Blooms got featured on international blog of Joycrafts :)
Its hardly two weeks that I have been working with Joycrafts floral flourishes/flower dies and that too not mine.....borrowed from one of my student. I just got a complete set of mine three days back from Crafters Corner on a special call .Thank you Crafters Corner for such a quick supply. Though my work was already being featured on Joycrafts page on fb.....but didn't expected  being featured on their blog too.

Here are the pics of  my Rose Tinted blooms that I made with Joycrafts floral flourish/ flower 2 


Thanks Anke for featuring my work on your blog.....you have really honored my creativity.


Thursday, August 01, 2013

One perfect day..

Posted by Rajni Chawla

Hi..


The clock kept ticking.....the hours n days are going by....and one more year passed without you.

We never can just stop time. Or take moments back.
Life doesn't work that way, does it???
I still can’t believe that he is gone, and perhaps I never will. I never thought that I would be alone, and in my mind, I know that being alone is the hardest thing that I will ever have to do.
It will be completing 5 years on 7th Aug without him. My friends and family assume that I am moving on.  Little do they know that there are days when all I do is think about him, days when all I long for is to see his smile, and feel his touch just one more time.  Little do they know that after five years there are nights when I still cry myself to sleep.


AHHH !!!
 “time heals all wounds.”  I want to tell people that the wound in my heart remains open, and that time will never heal it.  But, they wouldn’t understand.  Time for me has only led to a form of acceptance.  A form of acceptance that comes and goes as it pleases, because there are days when you cannot accept the loss.  Yes, there are days when grief washes over you in uncontrollable waves of sadness.

I somewhere read.... “Our wounds run deep, our undying love is forever, and staying connected beyond the veil brings us comfort.”
Today the waves of pain are less frequent but no less intense. I cry unexpectedly and then feel better.  I’ve learned to live without him but not to forget him; to honor the memory of what was, while functioning in the world that is.

Today I am sharing this project to welcome the sadness that keeps us connected .This picture has captured a moment that has gone forever....but will always remain alive in my heart. If I could, I would live forever in this moment. But no one can live in a moment, and time moves......on.
This is my DT project for CCC Blog's Nail it down with textures Aug month challenge.Hop on to see some more fabulous creations from rest of our DT's.

Lots of textures...Multi medium ,Lyndy's sprays,UTEE....so many things to learn.


Most of the embellishments are handmade


Super lovely quote that suits my project and my feelings too!!!
This is Forever Memories from Technic Tuesday stamp set.


Stamped and then embossed with UTEE......really in love with it.


Now these are ready made....hun!!


Look at the yummy texture....all done with Studio Multi Medium ,Lyndy's sprays and distress paints..


 Isn't it mouthwatering???
Don't you want to try ??


Flowers....all hand made using Sun kissed fluer die n stamp set and coloured using distress inks....


All little things used in this project are available at The Craft Shop.

Hope I inspired you again.
Keep moving with love and also keep preserving your memories with your crafting.
I am linking this project with...


((Hugs))