Showing posts with label distress inks. Show all posts

Monday, March 14, 2016

Heat Embossed Card with Heartfelt Creation's Birds and Bloom Collection

Posted by Rajni Chawla

Hello all...!! 

Hope you all had a great weekend and a great start of new week. Today I am here with quite a neat and simple card that I created when I was not well. Sitting on the bed and not allowed to enter the craft room for nearly 10 days ...nothing worst than that could be for any crafter. Still I managed to paint few images. Since I was not allowed to do fussy cutting those days, this was done by my daughter Srishti. Though I have not taught her anything but she is master in many. She can cut much much better than what I do. My bad luck...she crafts only if I m not there in craft room and prefers to do only for her friends. 

For this card I chose two of the stamps from Heartfelt Creation's Birds And Blooms Collection. The one is the background stamp (Birds and Blooms Collage Cling Stamp ) and other has beautiful birdies and flowers ( Fluffy Birdies Cling Stamp ) 

Here is the final result. 


The background is simply heat embossed using Versamark ink and white heat embossing powder on vellum sheet. And the stamped image is painted using peeled paint, barn door, vintage photo and brushed corduroy distress inks. Few images on the vellum background were also painted with same shades of distress inks. 


After painting the image it is fussy cut using Xacto knife. Many of you liked my fussy cutting and asked me what scissors or cutters I use for fussy cutting. I work with simple Xacto knife and Parchment scissors. I have tried many cutters but found these best till date. Plastic body cutters don't work  for me as I often use 220 gsm card stock for painting. Its difficult to put more pressure on plastic body cutters as they break very easily. Yes...for thinner papers of-course they work very well as it needs less pressure. 


Here is the more closer look of the image. I have used Glamour dust dry glitter using art glitter adhesive glue which dries clear.  The heat embossed vellum is layered on pattern paper from Birds and Blooms Collection itself. The white ring is cut out by nesting 2 circle dies together on white card stock. 


Though I hardly make clean and simple cards but I really loved making this one. Birds and flowers have always been my weakness. Hope you too liked this card. 


If you are new and hunting for various craft supplies at best prices in India,you can contact Meetu Aggarwal  or check her website Here  and Priya Sivaraj or check her website Here 

Hope I m able to inspire you with my creations. If you like my work and want me to see reach my goals as a Dt with Heartfelt Creations, do leave some love n vote for me. Each single vote is precious for me. You can check all my three creations that I submitted for semifinals in the photograph below.


For more detailed pictures of Desk Calendar cum Mini Album....Click HERE
For more detailed pictures of Flip Fold photo Booklet .....Click HERE
For more detailed pictures of card Let Love Blooms.....Click HERE

And, to vote click HERE 


Thanks for dropping by. 
Happy Crafting !!

Saturday, March 05, 2016

Peacock Paisley Card With Heartfelt Creations

Posted by Rajni Chawla

Hello all...

Thanks for popping by my blog again. 
Crafting is something I really love to do....even when I m unwell. Last week was really a bad week for me. According to my doctor, I need complete rest for few days and should not sit for long with my legs hanging down. No problem, I can manage to craft on the bed as well. :D 
I am happy and live only if I am able to craft. 

I might not be active on FB or any other social media but will surely keep all of you inspired by few of my new creations that I made few days back. I have already scheduled posts here on my blog and that will be copy pasted by my daughter on my other profiles. 

Getting selected as one of the semi-finalists for Heartfelt Creations Dt Team really made me super happy  and I thought I will keep you all more inspired with my few more creations with the same brand. Heartfelt Creation stamps are one of my favorite stamps ....Very versatile in not only making the backgrounds and flowers for the projects but also for making fancy embellishments. Sometimes when I create a card or a tag I give more stress on the embellishments. The card that I am sharing today is the example. The main stress is on the focal image which is Peacock. Though I have worked on the background also but that Is complimenting the embellishment and the whole card and is not disturbing the beauty of embellishment I made. 

Heartfelt Creation supplies used: 


Other supplies used: 

Distress inks: Peacock Feathers, Salty Ocean
Staedtler Pencil Colours 
Koi Brush 
Clear rock candy glitter 
Lime Green Stickles from Ranger 
Spellbinder's Victorian Arch 
Spellbinders classic oval die template
Glossy accent 
Die cutting machine 


Here is the full view of the card...


A close-up showing the background. 

The background is created by simply squeezing both the shades of distress inks on the card stock and then misting it with water and heat set. Stamp the image with Cobalt Blue Archival ink and lift the colour using koi water-colour brush. Colour lifting technique which I also call water wash technique is one of my favourite technique of making backgrounds. I accidently stumbled down this technique while teaching one of my student in Hyderabad 2 years back. She was the one who was always scared of picking the colors while painting but was very keen of using bright colours. The softness of colours you get after lifting it with water gives tints and tones of the same colour. 


All the daisies are fussy-cut, painted roughly with salty ocean and peacock feathers and embossed using Heartfelt Creations Delux Flower Shaping Tool Kit and then decorated by adding a small drop of lime green stickles. 


 I have layered the body of peacock and tried to give 3dimensional effects by cutting separate layers and adding glue dots. 


Have you ever read..."The sparrows are sorry for the peacock at the burden of its tail." 
Aww....sparrows should not !!
That's not the burden thats the beauty of peacock which is making him unique from all other creations of God. I added few extra feathers and made it look more beautiful. 
The sentiment tag is from designer paper HFC Peacock Paisley Collection. 


If you are new and hunting for various craft supplies at best prices in India,you can contact Meetu Aggarwal  or check her website Here  and Priya Sivaraj or check her website Here 


Hope I m able to inspire you with my creations. If you like my work and want me to see reach my goals as a Dt with Heartfelt Creations, do leave some love n vote for me. Your votes are important for me. You can check all my three creations in the photographs below:


For more detailed pictures of Desk Calander cum Mini Album....Click HERE
For more detailed pictures of Flip Fold photo Booklet .....Click HERE
For more detailed pictures of card Let Love Blooms.....Click HERE

And, to vote click HERE 

Thanks for dropping by..
Happy Crafting !!


Wednesday, April 02, 2014

Know that you are loved !!

Posted by Rajni Chawla


Hello all....


I am again here to share my entry for JustRite Challenge #117. This weeks challenge is to use their gorgeous sketch. Here is what I came up with. I have used JustRite's March release Magnolia Vintage Labels Seven Clear Stamp set and created two cards. Here is the first one.


The magnolia flowers are stamped and then colored using distress re-inkers on Spellbinder's Label 17. Again distressed the complete label with distress inks using stenciling technique. Then highlighted it to make it a center  piece for my card and placed it on Spellbinders detailed scollops die cut. 


The  magnolia flowers are glittered using Wink of Stella clear brush. Really loved the end results of my card.


 The sentiment is from the same stamp set, fussy cut and matted on a black card stock. The butterflies I have taken from Hydrangea vintage labels seven stamp set and winged vintage labels two and three. 


The  main flowers are handmade by me and garnished with diamond dust and white puffy paint. 


Thanks for stopping by !! 
Looking forward to hear your views about my creation.


Tuesday, April 01, 2014

Money envelopes...

Posted by Rajni Chawla


Hello all...

A small and a very quick post. Today I'm sharing money envelopes that i designed with heat embossing technique. I loved the way they turned out. Hope u liked them.


Wednesday, March 19, 2014

Miss you !!

Posted by Rajni Chawla


Helo all.....!!


Third and the last entry for Justrite Challenge #116. This time I used background stamp..Remember When and created a tag and stuck it on my card base. I kept it quite simple and just gave little distressing at the edges.  Sentiment is from Timely Banners


Loved the clean and yet the elegant and vintage results.

Hope you like this too!!


Entering 


Cheer Up...Tomorrow Is Another Day !!

Posted by Rajni Chawla

Hello...Its CAS Cards at Justrite stampers current challenge.
Now this is a real challenge !!
As you all know I love working with lots of layerings , die-cuts, distressing and adding handmade flowers...CAS is not my style. These days I'm neck deep with my tight schedule of workshops and my pending orders. I am running short of time and on top of that....this challenge putting me out of my comfort zone. My mind wanted to skip but my heart wanted me to try....so the cards I'm entering the current challenge are my creations results of that little confusion and shortage of time  :P


It has always been fun playing with justrite stamps. This time I used Let Your Soul Sing from their collection. 
Now, this was my first try....not bad but not satisfied.
Its heat embossing with seafoam white embossing powder and distress inks.


This was my second try....and loved it !!
I have used simple techniques of masking, water splitting and layered stamping. 
Love it as it ended but thought adding some small pearls will finish off the card. so I did. Hope you like it.


Saturday, January 11, 2014

Design candy baskets with your stamps

Posted by Rajni Chawla

Hello lovely ladies...

Hope you all had a lovely start of the year 2014 !!

Most people love and even prefer hand-made over store bought gifts and also prefer to make them more precious by giving them handmade presentations. Gift baskets are as fun to make as they are to receive. The choice of the basket or similar container can also help define the sentiment and theme.


What if I suggest  you to design your own gift baskets using stamps...??

As you all know our current challenge is on making 3 D boxes, bags , baskets or any altered or recycled gifting item. Today I'm here to inspire you with my paper candy basket using Justrite stamps. I myself got inspired  to make the same by Marisa Job's candy basket. You can also click to her blog link to see the instructions she used while making this basket. I have used Justrite Clear Stamps - Enjoy The Day and Spellbinders Vintage Labels Four die set to create the four sides of basket .The handle of the basket is made using MS vintage Doily Lace Punch and decorated with black ribbon and pearls.
The flowers are handmade with Joycrafts floral flourish.


Instructions: 
I have tried two baskets using same technique and also took same dimensions for the base but with two different stamps from same stamp set.
1. Cut a black card stock measuring 4 3/4" by 4 3/4 '' and score all sides at 1/2 an inch.
Cut extra corner.


2. Again take 1/4" on all the four sides and make a slit. Cut it diagonally. This will make the base of the basket.


3. Stamp four images with justrite - Enjoy the day stamp with deep maroon (currant) Adirondack ink and fussy cut the edges. I have cut the base of the image to give a flat look to the basket.
4. Cut four pieces using black card stock with Spellbinder's Vintage Label Four and cut the base.


5. Color all the stamped images with distress markers/inks /copics.

6. Construct the four sides of the basket by sandwiching one stamped image and one vintage label die-cut to the base of the basket using red tacky tape or with any strong glue. 


7. Lift all the sides and tie them with a ribbon bow and decorate the basket as per your choice.Here is the complete look....of both 


And this one without handle...


 A little close-ups of both...


Aren't 
these pretty??Show your friends and family your love with beautiful handmade baskets made
 from your very own heart and hands!

So...what are you waiting for??
Just give yourself a little try on handmade presentations for your gifts for your loved ones. 
Also don't forget to participate in our current challenge,boxes/bags /baskets,hosted by my co Dt Tanvi


All the supplies used are available at The Craft Store or you can even customize your orders with Priya Sivaraj. 

Thursday, December 19, 2013

Crafting needs no restrictions and need no recipes at all...

Posted by Rajni Chawla


Hello all..
I have been in creative line and production work since years. W
hen I do creative work, I don’t worry about being right or wrong
. I simply allow the ideas to express themselves. My experiences with different clients...with their different requirements...with different budgets have made me learn at all steps. Also every little question of  my student has made me move one step forward.  
Today I'm here to share my experience of making handmade paper flowers. 
It's been more then 3 months that I have been taking paper flower workshops now. I always try to guide my students that while creating any type of flower don't restrict yourself to use same die or punch that I use. Check your own collection and think before you buy anything new. I also guide them not to restrict themselves to number of petals used while making any flower. Use as many petals as you want to give a complete and finished look to your flowers. No limitations and no restrictions at all when you are crafting.

 I came across quite a lot of queries while conducting my workshops.

What all dies I love to use for making flowers and why ?

What paper and what gsm I prefer?

Please share some video tutorials.... mam?

How do I take out production work of handmade  paper flowers?

My this post is reply to all these queries.


What all dies I love for making flowers?
As it is with most of all  the crafters, my greed of buying craft supplies also never ends. I have a huge collection of flower dies and punches but I love using following dies.
 

Spellbinders Rose Creation

Sizzix  Bigz Tattered Floral Die

Heartfelt Creations  Sunfluer Kissed Die

Joycraft floral flourish 1,2,3,4 and 5


For me  all the above listed are....theee bestMy spellbinders rose creation and Sizzix Bigz is good for production. I can cut more then 1 paper at a time because of  their deep blades. I can cut two different shades of papers and cut for two different colored flowers simultaneously. More over for few flowers I need a hole in the center....so I can avoid that extra step of punching if I m cutting it with my spellbinders rose creation. I get a good sized flower with both these dies.

 Heartfelt  Creations Sunfluer Kissed die is also equally good. But I love it more because I save my time as i get so many sizes of die cuts in just one go...I don't have to arrange loose dies. Here I want to share my one secret....I use this die more to cut  green sepals for my flowers. Different sized flowers need different size of sepals and that I can do with this die in one go. 


And I also love all the five of my Joycraft floral dies. I love them because of their designs. Though few of the designs I have in my punches but I find dies more easier to work with and also they are long lasting. Punches can loose their sharpness after few regular uses. But I get a medium sized flower with these dies....that is not perfect for my packaging and  door decoration.   


What paper and what gsm I prefer?


Earlier I was making my flowers with fabriano card stock which is 220 gsm. Now I can work with paper as thin as 80 gsm also. May be its just because I have already done so much of production now. You just have to choose a paper which has good capacity to soak water well. If u think the paper you are using is thin and will tear while pinching.....try to pinch 2 or 3 petals together. The one I'm using now is a local buy in the name of Neelgagan and Lotus. Keep trying on new papers  as well as you never know sometime you might find something better then this.  


What all videos I follow ?

I specially thank to all those crafters who took out their precious time in making and sharing so many interesting videos on you tube. I not only enjoy watching videos but also enjoy trying different techniques. It depends from person to person how they apply every technique after watching videos. Few of my favorite videos for making crumbled flowers are listed below. Each one has something special to learn.

 (tutorial by Luvleescrappin showing how to crumble each petal individualy) 

(for assembling the paper flower if you are using punch or a die which has loose petals)

(one of the best video by Joycraft's deigner using all the five joycraft flower dies with same technique) 

(how to make flowers using punches)

(easiest way to make roses)

Tutorial on handmade paper gardenia flowers
(an awesome tutorial by Varshitha  Nagarajan which she made for Lulupu,the craft launge, showing what all inks you can use to create naturally looking gardenias)


How I take out production of handmade paper flowers?

 I use my handmade flowers for packaging, on cash envelops, as hair accessories, for door decorations, for cards n scrapbooks, corner arrangements and many more. And mostly I am into production work....always need good quantity. For different projects I need different sizes of flowers . Also to me, a single big flower looks less pretty then the one when tied in a small sweet bouquet .

You know what....all my tools are very friendly. They happily work together and help me enough in bringing out production. My spellbinder dies and Joycraft dies don't cry when I force them together and roll them through my Bigshot. I put them together and cut and also sometimes combine them to take out production. 


Have a look at this picture. I made this flower for challenge at CCC blog which was hosted by me. This was my very first try at these flowers I tried only few and tried only with Spellbinder's Rose Creation. 


Watch these 2 video tutorials.

Video by one of the joycraft designer Jolanda Bergmans
(this particular video will show you how u can use different dies with same technique)

Video by Archana Joshi 
(this will show you that you can even use your punches for the same technique...You must must follow her tutorial board on pinterest for her mixed media flowers )


I have followed the above mentioned tutorials and made these flowers.  When I was working on my bulk order for hair accessories for one of my client I really went short of time and also short of my staff who generally help me in cutting. It was my first big order of these flowers and I was quite new in making the same. I was little stuck up but then got an idea of combining my joycraft and spellbinders together to save little time in cutting. If you take a closer look to joycrafts floral die (6002/0156) , ( 6002/ 0158) and spellbinder's rose creation the flower petals are more or less same.....and more over once the petals get crushed  it hardly makes any difference.You can either use your dies separately or you can also combine them together....the results will be more or less same. Let them be like that as even nature has not created exactly the same flowers. 
Everything depends on your own creativity and your own satisfaction...the end result should be eye pleasing....that's it!!

As far as I'm getting good production and good results I can combine anything.....any brand...any die....any punch.

Here are the pictures of some flowers with same technique....with different dies....and  almost same results....though the sizes are bit different.
Never mind!!


Now...here they are when tied in a small bunch...


Don't you think they are pretty enough to catch anybody's attraction??
 Can you point out which 1 is with which die??
So think twice before you buy any floral die....the one already in your stash can create wonders....but only if you give yourself lots of tries. 

 For me...

 
Crafting needs no restrictions and  need no recipes at all. The phases of crafting are discovery, self satisfaction and production. Every crafter must discover the recipe of its own and then create the item.
Art prefers no rules. Do whatever you want. Also sometimes if you impose rules and restrictions on creativity......your requirements can force you to be creative in unusual ways.


That's all for today. If You still have any queries leave a comment below and I will definitely reply back.

(HUGS)
   

Wednesday, October 30, 2013

Happy Birthday

Posted by Rajni Chawla


Hi..


Though I was satisfied with the previous card that I specially created for Justrite Stampers Challenge 108.  But was not sure that whether it fits and follow all the rules of the challenge or not so gave myself another try.


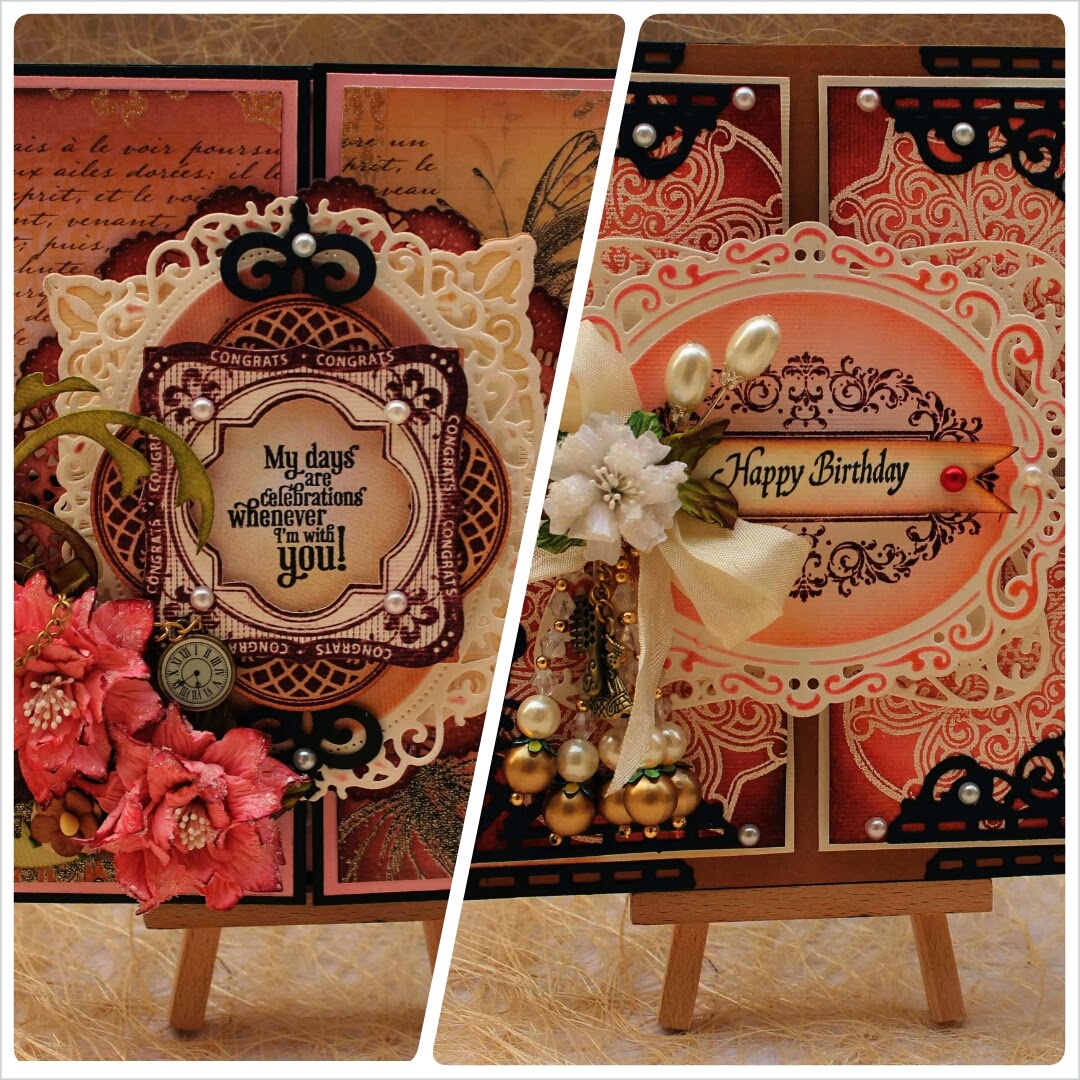
This time without making any change  I created the background of my card with heat embossing using white heat embossing powder, distress inks and justrite lace vintage label three. I also restricted myself to add more handmade flowers to the card and decorated  it with beaded tassels , card head pins. metal charms , ribbon and pearls.


Here are few close ups of the card...


Side view...


The sentiment saying....Happy birthday!!


Loved that metal embellishments....a dress piece and a little comb.

(Sorry couldn't catch the proper picture of comb)


And the collage of the different close ups together..


My both the entries together..... Justrite Challenge #108 


Thanks for dropping by my blog :)

Entering...

Justrite Challenge # 108
Sentimental Sundays Challenge #178